
Screen guide · Web app
View Applications
The list of everyone registered on the entrance form, where you can search, edit, change an applicant's status, enrol the child as a student, delete, and print the admission form or fee receipt. It belongs to the Admission pages (New Admission, Dashboard, By Date Range), shown when your role has Admission access and the Admissions module is on; online applications are in Pipeline instead.
यह पेज अंग्रेज़ी में है। कुछ समझ न आए तो ।
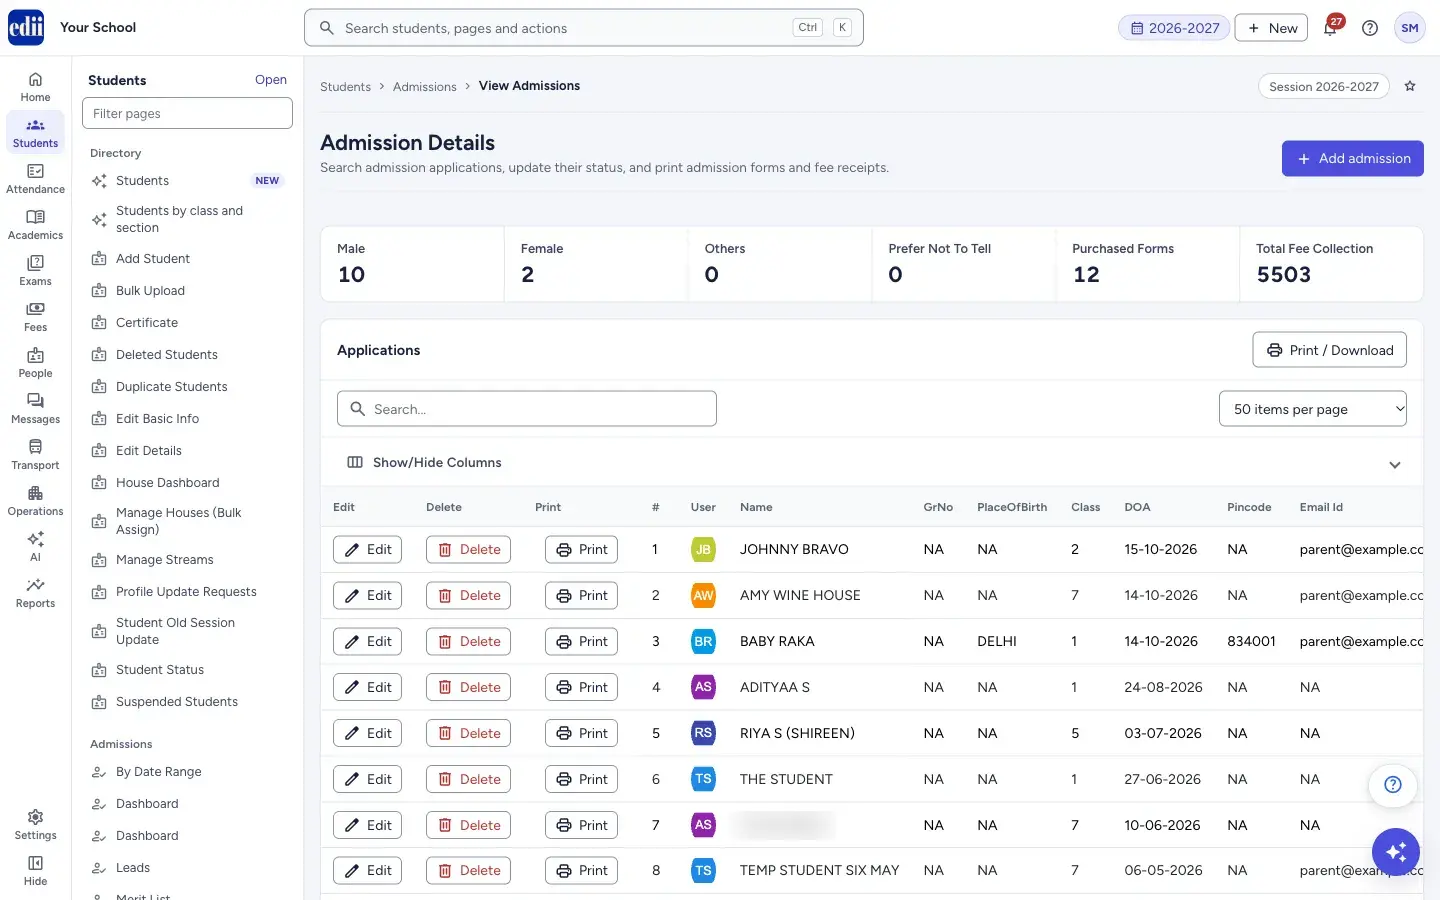
View Applications opens Admission Details: “Search admission applications, update their status, and print admission forms and fee receipts.” Above the list are the totals for the session: Male, Female, Others, Prefer Not To Tell, Purchased Forms and Total Fee Collection. Below the list is the Class-wise gender count.
Each row has Edit, Delete and Print buttons, and a coloured Status bar. Click the status bar to change the status. Add admission at the top right opens New Admission.
The list and the totals are for the school’s current session.
Who uses it and when
Section titled “Who uses it and when”The admission office uses it to look up an applicant, update where they are in the admission process, enrol them as a student and print their form or receipt.
Where to find it
Section titled “Where to find it”- In school.edii.in: Students › Admissions › View Applications
- Or press Ctrl K (⌘ K on a Mac) and type View Applications.
- Address:
school.edii.in/add/admission-data - Who can see it: Needs Admission access for your role, and the Admissions module switched on for the school. If it is missing from your menu, ask your school admin.
 Open a bigger pictureतस्वीर बड़ी करें
Step by step
Section titled “Step by step”1. Find the applicant
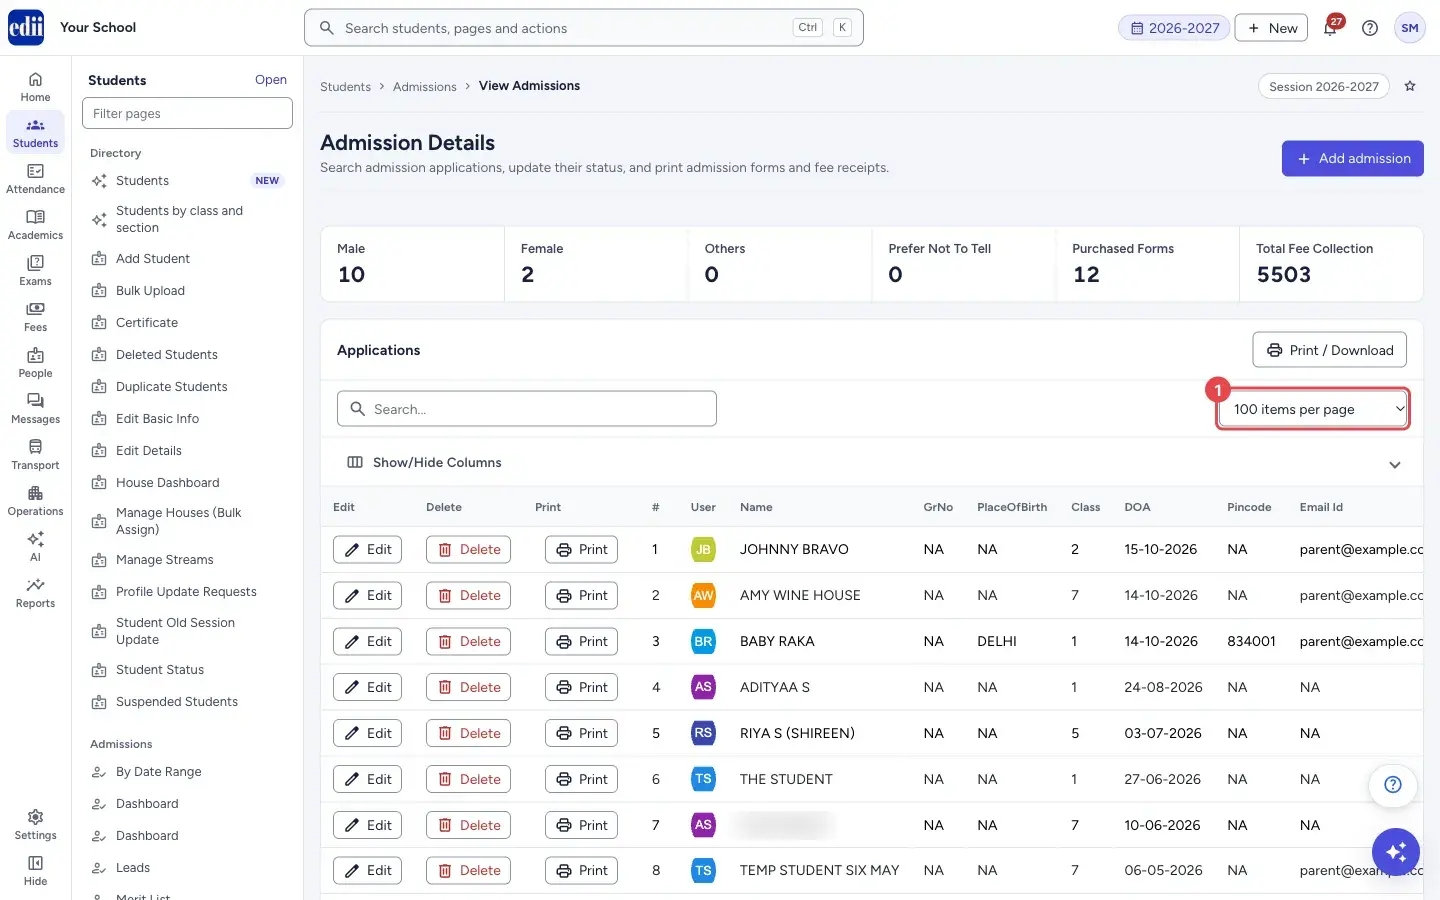
Section titled “1. Find the applicant”Type in Search… to narrow the list. Choose how many rows to show with the box at the right, from 50 items per page up to 5000 items per page. Use Show/Hide Columns to open a list of ticks and untick the columns you do not need.
 Open a bigger pictureतस्वीर बड़ी करें
2. Edit the registration
Section titled “2. Edit the registration”Press Edit on the row. Edit Registration Form opens with all the details; change what is needed and press Submit. A message says Details updated successfully.
3. Change the status
Section titled “3. Change the status”Click the status bar on the row. Choose Initiated, Form Issued, Enrolled, Stand By or Rejected and press Submit. For Enrolled and Rejected you also write a Reason.
For Enrolled the box also asks for the Section, the Admission Form No and the Id No (student ID / enrollment number). The next numbers are filled in for you; check them before you submit. Enrolling adds the child to the school as a student.
4. Print the form or the receipt
Section titled “4. Print the form or the receipt”Press Print on the row and choose Admission Form or Admission Fee Receipt. A window opens with the document, ready to print.
5. Delete an applicant
Section titled “5. Delete an applicant”Press Delete. The box says Are You Sure You Want To Delete The Admission Details ! and This Action Is Irreversible. Press Delete to remove the applicant or Cancel to keep them.
6. Print or download the list
Section titled “6. Print or download the list”Press Print / Download and choose Print, Download CSV File or Download Excel File.
Fields and filters
Section titled “Fields and filters”| Field | What it is | Notes |
|---|---|---|
| Search… | Narrows the list to rows containing what you type. | Only filters the list. |
| Items per page | How many applicants show at a time. | 50, 100, 200, 500, 1000, 1500, 2000, 2500, 3000 or 5000. The page starts at 100. |
| Show/Hide Columns | Ticks for each column, including Edit, Delete and Print. | Untick to hide. |
| Status (in the status box) | Where the applicant stands. | Initiated, Form Issued, Enrolled, Stand By or Rejected. |
| Reason | Why the applicant was enrolled or rejected. | Shown for Enrolled and Rejected. |
| Section / Admission Form No / Id No | Where and under which numbers the child is enrolled. | Shown for Enrolled only. |
Buttons
Section titled “Buttons”| Button | What it does | What happens next |
|---|---|---|
| Add admission | Opens New Admission to register another applicant. | The Entrance Form opens. |
| Print / Download | Menu to print the list or save it as CSV or Excel. | The print window opens or a file is saved. |
| Edit | Opens the registration form of that applicant for changes. | Edit Registration Form opens; the list refreshes when you close it. |
| Delete | Removes the applicant after you confirm. | Admission Detail Deleted! |
| Prints the Admission Form or the Admission Fee Receipt. | A window with the document opens. |
Columns
Section titled “Columns”| Column | Meaning |
|---|---|
| # | Row number. |
| User | The applicant’s photo or initials. |
| Name, GrNo, PlaceOfBirth, Class, DOA, Pincode, Email Id | Details entered on the form. DOA is the date of admission. |
| ReferredBy | Who referred the family. |
| Status | A bar and the status name: initiated, form-issued, in-process, enrolled, standby or rejected. |
| Disability, NatureOfDisability | Special-needs details entered on the form. |
| Father Name, Gender, Mobile Number | Father’s name, gender and phone. |
| Admission Fee, DistanceFromSchool | The fee taken and the distance from school. |
| Form Number, Form ID, PAN No. | The form’s numbers and the student’s PAN. |
After you save
Section titled “After you save”- Edit updates the applicant. Delete removes the applicant from the list. Changing the status to Enrolled adds the child as a student.
Good to know
Section titled “Good to know”- Delete cannot be undone.
- In the edit window the class applied for, blood group, admission fee and optional subject must be filled.
- The totals at the top are for the school’s current session and do not change with the search box.
- If the Admission Form No or Id No you typed was used meanwhile, a message says The Admission Id/form Number has been used, Please wait while we fetch the latest values and the next free numbers are filled in. Check them and submit again.
Messages you may see
Section titled “Messages you may see”| Message | What it means | What to do |
|---|---|---|
| Details updated successfully | Your changes to the registration were saved. | No action needed. |
| Data successfully submitted | The status was saved. | No action needed. |
| Admission Detail Deleted! | The applicant was removed. | No action needed. |
| Duplicate ID! | The Admission Form No or Id No is already used; the box then shows the message The Admission Id/form Number has been used, Please wait while we fetch the latest values. | Check the refreshed numbers and submit again. |
| Attachment(s) uploaded | Files added in the edit window were saved. | No action needed. |
| Failed to upload attachment(s) | A file did not upload. | Try again. |
| Bad/Slow Internet Connection, Please check your internet connection | A request did not reach the server. | Check the internet and try again. |
| No admission applications to show. | The list is empty. | Register an applicant on New Admission. |
- Update the Status as each applicant moves along, so the Admission dashboard stays right.
- Use Show/Hide Columns to hide the columns you never use, then print the list.
Stuck? Try this
Section titled “Stuck? Try this”| Problem | Likely cause | What to do |
|---|---|---|
| An applicant is missing | They were not registered on the entrance form, or they were deleted, or the session at the top of the app is not the one they were registered in. | Register them on New Admission, or check the session. |
| Admission Fee and DistanceFromSchool look swapped when I hide one of them | The two columns share their ticks in a mixed-up way. | Keep both columns ticked while you read the values. |
Did this page help?क्या इस पेज से मदद मिली?
Thanks! Glad it helped.धन्यवाद! अच्छा लगा कि काम बन गया।
Sorry about that. Ask in your own words, or write to us.माफ़ कीजिए। अपने शब्दों में पूछें, या हमें लिखें।