
Screen guide · Web app
Add Role
Create a role and choose, for each part of EDII, whether people with that role can view, edit, delete or create.
यह पेज अंग्रेज़ी में है। कुछ समझ न आए तो ।
A role is a set of permissions, for example Teacher or Cashier. Each user is given one role on Add User, and what that person can open and change in EDII depends on it.
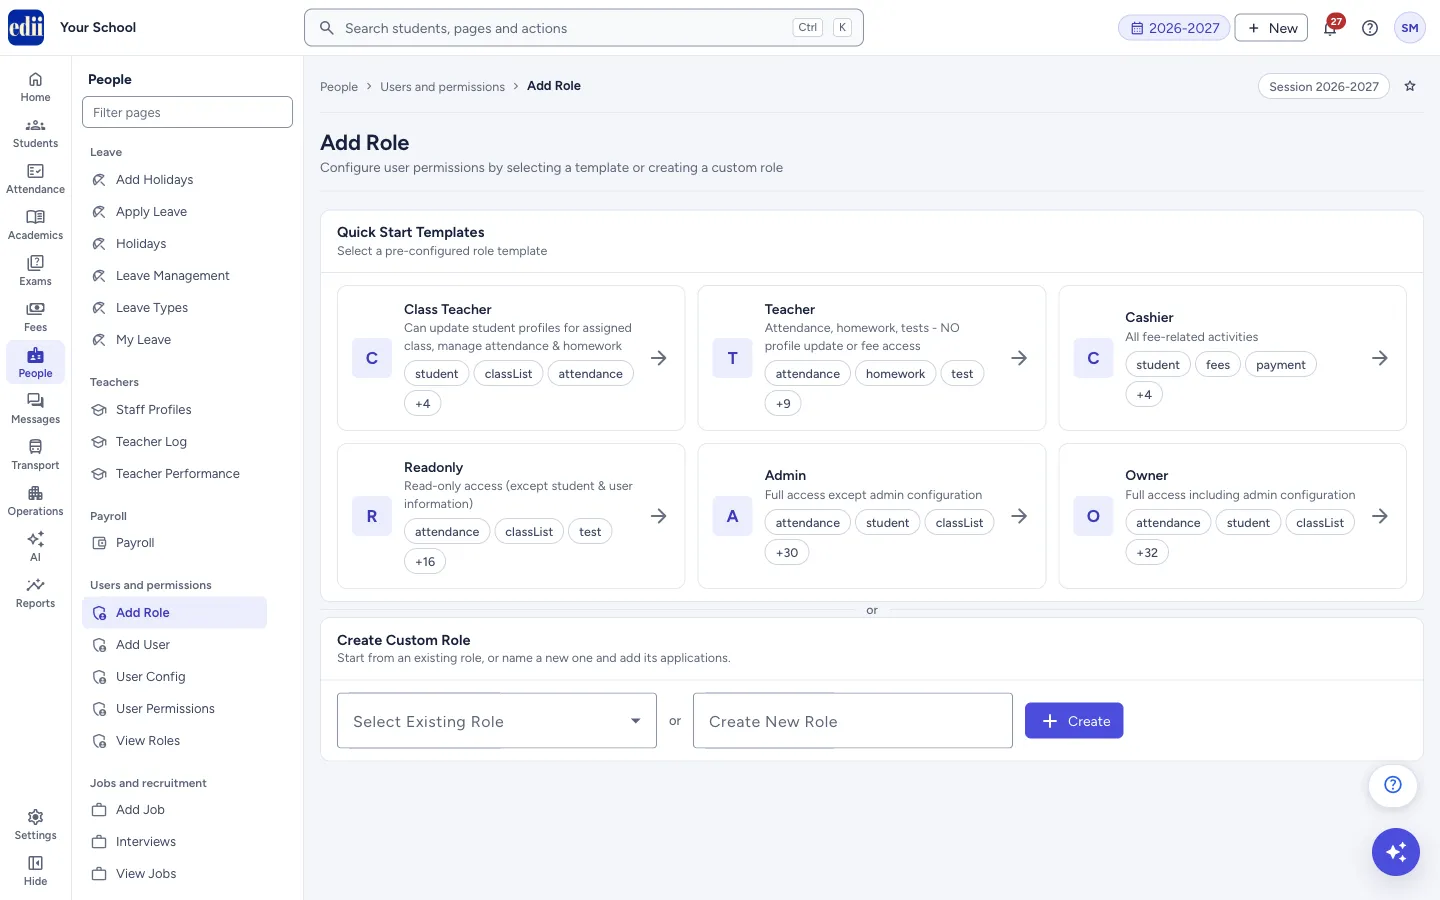
Add Role gives two ways to start. Quick Start Templates are ready-made roles (Class Teacher, Teacher, Cashier, Readonly, Admin and Owner). Create Custom Role lets you take an existing role, or type a new name, and add the applications yourself.
For each role, a table lists the applications (such as student, fees, attendance) with four ticks: View, Edit, Delete and Create. Nothing is saved to the role’s permissions until you select Save Role Permissions.
Who uses it and when
Section titled “Who uses it and when”The school administrator, when setting up the school and whenever a new kind of staff member needs different access.
Where to find it
Section titled “Where to find it”- In school.edii.in: People › Users and permissions › Add Role
- Or press Ctrl K (⌘ K on a Mac) and type Add Role.
- Address:
school.edii.in/add/add-role - Who can see it: Staff whose role includes Users or Admin pages access. Shown only when your school uses User in EDII. If it is missing from your menu, ask your school admin.
 Open a bigger pictureतस्वीर बड़ी करें
Step by step
Section titled “Step by step”1. Start from a template (quickest)
Section titled “1. Start from a template (quickest)”Select a template card. Each card shows what the role is for and the first three applications it covers, with a count of the others. EDII creates the role name, shows Default role “<name>” applied, and opens a permission table for it below.
The templates are: Class Teacher (can update student profiles for the assigned class, manage attendance and homework), Teacher (attendance, homework, tests; no profile update or fee access), Cashier (all fee-related activities), Readonly (read-only access except student and user information), Admin (full access except admin configuration) and Owner (full access including admin configuration).
2. Or start from your own role
Section titled “2. Or start from your own role”Under Create Custom Role, either pick a role from Select Existing Role (its present permissions are loaded so you can change them), or type a name in Create New Role and select Create. You see Roles Created, and the new name is saved at once and added to the list of roles.
If the name box is empty you see Empty Role; if the role is already in the list you see Role Already Added.
3. Add applications to the role
Section titled “3. Add applications to the role”In the role’s box, open Add Application and choose an application. It is added as a row in the table. An application already in the table is left out of the list.
4. Tick what the role can do
Section titled “4. Tick what the role can do”For each application tick View (can view and read data), Edit (can change existing data), Delete (can remove data) and Create (can add new data). Untick to take a permission away.
5. Save the permissions
Section titled “5. Save the permissions”Select Save Role Permissions at the bottom. You see Roles Added and View Roles opens. If you leave without saving, the ticks are lost.
Fields and filters
Section titled “Fields and filters”| Field | What it is | Notes |
|---|---|---|
| Select Existing Role | Loads a role that already exists, with its present permissions, so you can change it. | Starts with Teacher and Staff, plus the roles your school has. |
| Create New Role | The name of a new role. | Required for Create. Letters, numbers, spaces and the signs - @ & . , / _ # : can be typed. A name that is already in the list is refused. |
| Add Application | Adds an application row to the role’s table. | Options include attendance, student, classList, test, admission, transport, event, fees, dashboard, SMS, salary, homework, notification, expense, meeting, finance, leave, payment, task, user, library, visitor, support, biometric, report, hostel, certificate, inventory, health, canteen, alumni and more. |
| View, Edit, Delete, Create | What the role may do in that application. | Any combination. An application with nothing ticked gives no access. |
Buttons
Section titled “Buttons”| Button | What it does | What happens next |
|---|---|---|
| Create | Saves a new role name and lists it. No permissions are given yet. | Roles Created. |
| Template card | Saves the template’s name as a role (if it is not already one) and fills the table with the template’s applications and ticks. If the role is already on the page, its ticks are replaced by the template’s. | Default role “<name>” applied. |
| Save Role Permissions | Saves the ticks of every role shown on the page. | Roles Added and View Roles opens. |
After you save
Section titled “After you save”- The role shows on View Roles with its permissions.
- Users who have this role on Add User get these permissions.
Good to know
Section titled “Good to know”- A role’s name is saved as soon as you use Create or a template card, before you save the permissions.
- You can work on several roles on one page; Save Role Permissions saves all of them together.
- To change a role that is already saved later, use Edit on View Roles.
Messages you may see
Section titled “Messages you may see”| Message | What it means | What to do |
|---|---|---|
| Roles Created | The new role name was saved. | Add its applications and save the permissions. |
| Empty Role | Create was selected with no name. | Type a name. |
| Role Already Added | A role with that name is already in the list. | Use another name, or pick it under Select Existing Role. |
| Roles Added | The permissions were saved. | Nothing to do. |
| Bad/Slow Internet Connection, Please check your internet connection | A request did not reach EDII. | Check the internet and try again. |
- Start from a template and remove what the role does not need. Give the least access that does the job; Readonly suits people who only look at information.
- The Owner and Admin templates cover almost every application. Use them for very few people.
Did this page help?क्या इस पेज से मदद मिली?
Thanks! Glad it helped.धन्यवाद! अच्छा लगा कि काम बन गया।
Sorry about that. Ask in your own words, or write to us.माफ़ कीजिए। अपने शब्दों में पूछें, या हमें लिखें।