
Screen guide · Web app
Expenses
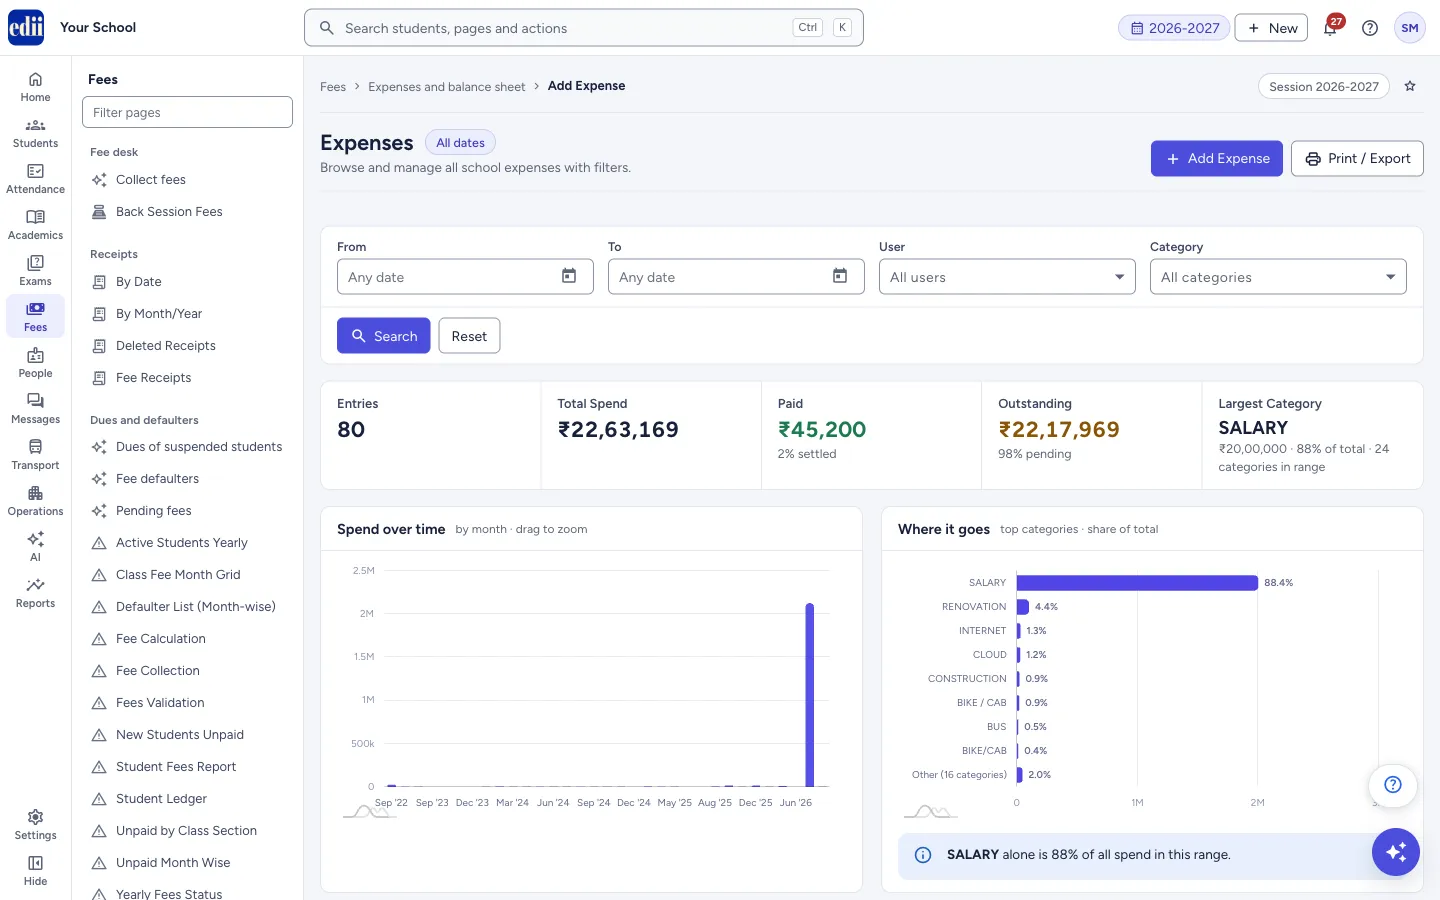
The school's expenses with totals and two charts: add an expense, filter by date, user and category, edit, print a slip, view the attachments, delete, and print or download the list.
यह पेज अंग्रेज़ी में है। कुछ समझ न आए तो ।
Expenses (menu name Manage Expenses) is where the school’s spending is recorded and reviewed. Select Add Expense to record a new expense. The list below shows the expenses that match the From, To, User and Category boxes.
Unlike most fee pages, this page is not limited to the open session. The chip next to the title shows what is in force: All dates when no date is chosen (every expense the school has recorded), or the dates you chose, for example 1 Apr 2026 – 31 Mar 2027.
Above the table, five cards give the Entries, Total Spend, Paid, Outstanding and Largest Category. Two charts show Spend over time and Where it goes.
Who uses it and when
Section titled “Who uses it and when”The accounts office records an expense when a bill is paid or raised, and the principal reviews the spending by category.
Before you start
Section titled “Before you start”- Only people who have fees access and expense access can open this page.
- Expense categories can be typed when you add an expense, so there is nothing to set up first.
Where to find it
Section titled “Where to find it”- In school.edii.in: Fees › Expenses and balance sheet › Manage Expenses
- Or press Ctrl K (⌘ K on a Mac) and type Manage Expenses.
- Address:
school.edii.in/view/expense-v2 - Who can see it: Staff whose role includes Fees and Expenses access. Shown only when your school uses Finance in EDII. If it is missing from your menu, ask your school admin.
 Open a bigger pictureतस्वीर बड़ी करें
Step by step
Section titled “Step by step”1. Look at the list
Section titled “1. Look at the list”When the page opens it loads the expenses of all dates. The cards and charts describe the rows that are shown.
2. Filter by date, user and category
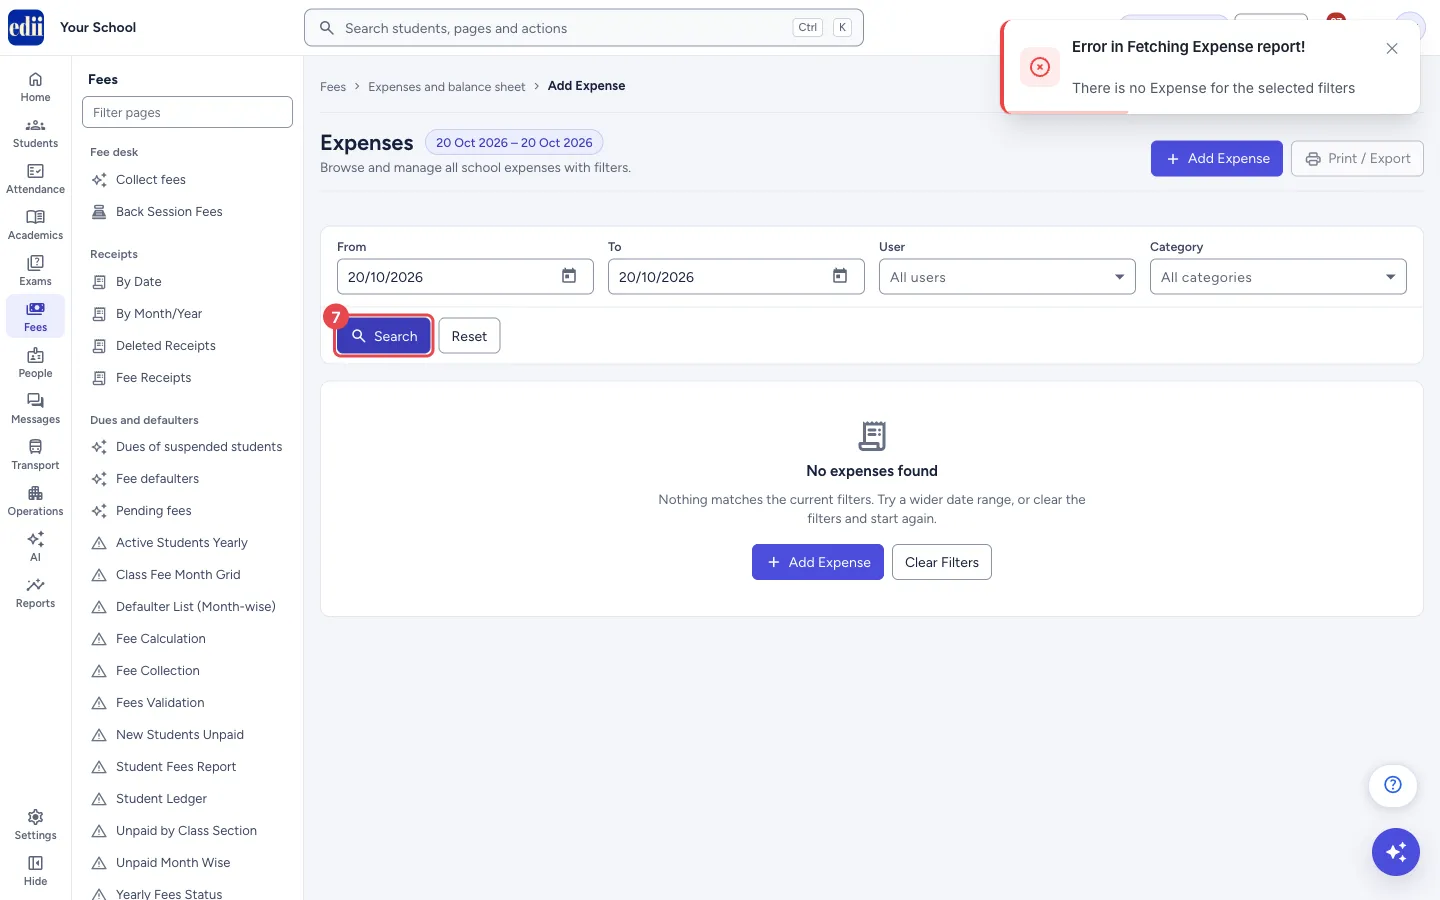
Section titled “2. Filter by date, user and category”Pick From and To (the boxes say Any date until you pick), choose a User (who recorded the expense) or a Category. The list reloads as soon as you choose. Search loads it again. Reset clears all the boxes and shows all expenses.
When nothing matches you see No expenses found with the advice to try a wider date range; Clear Filters goes back to the full list.
 Open a bigger pictureतस्वीर बड़ी करें
3. Read the cards and charts
Section titled “3. Read the cards and charts”Total Spend is the total amount of the expenses shown. Paid is the amount of the expenses whose status is Paid. Outstanding is the amount of the expenses that are neither Paid nor Rejected (that is Unpaid and Created); the notes under them give the share as N% settled and N% pending. Largest Category names the category with the highest spend, with its amount, its share of the total and the number of categories.
Spend over time shows spending by month when the expenses cover more than about three months, and by day otherwise; drag across the chart to zoom. Where it goes shows the top categories as bars, with the other categories added together as Other. When one category is half or more of the spend, a note says so.
4. Find an expense and choose the columns
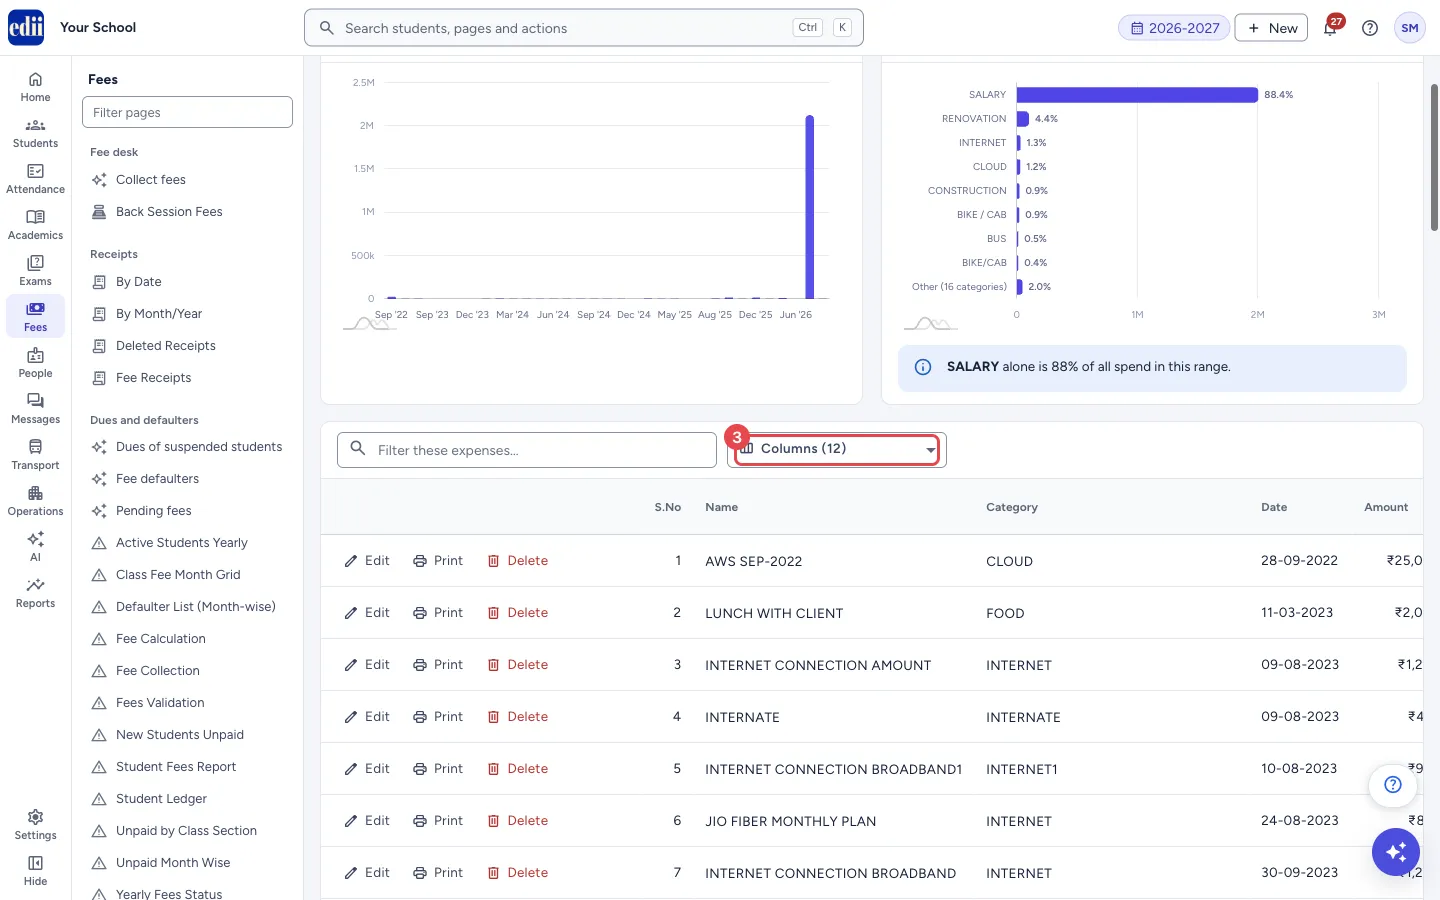
Section titled “4. Find an expense and choose the columns”Type in Filter these expenses… to keep only the rows that contain what you typed. Open Columns to tick the columns you want. A note such as Bus Name, Method hidden — no data tells you that those columns are empty for every expense in the result; tick them in Columns to show them anyway.
 Open a bigger pictureतस्वीर बड़ी करें
5. Add an expense
Section titled “5. Add an expense”Select Add Expense. The window Add Expense opens. Fill Name, Category (pick one or type a new one), Date (starts as today), Amount, Quantity, Total Amount and Status (Paid, Unpaid, Created or Rejected; it starts as Created). Total Amount is filled in as Amount times Quantity as you type.
When the status is Paid, Mode of Transaction is required: Cash, Cheque, Bank Transfer, UPI, Card, Online or Other. When the category is BUS, you can also choose the bus and enter Method, Odometer and Diesel/Fuel in litre. Description and Attachments (Optional) are optional. Attachments can be JPEG, PNG, GIF or PDF files of up to 10 MB each, several at a time.
Select Add Expense in the window. Expense: <name> Successfully Added shows and the list reloads.
6. Edit, print a slip, view attachments or delete
Section titled “6. Edit, print a slip, view attachments or delete”On each row, Edit opens the page to change the expense. Print opens a slip of the expense that you can print. View attachments (shown only when the expense has files) opens the files. Delete asks Delete expense? and says This expense will be permanently deleted. This action cannot be undone. Select Delete expense to confirm. Expense: <name> Successfully Deleted shows.
7. Print or download
Section titled “7. Print or download”Select Print / Export for Print, Download Excel File, Download Text File or Download CSV File. The button is switched off when there is no list. At the bottom you can choose to see 100, 200, 300, 400, 500 or 1000 rows on a page. The last row, Gross Total, adds up the amounts.
Fields and filters
Section titled “Fields and filters”| Field | What it is | Notes |
|---|---|---|
| From, To | The first and the last date of the expenses to list. | Optional. Both empty means all dates. |
| User | Only the expenses recorded by this user. | All users by default. |
| Category | Only the expenses of this category. | All categories by default. |
| Filter these expenses… | Keeps only the rows that contain what you type. The cards and charts follow the rows left. | Optional. The cards show a filtered badge. |
| Columns | Chooses the columns of the table. | The choice is remembered for this page on this computer. |
| Add Expense window: Name, Category, Date, Amount, Quantity, Total Amount, Status | The details of the new expense. | All required except Date, which starts as today. Messages: Expense Name is required, Category is required, Amount is required, Quantity is required, Total Amount is required, Status is required. |
| Mode of Transaction | How the expense was paid. | Required when Status is Paid. |
| Select Bus, Method, Odometer, Diesel/Fuel in litre | Vehicle details. | Shown only when the category is BUS. |
Buttons
Section titled “Buttons”| Button | What it does | What happens next |
|---|---|---|
| Add Expense | Opens the window to record an expense. | After saving, the list reloads. |
| Search / Reset / Clear Filters | Search loads the list again. Reset and Clear Filters empty all the boxes and show every expense. | The list and the cards reload. |
| Edit, Print, Delete (on a row) | Change the expense, print a slip of it, or delete it. | Edit opens the edit page. Print opens the slip. Delete asks for confirmation first. |
| Print / Export | Opens a menu with Print and the three downloads. | Print opens the print window; each download saves a file named Expenses. |
Columns
Section titled “Columns”| Column | Meaning |
|---|---|
| S.No | The serial number of the row. |
| Name, Category, Date | The expense, its category and its date. A paper-clip next to the name means the expense has attachments. |
| Amount | The amount of the expense. The last row, Gross Total, adds them up. |
| Mode of Transaction | How the expense was paid. Blank for expenses recorded before this was asked. |
| Status | Paid, Unpaid, Created or Rejected. |
| Bus Name, Method, Odometer, Diesel / Fuel (L) | Vehicle details of a bus expense. |
After you save
Section titled “After you save”- Adding, editing or deleting an expense changes the cards and the charts on this page. The other expense reports (by category, date, month, user and year) are made from the same expenses.
Good to know
Section titled “Good to know”- The page is not limited to the open session; it shows the dates you choose, or all dates.
- Deleting an expense cannot be undone from this page.
- A paid expense needs a Mode of Transaction. An expense that is not paid does not.
Messages you may see
Section titled “Messages you may see”| Message | What it means | What to do |
|---|---|---|
| Expense: <name> Successfully Added | The expense was saved. | Nothing to do. |
| Expense: <name> Successfully Deleted | The expense was deleted. | Nothing to do. |
| Mode of Transaction is required for a paid expense | The status is Paid but no mode is chosen. | Choose how it was paid. |
| File <name> is too large. Max size is 10 MB | An attachment is bigger than 10 MB. | Pick a smaller file. |
| File <name> is not allowed. Allowed types: JPEG, PNG, GIF, PDF | The attachment is of another type. | Pick a JPEG, PNG, GIF or PDF file. |
| No attachments available for this expense | The expense has no file. | Edit the expense to add one. |
| No expenses found | No expense matches the boxes. | Use a wider date range or select Clear Filters. |
| Network Issue, Please Try Again. | The list could not be loaded. | Check the internet and select Search. |
- Attach the bill to every expense, so that the bill is at hand when the accounts are checked.
- Use the Largest Category card and the bar chart to see where most of the money goes.
Stuck? Try this
Section titled “Stuck? Try this”| Problem | Likely cause | What to do |
|---|---|---|
| An expense is missing from the list | It is outside the dates chosen, or the User or Category box is not on All. | Select Reset to show all expenses. |
| The page says No expenses found after I picked a date | No expense was recorded on the dates you chose. | Choose a wider range, or select Clear Filters to see all expenses. |
Did this page help?क्या इस पेज से मदद मिली?
Thanks! Glad it helped.धन्यवाद! अच्छा लगा कि काम बन गया।
Sorry about that. Ask in your own words, or write to us.माफ़ कीजिए। अपने शब्दों में पूछें, या हमें लिखें।