
Screen guide · Web app
Website
Fill in the details that appear on your school's public website: basic information, address, about the school, facilities, contacts, search-engine text, a pop-up announcement and six reasons to choose the school.
यह पेज अंग्रेज़ी में है। कुछ समझ न आए तो ।
Website Settings is one page with eleven tabs: Basic Info, Address, About School, Academic, Infrastructure, Facilities, Social Media, Contact Person, SEO, Popup and Why Choose Us. Whatever you type in the tabs is what your school’s public website shows.
All tabs are saved together with one button, Save Website Settings, at the bottom of the page. Select Preview Website (top of the box) to open your public website in a new browser tab and see how it looks.
The first time you open the page, many boxes are already filled from your school’s details. EDII then says Data prefilled from School Preferences. Please review and save. Check every tab and then save.
Who uses it and when
Section titled “Who uses it and when”The school administrator or the person who looks after the school’s website fills it when the website is first set up, and again when a photo, phone number, timing or announcement changes.
Before you start
Section titled “Before you start”- The page is in the Operations menu under School website. If you do not see it, ask your school admin.
- Keep the facts ready: phone numbers, address, affiliation details, principal’s and manager’s messages, and (for the pop-up) the image and the circular you want to link.
Where to find it
Section titled “Where to find it”- In school.edii.in: Operations › School website › Website
- Or press Ctrl K (⌘ K on a Mac) and type Website.
- Address:
school.edii.in/view/website - Who can see it: Shown to staff with Admin pages access. It is also shown to other staff when your school uses the Website feature in EDII. Only some schools have this page. If it is missing from your menu, ask your school admin.
 Open a bigger pictureतस्वीर बड़ी करें
Step by step
Section titled “Step by step”1. Check the Basic Info tab
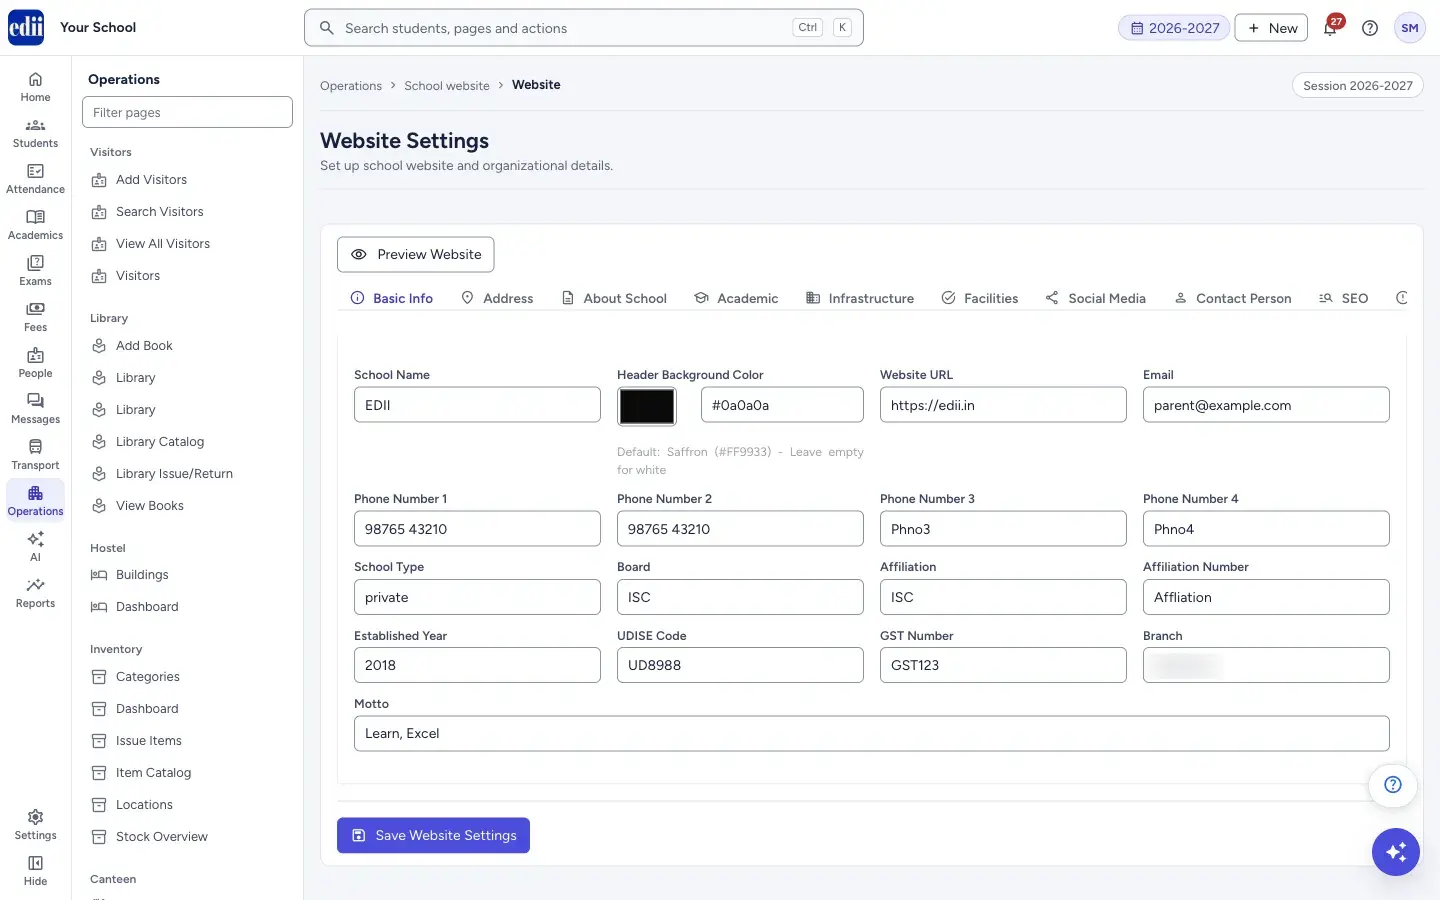
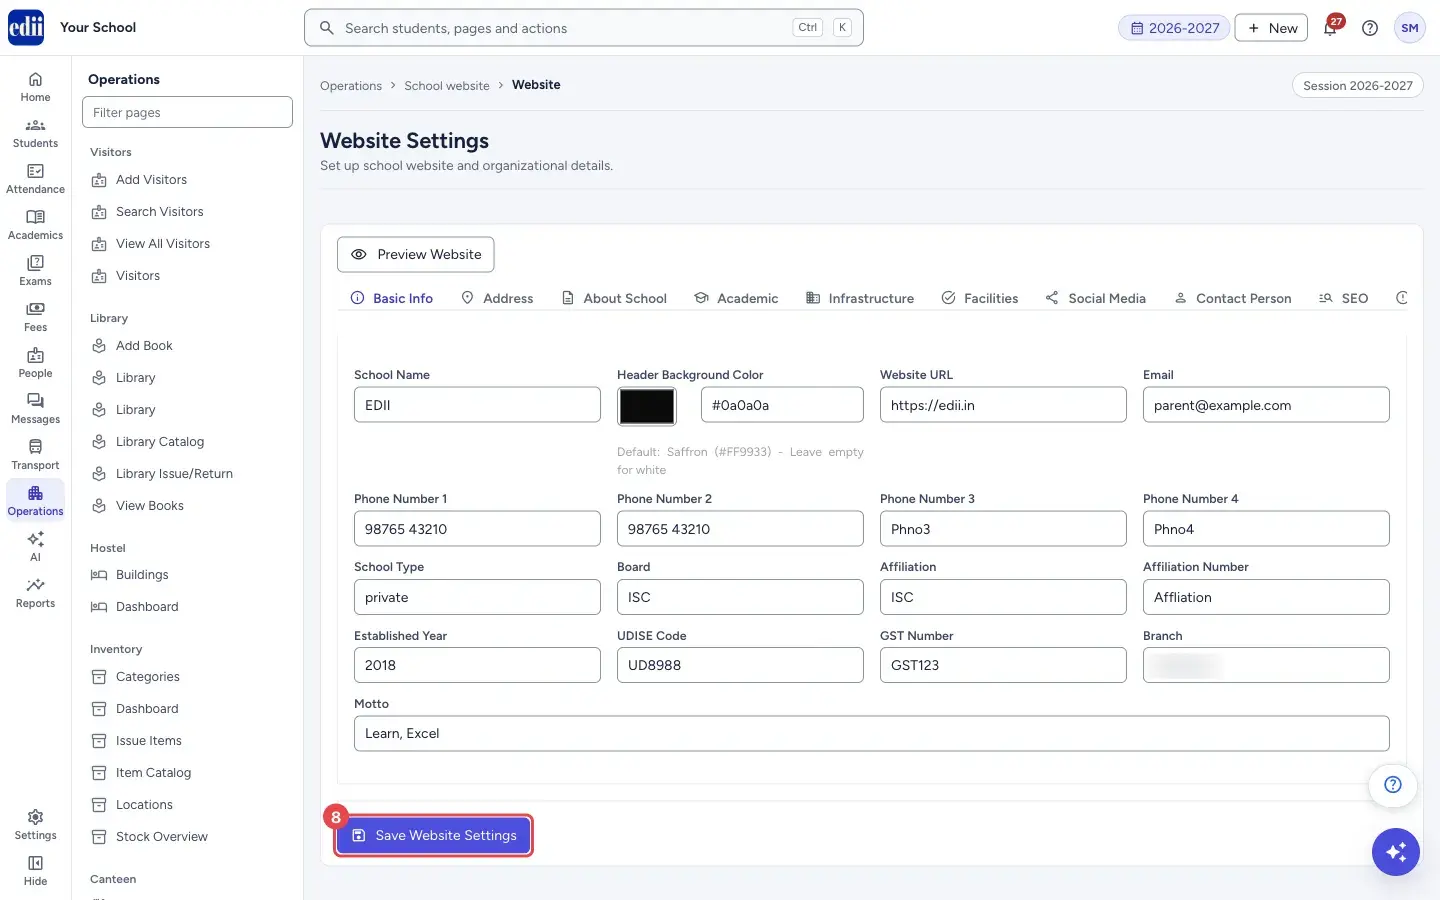
Section titled “1. Check the Basic Info tab”This tab opens first. Check School Name, Website URL, Email, Phone Number 1 to Phone Number 4, School Type, Board, Affiliation, Affiliation Number, Established Year, UDISE Code, GST Number, Branch and Motto.
Header Background Color sets the colour of the website’s header. The note under it says Default: Saffron (#FF9933) - Leave empty for white. Pick a colour from the small box or type a colour code.
2. Fill the Address tab
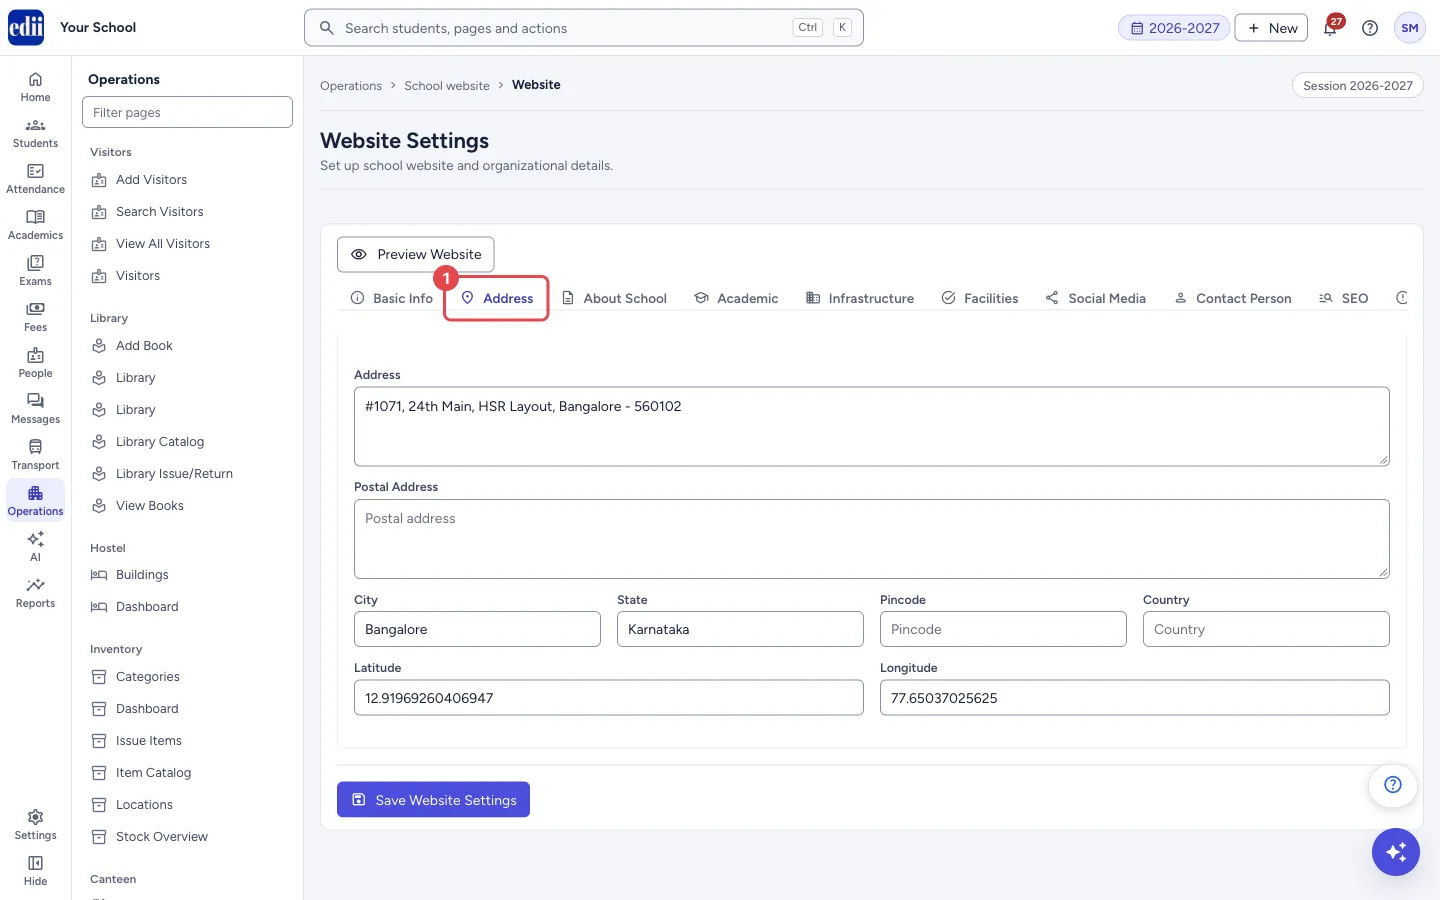
Section titled “2. Fill the Address tab”Enter the Address, Postal Address, City, State, Pincode and Country. Latitude and Longitude are the position of the school on the map.
 Open a bigger pictureतस्वीर बड़ी करें
3. Write the About School tab
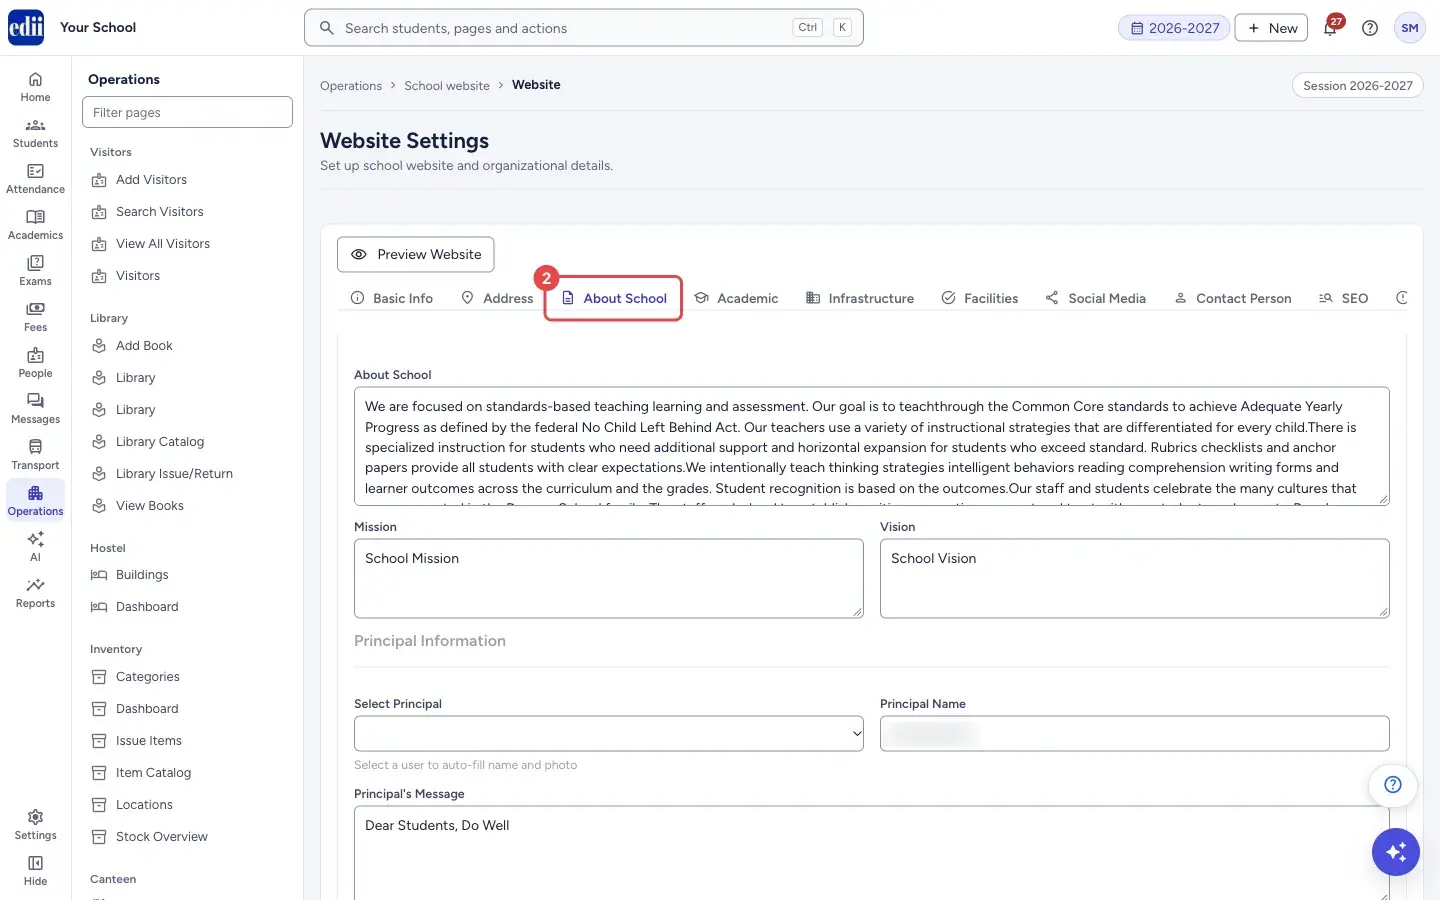
Section titled “3. Write the About School tab”Write About School, Mission and Vision. Under Principal Information, choose the principal in Select Principal (the list is your staff users) to fill Principal Name, and write Principal’s Message. Do the same under Manager Information with Select Manager, Manager Name and Manager’s Message. You can still type over a name that was filled in.
 Open a bigger pictureतस्वीर बड़ी करें
4. Fill Academic, Infrastructure and Facilities
Section titled “4. Fill Academic, Infrastructure and Facilities”Academic: Medium of Instruction, School Timings, Working Days and Academic Year.
Infrastructure: Total Area, Built-up Area, Playground Area, Total Classrooms, Total Labs, Total Staff Rooms, Parking Space, Garden, Survey Number, Land Obtained For, and under Toilet Facilities the Total, Boys, Girls, Staff and CWSN counts.
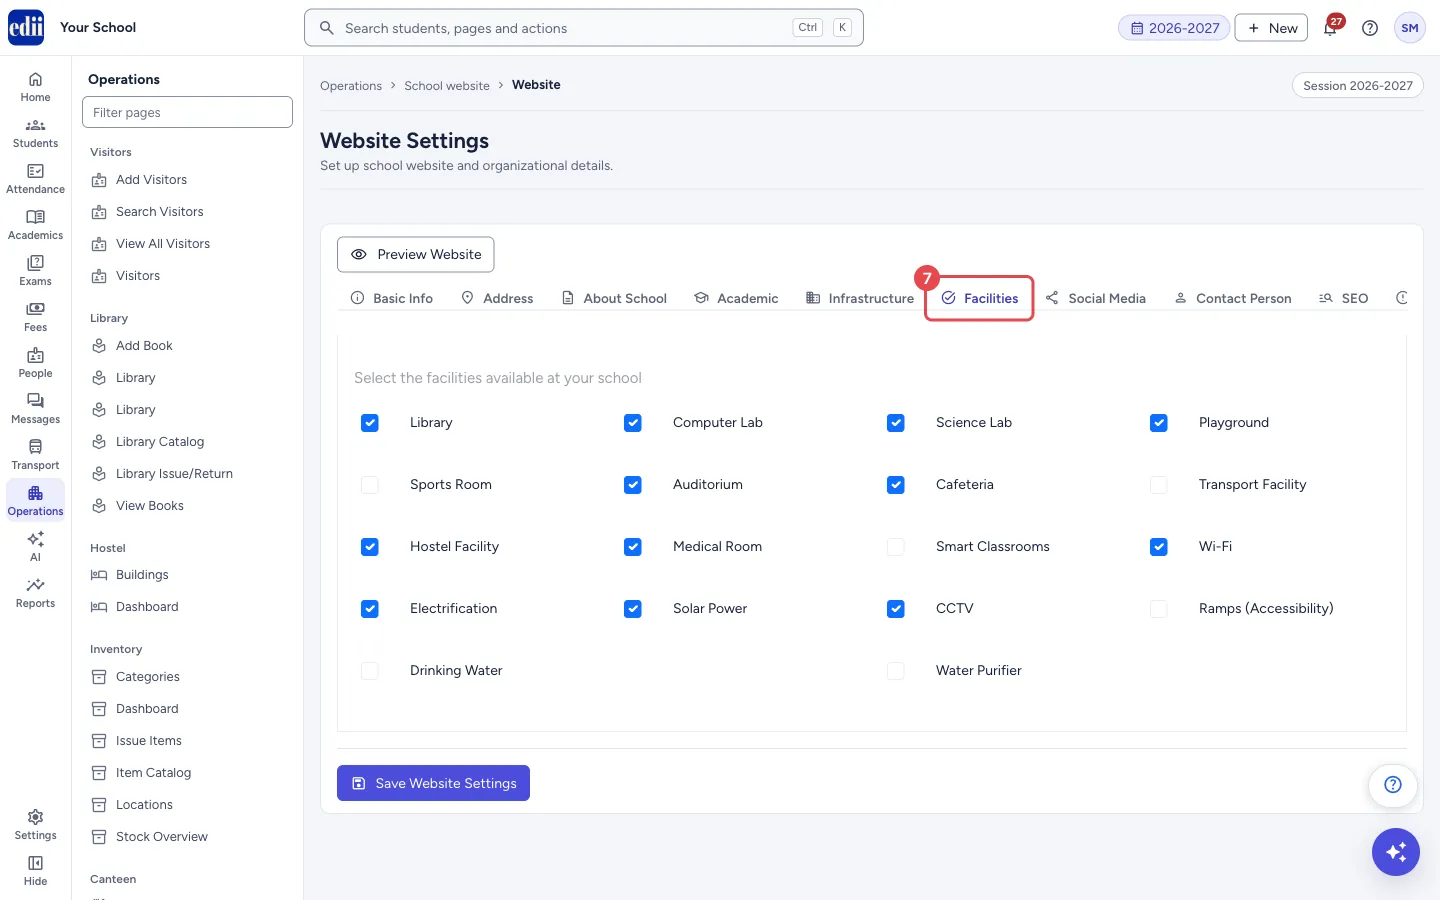
Facilities: tick each facility your school has. The list is Library, Computer Lab, Science Lab, Playground, Sports Room, Auditorium, Cafeteria, Transport Facility, Hostel Facility, Medical Room, Smart Classrooms, Wi-Fi, Electrification, Solar Power, CCTV, Ramps (Accessibility), Drinking Water and Water Purifier.
 Open a bigger pictureतस्वीर बड़ी करें
5. Add social links, contact person and SEO text
Section titled “5. Add social links, contact person and SEO text”Social Media: the page links for Facebook, Twitter, Instagram, YouTube and LinkedIn.
Contact Person: Contact Person Name, Contact Person Phone, Contact Person Email and Office Hours.
SEO: Meta Title (the page title search engines show) and Meta Description (150 to 160 characters is recommended).
6. Set up the pop-up announcement (optional)
Section titled “6. Set up the pop-up announcement (optional)”Open the Popup tab and tick Enable Popup on Website. Then type the Popup Title (required) and Popup Description. Use Upload Image to add a Popup Image (Optional). It must be JPG, PNG, GIF or WEBP and under 5 MB. A small picture shows with a button to remove it.
In Link to File/Circular (Optional) you can choose one of your circulars. The pop-up then gets a View More button that opens that file. A Preview of the pop-up shows under the fields.
7. Fill Why Choose Us
Section titled “7. Fill Why Choose Us”The last tab has six cards, shown on the website in a grid of 2 by 3. For each card choose an Icon, type a Title (up to 50 characters) and a Description (up to 150 characters). The page says that all six cards must be filled. EDII starts you with six ready-made cards, such as Experienced Faculty and Safe Environment, which you can rewrite.
8. Preview and save
Section titled “8. Preview and save”Select Save Website Settings. When it is saved, the message Website Settings Saved Successfully appears. Use Preview Website to check the public site.
 Open a bigger pictureतस्वीर बड़ी करें
Fields and filters
Section titled “Fields and filters”| Field | What it is | Notes |
|---|---|---|
| School Name | The name shown on the website. | Filled from your school details at first. |
| Header Background Color | The colour of the website header. | Empty means white. The default colour is saffron (#FF9933). |
| Website URL, Email, Phone Number 1-4 | How visitors can reach the school. | Optional. Up to four phone numbers. |
| School Type, Board, Affiliation, Affiliation Number, Established Year, UDISE Code, GST Number, Branch, Motto | Facts about the school. | Optional. Typed as text. |
| Address, Postal Address, City, State, Pincode, Country, Latitude, Longitude | Where the school is. | Optional. |
| About School, Mission, Vision | Text about the school. | Optional. |
| Select Principal, Principal Name, Principal’s Message | Who the principal is and their message. | Choosing a staff user fills the name. You can edit it. |
| Select Manager, Manager Name, Manager’s Message | Who the manager is and their message. | Same as the principal. |
| Medium of Instruction, School Timings, Working Days, Academic Year | Academic details shown to visitors. | Optional. For example English, 8:00 AM - 2:30 PM, Monday to Saturday, April to March. |
| Infrastructure boxes | Areas, counts of classrooms, labs and staff rooms, parking, garden, survey number, land and toilet counts. | Optional. Typed as text, for example 5 acres. |
| Facilities tick-boxes | Facilities your school has. | Ticked ones are shown on the website. |
| Facebook, Twitter, Instagram, YouTube, LinkedIn | Links to your pages. | Optional. Paste the full web address. |
| Contact Person Name, Phone, Email, Office Hours | A person visitors can contact. | Optional. |
| Meta Title, Meta Description | Text that search engines show for your site. | Optional. Description: 150 to 160 characters recommended. |
| Enable Popup on Website | Shows a pop-up announcement on the website. | Off by default. The pop-up fields appear when it is on. |
| Popup Title, Popup Description, Popup Image, Link to File/Circular | The content of the pop-up. | Title is required. The image must be JPG, PNG, GIF or WEBP, under 5 MB. |
| Why Choose Us cards | Six cards with icon, title and description. | All six must be filled. Title up to 50 characters, description up to 150. |
Buttons
Section titled “Buttons”| Button | What it does | What happens next |
|---|---|---|
| Preview Website | Opens your school’s public website in a new tab. | The public site opens. It shows what was last saved. |
| Save Website Settings | Saves all tabs together. | The message Website Settings Saved Successfully appears and the page reads the saved settings again. |
| Upload Image | On the Popup tab, chooses the image for the pop-up. | Image uploaded successfully appears and a small picture shows. |
After you save
Section titled “After you save”- The public website shows the new information. Selecting Preview Website is the quickest way to check it.
Good to know
Section titled “Good to know”- Selecting Preview Website opens what is already saved. Save first if you want to see your latest changes.
- One Save Website Settings button saves every tab, so you can move between tabs without saving each one.
- The tab strip is wide. On a smaller screen the last tabs, Popup and Why Choose Us, may be cut off. Make the browser window wider or zoom out to reach them.
Messages you may see
Section titled “Messages you may see”| Message | What it means | What to do |
|---|---|---|
| Data prefilled from School Preferences. Please review and save. | No website settings were saved before, so EDII filled the boxes from your school’s details. | Check each tab and select Save Website Settings. |
| Website Settings Saved Successfully | Everything is saved. | Select Preview Website to check. |
| Please select an image file (JPG, PNG, GIF, WEBP) | The file for the pop-up image is not a picture of these types. | Choose a JPG, PNG, GIF or WEBP file. |
| Image size should be less than 5MB | The pop-up image is too big. | Use a smaller picture. |
| Image uploaded successfully | The pop-up image is uploaded. | Save the settings to keep it. |
| Failed to upload image | The pop-up image could not be uploaded. | Try again, or use a different picture. |
| Network Issue, Please Try Again. | The page could not load or save. | Check your internet connection and try again. |
- Write the Meta Description for parents who search for your school: say the board, the town and what makes the school special.
- Review the six Why Choose Us cards. The ready-made text may not fit your school.
Stuck? Try this
Section titled “Stuck? Try this”| Problem | Likely cause | What to do |
|---|---|---|
| My changes are not on the public website. | The settings were not saved. | Select Save Website Settings and look for Website Settings Saved Successfully. |
| I cannot see the Popup or Why Choose Us tab. | The tab strip is cut off at the right edge of a narrow window. | Make the window wider or zoom out the browser. |
Did this page help?क्या इस पेज से मदद मिली?
Thanks! Glad it helped.धन्यवाद! अच्छा लगा कि काम बन गया।
Sorry about that. Ask in your own words, or write to us.माफ़ कीजिए। अपने शब्दों में पूछें, या हमें लिखें।