
Screen guide · Web app
Buzz
The school's feed: post photos, videos, events, achievements and announcements for the whole school or chosen classes, with reactions, comments, pinning and optional tagging of students in photos.
यह पेज अंग्रेज़ी में है। कुछ समझ न आए तो ।
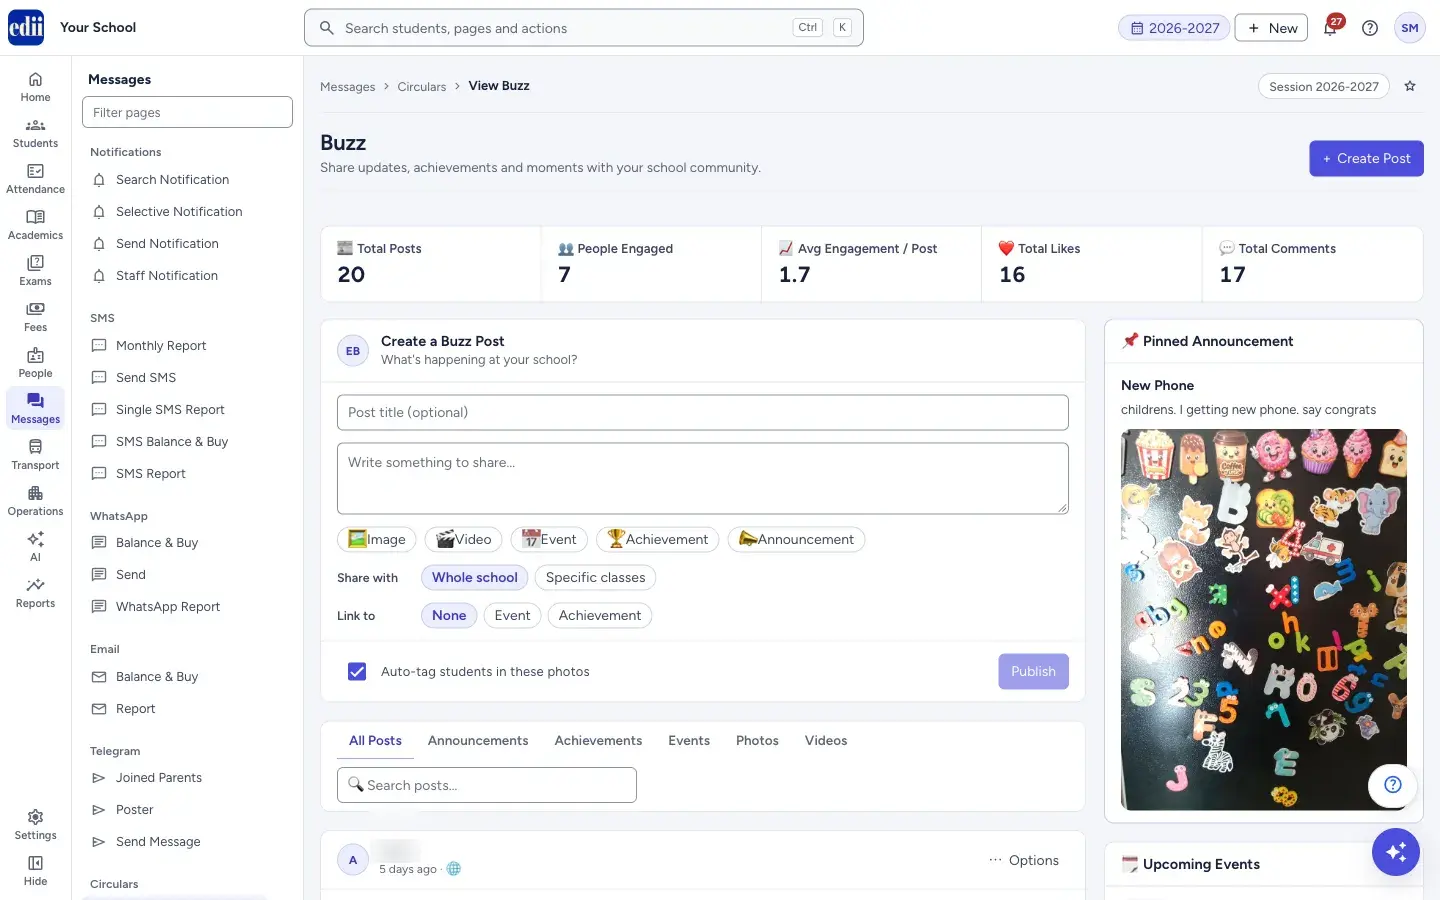
Buzz is the school’s own feed. The office or a teacher writes a post, adds photos or videos, chooses who sees it, and publishes. People react and comment, and the page shows simple counts at the top.
The page has a row of totals (Total Posts, People Engaged, Avg Engagement / Post, Total Likes, Total Comments), the box Create a Buzz Post, the feed of posts, and a side panel with the Pinned Announcement, Upcoming Events and Top Contributors.
Publishing a post does not send an SMS and uses no SMS credits. The post is shown in the feed to the audience you pick.
Who uses it and when
Section titled “Who uses it and when”The office and teachers use it to share school life: the annual day, a sports win, a notice or a contest result.
Where to find it
Section titled “Where to find it”- In school.edii.in: Messages › Circulars › Buzz
- Or press Ctrl K (⌘ K on a Mac) and type Buzz.
- Address:
school.edii.in/view/buzz - Who can see it: Staff whose role includes Messages or Events access. Shown only when your school uses Messages and Social Media in EDII. If it is missing from your menu, ask your school admin.
 Open a bigger pictureतस्वीर बड़ी करें
Step by step
Section titled “Step by step”1. Write the post
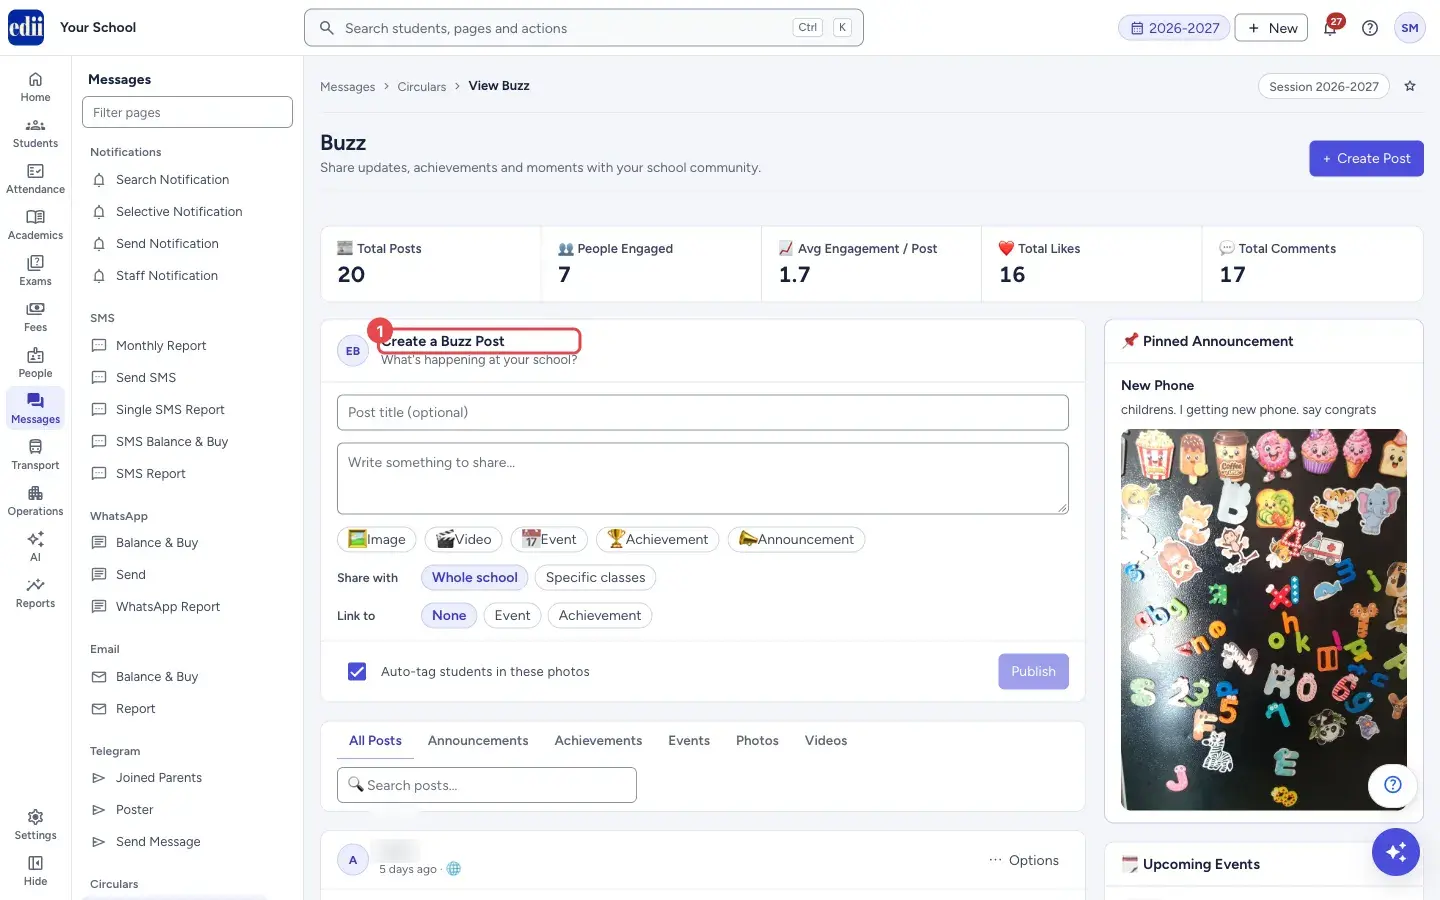
Section titled “1. Write the post”Select Create Post at the top, or go to the box Create a Buzz Post. Type a Post title (optional) and the text under Write something to share….
Choose what kind of post it is with the buttons Image, Video, Event, Achievement and Announcement. Image and Video open your files so you can add several photos or videos. Event, Achievement and Announcement mark the type of post, and the feed tabs use it; select it again to clear it.
 Open a bigger pictureतस्वीर बड़ी करें
2. Choose who sees it
Section titled “2. Choose who sees it”Under Share with, Whole school is the default. Choose Specific classes to pick Classes and, if you like, Sections. If you pick Specific classes and leave the classes empty, the post goes to the whole school.
3. Link it to an event or an achievement (optional)
Section titled “3. Link it to an event or an achievement (optional)”Under Link to, keep None, or choose Event and search for an upcoming event, or choose Achievement and search for a certificate. The post then shows a tag such as Event: name.
4. Publish
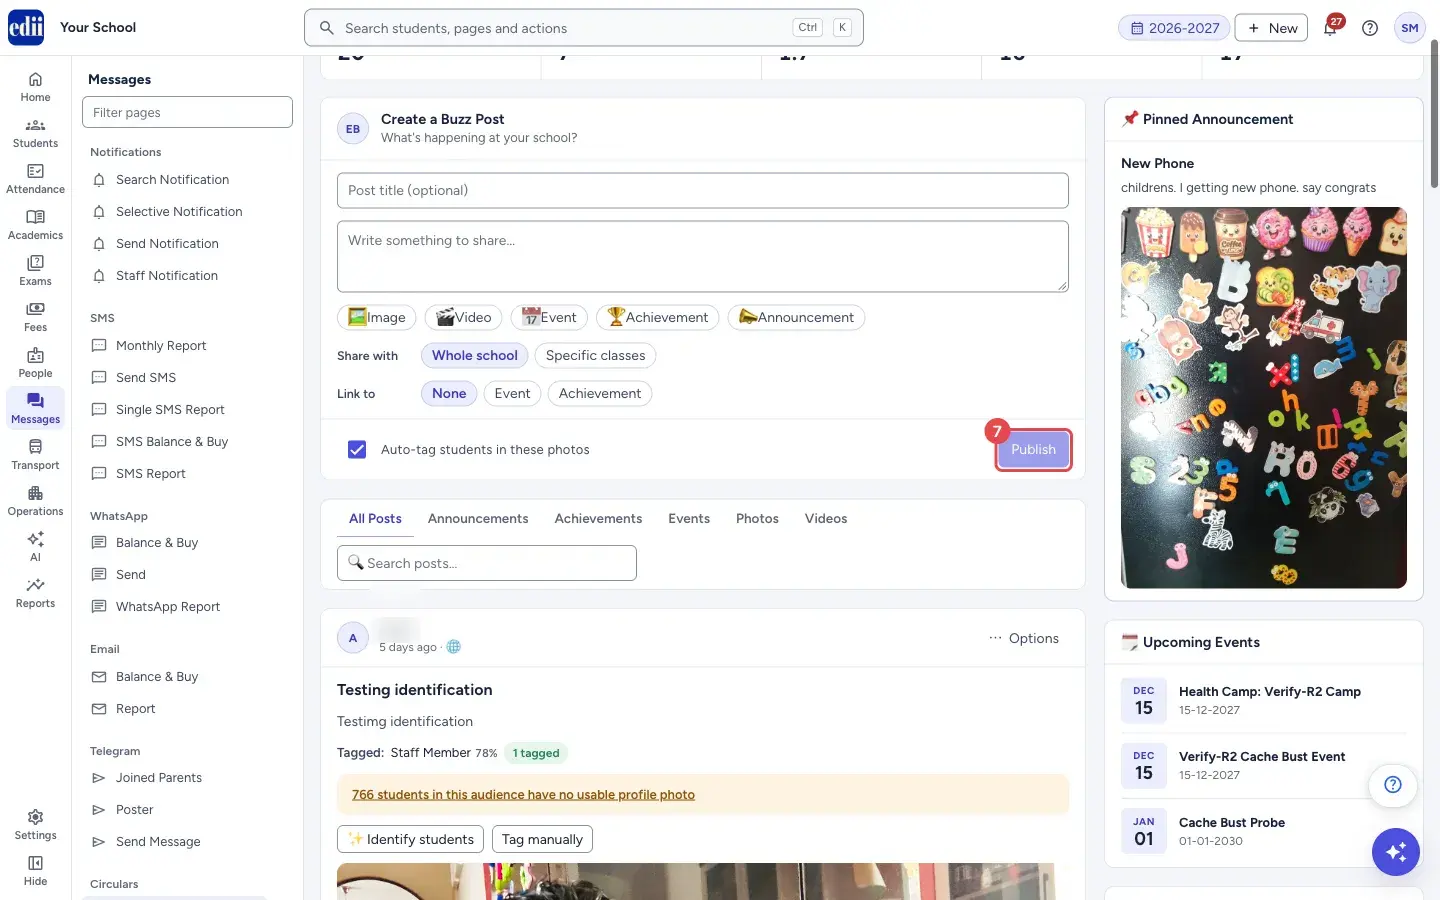
Section titled “4. Publish”Select Publish. It stays greyed out until the post has a title, some text or at least one file. You see Posted to Buzz! and the post is at the top of the feed.
If the school has the automatic student tagging setting on, Auto-tag students in these photos is ticked: after publishing, faces in the photos are matched with the students’ profile photos. Untick it for a post that should not be tagged.
 Open a bigger pictureतस्वीर बड़ी करें
5. Read and search the feed
Section titled “5. Read and search the feed”Use the tabs All Posts, Announcements, Achievements, Events, Photos and Videos (the whole tab row can be scrolled sideways on a narrow window, so Photos and Videos can always be reached), and Search posts…. Six posts show at first; select Load more for more.
Each post shows who posted it and when, with a globe sign when it is for the whole school, the title, the text, photos, and the numbers of reactions and comments.
6. Look after a post
Section titled “6. Look after a post”Select Options (⋯) on a post: Pin to top or Unpin, and Edit post. A pinned post shows Pinned and the Pinned Announcement panel shows it on the side. Edit post lets you change the Buzz Name (up to 100 characters), the Description (up to 500 characters), and add or remove photos.
To delete a post, select one of its photos to open it in full size and use Delete this post. EDII asks Delete this post? This cannot be undone.
React (hover for Proud, Great, Awesome, Congrats or Like) and Comment let people respond to a post. To comment, type in the box and select Send.
7. Tag students in photos (when the school has it on)
Section titled “7. Tag students in photos (when the school has it on)”On a post with photos you see Identify students and Tag manually. Identify students lets you tick the photos to scan, then select Identify N selected; EDII shows Student identification started and the matches appear later with a percentage. Tag manually opens the edit window where you add a student by class and section.
Possible matches show as Possibly: with a percentage. Select Yes next to a name to confirm the tag, or No to remove the suggestion. Confirmed students are listed after Tagged:, and a badge such as 1 tagged gives the count. In the edit window each match can be Confirmed or Rejected, and a rejected one can be undone.
Fields and filters
Section titled “Fields and filters”| Field | What it is | Notes |
|---|---|---|
| Post title (optional) | The heading of the post. | Optional. |
| Write something to share… | The text of the post. | Optional if there is a title or a file. |
| Share with | Who sees the post. | Whole school or Specific classes (with Classes and Sections). |
| Link to | Attaches the post to an event or a certificate. | None, Event or Achievement. |
| Auto-tag students in these photos | Matches faces in the photos with the students’ profile photos after publishing. | Shown only when the school has switched this on. |
| Search posts… | Finds posts in the feed. | |
| Write a comment… | A comment on a post. | Press Enter or select Send. |
Buttons
Section titled “Buttons”| Button | What it does | What happens next |
|---|---|---|
| Create Post | Takes you to the box Create a Buzz Post. | The box is ready for a title. |
| Publish | Posts to the feed. | Posted to Buzz! |
| Options (⋯) | Opens the menu of a post: Pin to top or Unpin, and Edit post. | Pinning shows Pinned or Unpinned. |
| React / Comment | Reacts to a post, or opens the comments. | The count updates. |
| Identify students | Scans the photos you choose for students’ faces. | Student identification started. Matches appear when ready. |
| Tag manually | Opens the edit window to add a student to a photo yourself. | Pick a class and section, then the student. |
| Load more | Shows six more posts. | More posts are added. |
Good to know
Section titled “Good to know”- A post is for the audience you choose under Share with: the whole school, or the chosen classes and sections.
- Photos and videos are uploaded as soon as you pick them. Remove one with its Remove button before you publish.
- Face matching can only match a student who has a usable profile photo. A note on the post says how many students in the audience have none, and links to the page where profile photos can be added.
- Matches are suggestions with a percentage. Check them before relying on them; you can confirm, reject or add a tag yourself.
- Deleting a post cannot be undone.
Messages you may see
Section titled “Messages you may see”| Message | What it means | What to do |
|---|---|---|
| Posted to Buzz! | The post was published. | Nothing to do. |
| Images added. | The files were uploaded and are ready to publish. | Select Publish. |
| Upload failed, please retry. | A photo or video did not upload. | Check the internet and add it again. |
| Student identification started | The photos are being scanned. | Wait. The matches show on the post when ready. |
| Select at least one photo for recognition. | You selected Identify with no photo ticked. | Tick a photo. |
| Delete post? — Delete this post? This cannot be undone. | Asked before a post is deleted. | Select Delete only if you are sure. |
| Network issue, please retry. | The post did not go through. | Check the internet and select Publish again. Look at the feed first so you do not post twice. |
| No Buzz yet — Share your first update with the school community. | The feed is empty. | Write the first post. |
- Pin the post you want everyone to see first, such as a notice or an event.
- Post clear, well-lit photos where faces can be seen. That makes face matching work better.
Stuck? Try this
Section titled “Stuck? Try this”| Problem | Likely cause | What to do |
|---|---|---|
| There is no Auto-tag students in these photos box and no Identify students | The school has not switched on automatic student tagging. | Ask the school admin to switch it on in the school’s preferences. |
| Publish is greyed out | The post has no title, no text and no file. | Add at least one. |
Did this page help?क्या इस पेज से मदद मिली?
Thanks! Glad it helped.धन्यवाद! अच्छा लगा कि काम बन गया।
Sorry about that. Ask in your own words, or write to us.माफ़ कीजिए। अपने शब्दों में पूछें, या हमें लिखें।