
Screen guide · Web app
Sell accessories
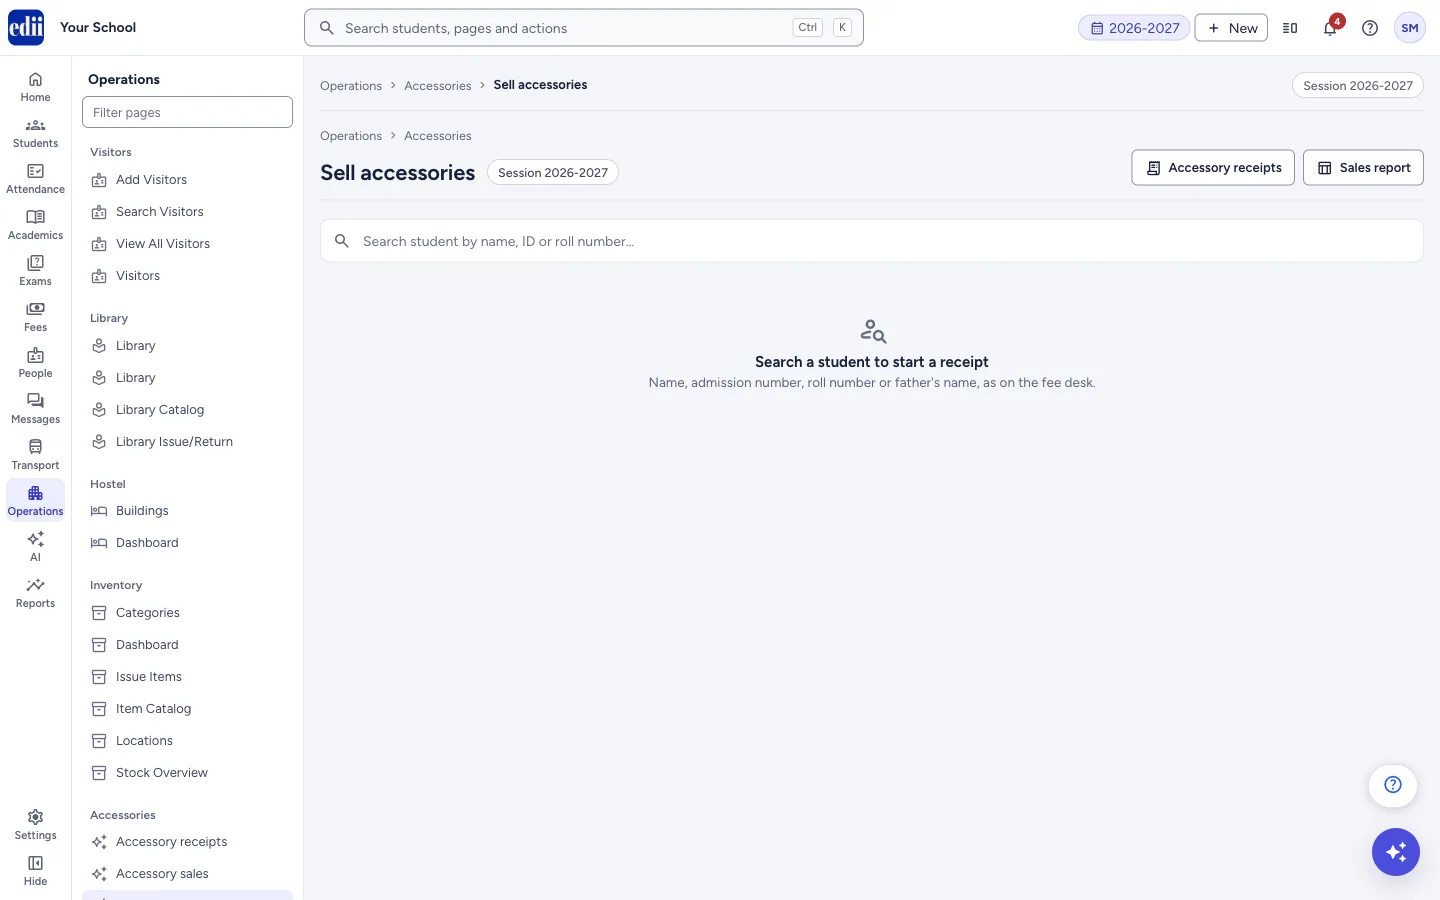
Sell school items such as ties, belts, diaries and ID cards to a student, take the payment and print a receipt of its own.
यह पेज अंग्रेज़ी में है। कुछ समझ न आए तो ।
Sell accessories is the counter for items your school sells to its students: a tie, a belt, a diary, an ID card. You find the student as on the fee desk, tick the items, choose how the student pays and select Sell and print receipt. The receipt opens at once, ready to print.
The items and their prices come from Item Catalog in Inventory. Only items with Sell to students switched on, a selling price and stock are listed. Selling an item takes the quantity sold off its stock. The sale is not a fee payment: the student’s fee dues and fee receipts do not change.
Accessory receipts have their own numbers, ACC-0001, ACC-0002 and so on in each session. When Settings › Fees › Show Accessories inside Fees is on, an accessory receipt takes the next fee receipt number instead.
Who uses it and when
Section titled “Who uses it and when”The accountant or office staff, whenever a student buys an item from the school office.
Before you start
Section titled “Before you start”- In Operations › Inventory › Item Catalog, each item you want to sell must have Sell to students switched on, a Selling price (₹) and stock. An item with no stock left is not listed.
- The student must be active in the session shown at the top of the page.
- Accessories must be on under Settings › Modules. It is on unless an admin has switched it off.
Where to find it
Section titled “Where to find it”- In school.edii.in: Fees › Accessories › Sell accessories
- By default the page is under Operations › Accessories › Sell accessories. The Fees › Accessories place above applies when Settings › Fees › Show Accessories inside Fees is on.
- When Accessories sit inside Fees, the page also opens from the Accessories button on Collect fees (with the desk’s student already chosen, if one is open), from Sell accessories in a student’s details on Students, and from the Sell accessories button under Accessories bought on the Fees tab of a student’s record.
- Or press Ctrl K (⌘ K on a Mac) and type Sell accessories.
- Address:
school.edii.in/fees/accessories/sell - Who can see it: The same staff who can open Collect fees: a role with Fees access, in a school that uses Finance in EDII. The page is in the menu only while Accessories is on under Settings › Modules. If it is missing from your menu, ask your school admin.
 Open a bigger pictureतस्वीर बड़ी करें
Step by step
Section titled “Step by step”1. Find the student
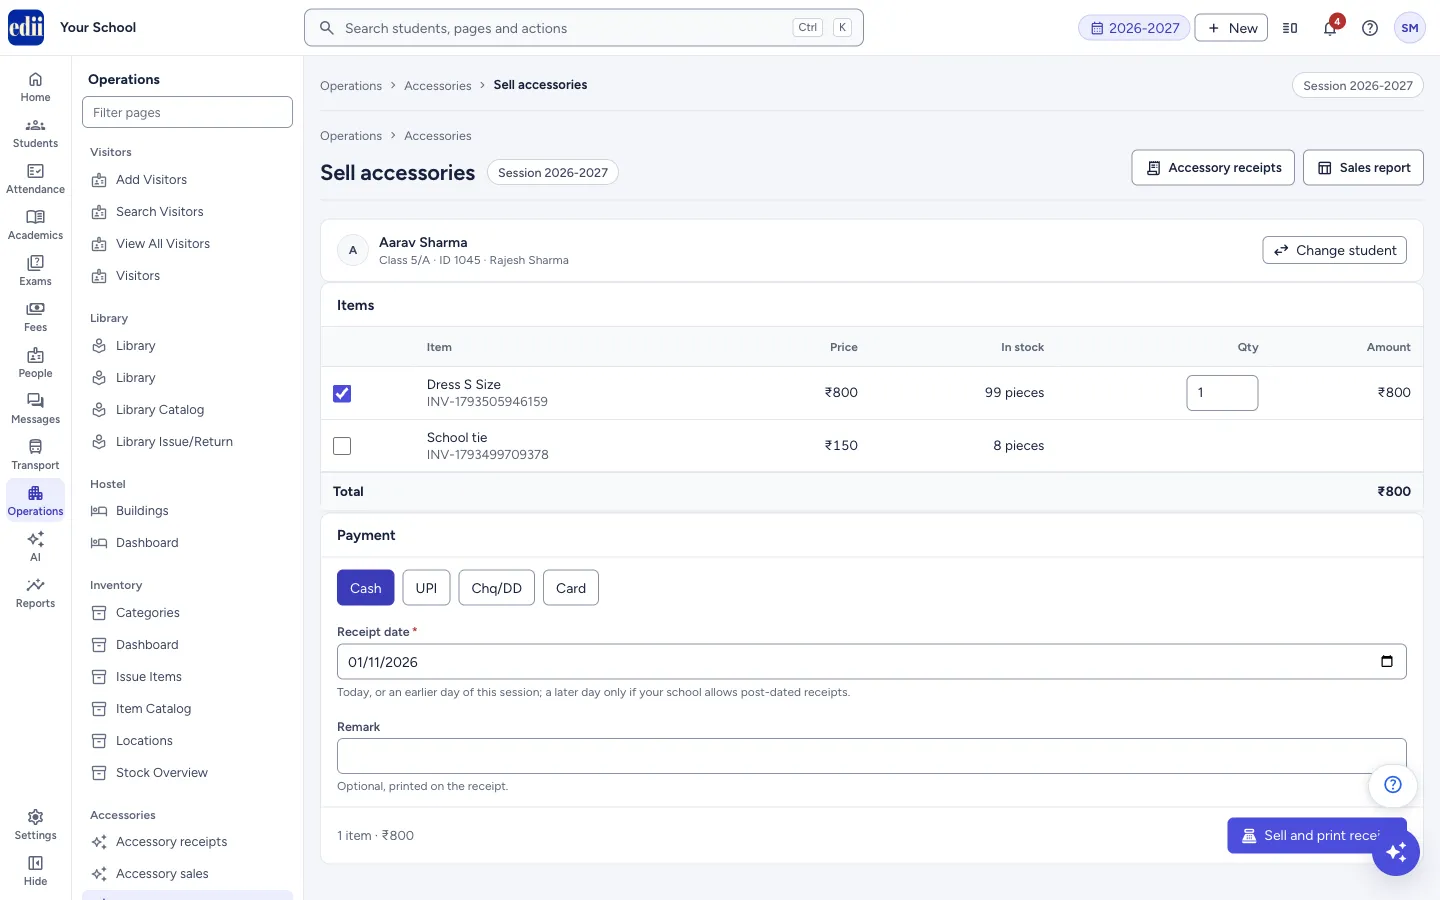
Section titled “1. Find the student”Type a name, admission number, roll number or father’s name in the search box. Up to 10 matching students are listed; pick one. A card shows the student’s name, class, ID and father’s name.
Only an active student can be chosen. For a suspended student the page says the student is suspended and nothing can be sold; a student with any other status is refused too. To pick someone else, select Change student; this also clears the ticked items.
2. Tick the items
Section titled “2. Tick the items”The Items list shows each item with its code, Price and In stock. Tick an item to add it with a quantity of 1, then change Qty if the student wants more. The quantity cannot go above the stock.
Amount shows the price times the quantity, and the Total row adds up the ticked items. On a phone, each item shows as its own card.
3. Choose how the student pays
Section titled “3. Choose how the student pays”Under Payment, choose Cash, UPI, Chq/DD or Card. UPI needs the UTR / reference no., Chq/DD needs the Cheque / DD no. and Card needs the Card no. (last digits). For a cheque or a card, Bank is optional.
4. Check the date and add a remark
Section titled “4. Check the date and add a remark”Receipt date is today. You can pick an earlier day of this session. A later day is possible only if your school allows post-dated receipts (Settings › Fees › Allow post-dated receipts), and then only up to the Days ahead allowed set there.
Remark is optional. Whatever you type is printed on the receipt.
5. Sell and print
Section titled “5. Sell and print”The line next to the button shows the number of items and the total. Sell and print receipt stays off until a student, at least one item and a complete payment are chosen.
Select Sell and print receipt. The message Receipt ACC-0001 saved shows with the student’s name, the amount and the mode, and the receipt opens. Select Print. If the button is selected twice by mistake, only one receipt is made.
 Open a bigger pictureतस्वीर बड़ी करें
Fields and filters
Section titled “Fields and filters”| Field | What it is | Notes |
|---|---|---|
| Search student | Name, admission number, roll number or father’s name, as on the fee desk. | Up to 10 matches are listed. Only an active student can be chosen. |
| Tick box (before each item) | Adds the item to the receipt. | Only items marked Sell to students, with a selling price and stock, are listed. |
| Qty | How many of the item the student buys. | Shown once the item is ticked. At least 1, never more than the stock shown under In stock. |
| Payment: Cash, UPI, Chq/DD, Card | How the student pays. | Required. One mode per receipt. |
| UTR / reference no. | The reference of the UPI payment. | Required for UPI. |
| Cheque / DD no. | The number of the cheque or demand draft. | Required for Chq/DD. |
| Card no. (last digits) | The last digits of the card used. | Required for Card. |
| Bank | The bank of the cheque or card. | Optional. Shown for Chq/DD and Card. |
| Receipt date | The date printed on the receipt and the day the money is counted. | Required. Today, or an earlier day of this session; a later day only if your school allows post-dated receipts. |
| Remark | A note printed on the receipt. | Optional, up to 200 characters. |
Buttons
Section titled “Buttons”| Button | What it does | What happens next |
|---|---|---|
| Sell and print receipt | Saves the sale, gives it the next receipt number and takes the items off stock. | The receipt opens. The button reads Saving… while it works. |
| On the receipt: prints it. | The print window opens. Each copy on the page is headed Office copy, Parent copy and so on. | |
| Close | On the receipt: closes it. | You are back on the counter with the same student chosen. |
| Change student | Clears the chosen student and the ticked items. | The search box shows again. |
| Accessory receipts | Opens the list of accessory receipts. | You can find, reprint or cancel a receipt there. |
| Sales report | Opens the Accessory sales report. | Choose the dates and run the report. |
After you save
Section titled “After you save”- The receipt is headed Accessories receipt with its number. It shows the school’s name, logo and address, Receipt no. marked (accessories series) or (fee receipt series), Date, Student with class and ID, Father, each item with Qty, Rate and Amount, the Total, the amount in words, Paid by with the reference, Remark and Received by.
- The student stays chosen. The ticked items, the payment mode and the remark are cleared, and In stock shows the new stock, so you can sell more to the same student.
- The stock of each item goes down by the quantity sold. An item with no stock left drops off the list.
- In Cash Deposit Register › Day Book, a cash sale counts in Daily Collection on the receipt date, and a UPI, card or cheque sale counts in Other Collection. With Show bank detail columns on, Collection by source shows it on the Accessories line.
- In the Day book report the sale shows under money in as Accessories – Cash, Accessories – UPI, Accessories – Card or Accessories – Cheque/DD. On Today, Collected today includes it.
- When Accessories sit inside Fees, the sale also shows under Accessories bought on the Fees tab of the student’s record.
- The student’s fee dues and fee receipts do not change.
Good to know
Section titled “Good to know”- Receipt numbers run ACC-0001, ACC-0002 and so on in each session. With Settings › Fees › Show Accessories inside Fees on, a receipt takes the next fee receipt number instead. Changing that setting applies to new receipts only.
- A sale cannot be edited. If it is wrong, cancel it in Accessory receipts with a reason and sell again.
- Prices are checked again when you sell. If a price was changed in Item Catalog after the page loaded, the sale is refused until you reload the page.
- If two people sell the last pieces of an item at the same time, the second sale is refused and nothing is taken from stock for it.
- Switching Accessories off under Settings › Modules removes these pages from the menu for everyone at your school. Nothing is deleted; switching it back on restores them.
- No message is sent to parents for an accessory sale.
Messages you may see
Section titled “Messages you may see”| Message | What it means | What to do |
|---|---|---|
| No items marked for sale | No item in Item Catalog has Sell to students on with a selling price and stock. The page adds: In Inventory › Item Catalog, edit an item, switch on ‘Sell to students’ and enter a selling price. Items with stock appear here. | In Item Catalog, edit the item, switch on Sell to students, enter a selling price and make sure it has stock. |
| The item list could not be loaded. Check the connection and try again. | The items did not load. The list shows Items did not load. | Check the internet connection and select Try again. |
| Suspended students are listed under Students › Suspended students; nothing can be sold to them here. | The student you picked is suspended. The message is headed <student> is suspended. | Only an active student can buy items here. |
| Only an active student can be chosen. | The student you picked is not active in this session. The message is headed with the student’s name and status. | Check the student’s status on Students. |
| Insufficient stock for <item>. Please check Inventory > Stock Overview | There is not enough stock of that item left, for example because another sale took the last pieces first. Nothing is taken from stock and no receipt is made. | Lower the quantity, or add stock in Inventory first. |
| The total does not match the current item prices (<amount>). Please reload the items and try again | A selling price was changed in Item Catalog after this page loaded. | Reload the page so the new prices show, then sell again. |
| No selling price set for <item> in Inventory > Item Catalog | The item has no selling price. | Enter a selling price for the item in Item Catalog. |
| Item is not available for sale: <item>. Mark it “Sell to students” in Inventory > Item Catalog | Sell to students was switched off for an item after this page loaded. | Reload the page. If the item should be sold, switch Sell to students back on in Item Catalog. |
| Payment date <date> is after today (<today>). Future payment dates can be allowed under Preferences > Finance > Fee Collection Settings. | The receipt date is later than your school allows. | Pick today or an earlier day. To allow later dates, an admin switches on Allow post-dated receipts under Settings › Fees. |
| The payment date falls outside the <session> session | The receipt date is not inside the session selected at the top of the page. | Pick a date inside the session, or change the session. |
| Student is not enrolled in the selected session. Please refresh the page or contact your school administrator. | The student is not in the session selected at the top of the page. | Refresh the page, or check the session and the student’s record. |
| Accessories is switched off for this school (Settings > Modules) | The Accessories module is off. | An admin switches Accessories on under Settings › Modules. |
| The connection failed before the sale was confirmed. Check Accessory receipts for this student before trying again; a retry sends the same request. | The answer did not arrive, so the page cannot tell whether the sale was saved. | Check Accessory receipts for the student. If you change nothing and select the button again, the same sale is sent and no second receipt is made. |
| Receipt <number> was already saved | A repeated attempt found the sale already saved. No second receipt was made. | Nothing to do. The saved receipt opens. |
Stuck? Try this
Section titled “Stuck? Try this”| Problem | Likely cause | What to do |
|---|---|---|
| An item is missing from the list | Sell to students is off for it, it has no selling price, or its stock is 0. | Check the item in Operations › Inventory › Item Catalog. |
| Sell and print receipt is grey | No student is chosen, no item is ticked, no payment mode is chosen, or the reference for UPI, cheque or card is empty. | Fill in the missing part. |
| The date cannot be set after today | Your school does not allow post-dated receipts. | An admin can switch on Allow post-dated receipts under Settings › Fees. |
Did this page help?क्या इस पेज से मदद मिली?
Thanks! Glad it helped.धन्यवाद! अच्छा लगा कि काम बन गया।
Sorry about that. Ask in your own words, or write to us.माफ़ कीजिए। अपने शब्दों में पूछें, या हमें लिखें।