
Screen guide · Web app
Add User
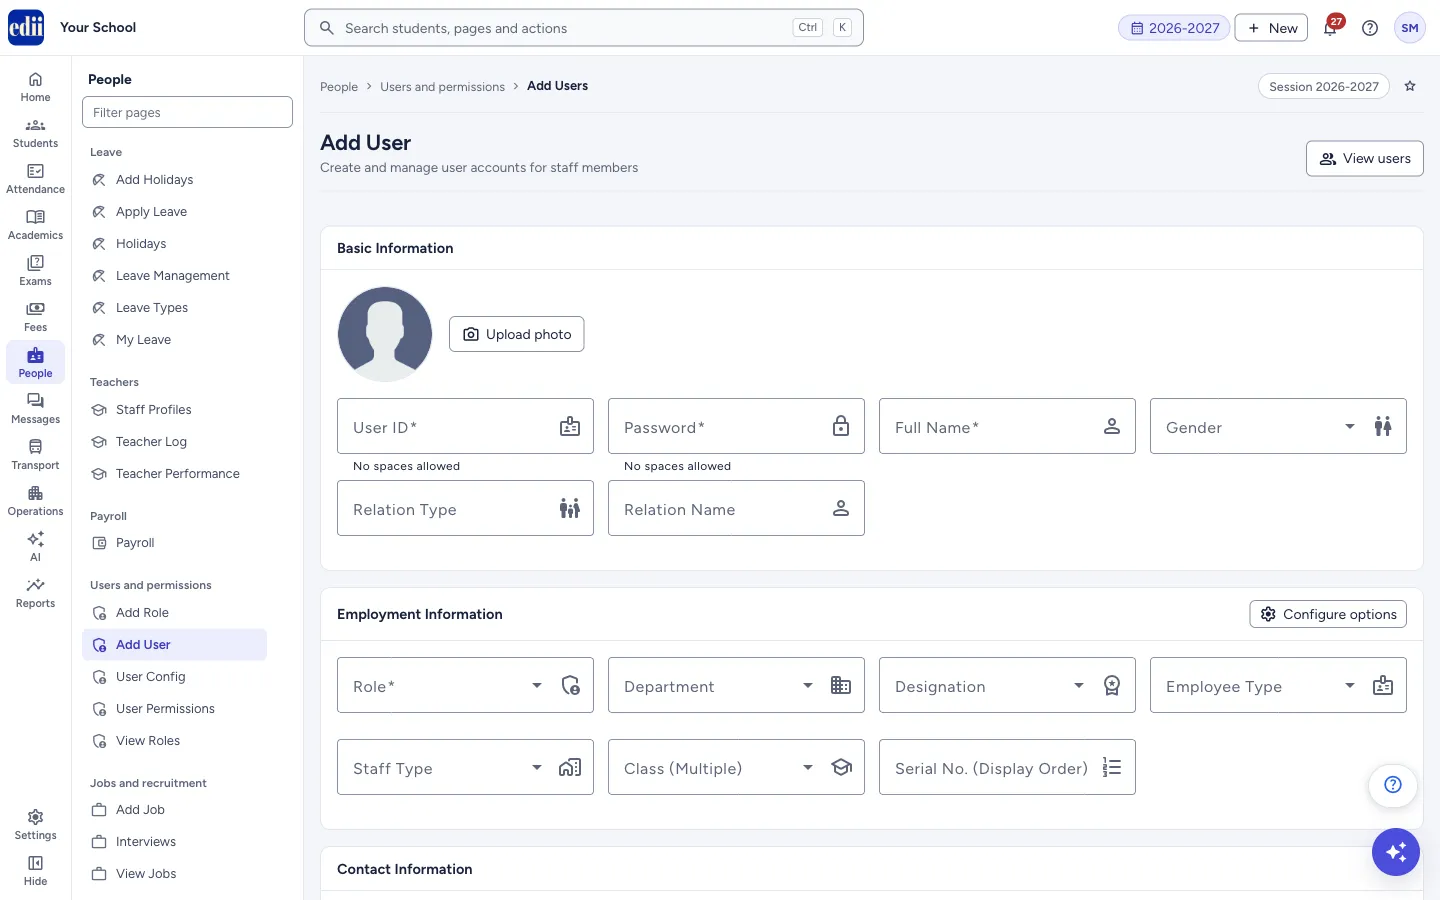
The form for creating one staff member who can sign in to EDII, with their role, contact and employment details and, if you wish, their class, section and subject permissions.
यह पेज अंग्रेज़ी में है। कुछ समझ न आए तो ।
Add User (the page is headed Add User; the screen’s own name is Add Users) creates a staff member account. The form is in sections: Basic Information, Employment Information, Contact Information, Identity & Personal Details, Qualification & Salary, Bank Details, Biometric Information, Additional Information and Permissions.
Only five things are required: User ID, Password, Full Name, Role and Mobile Number. Everything else can be left empty and filled later.
The User ID and Password are what the staff member types to sign in. The Role decides which parts of EDII they can use.
Who uses it and when
Section titled “Who uses it and when”The administrator, when a new teacher or staff member joins.
Before you start
Section titled “Before you start”- Create the role on Add Role first if it does not exist.
- Choose a User ID that is not used by anyone else and has no spaces, and a password with no spaces.
- Keep the mobile number (10 digits) ready. Departments, designations and employee types come from User Config.
Where to find it
Section titled “Where to find it”- In school.edii.in: People › Users and permissions › Add User
- Or press Ctrl K (⌘ K on a Mac) and type Add User.
- Address:
school.edii.in/add/add-user - Who can see it: Staff whose role includes Users or Admin pages access. Shown only when your school uses User in EDII. If it is missing from your menu, ask your school admin.
 Open a bigger pictureतस्वीर बड़ी करें
Step by step
Section titled “Step by step”1. Fill Basic Information
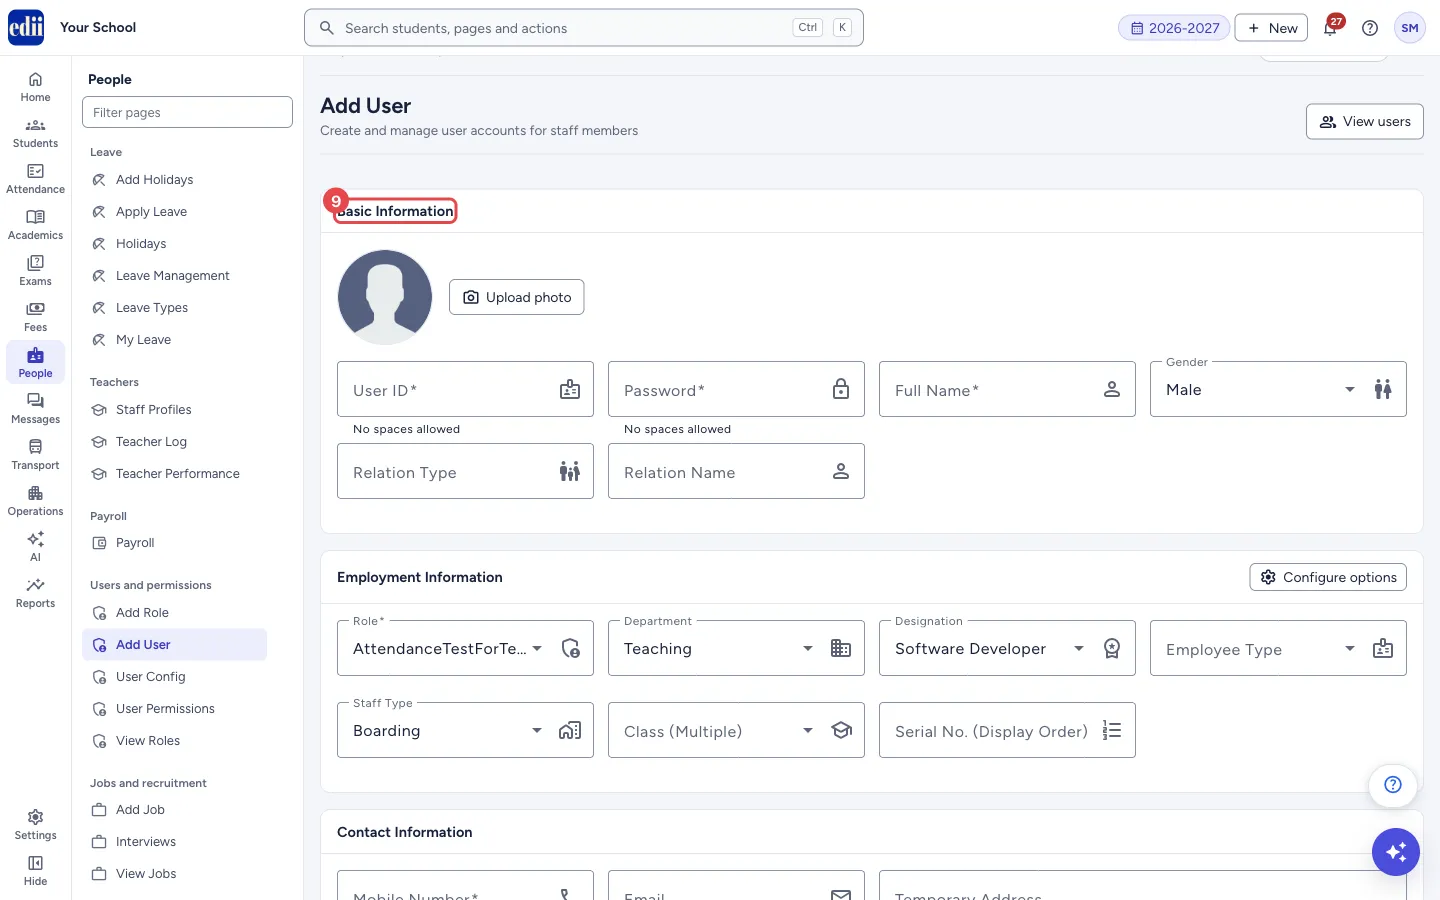
Section titled “1. Fill Basic Information”Type the User ID and, when you leave the box, EDII checks it against the existing users. If it is taken, the box says Try a different User ID. Then type the Password and the Full Name, and choose the Gender. Relation Type and Relation Name record, for example, Father and the father’s name.
To add a photo, first type the User ID (otherwise you see Please enter User ID first), then select Upload photo. In the window select Choose Image and pick a JPEG, PNG or GIF file of up to 10 MB; large pictures are resized.
 Open a bigger pictureतस्वीर बड़ी करें
2. Choose the role and employment details
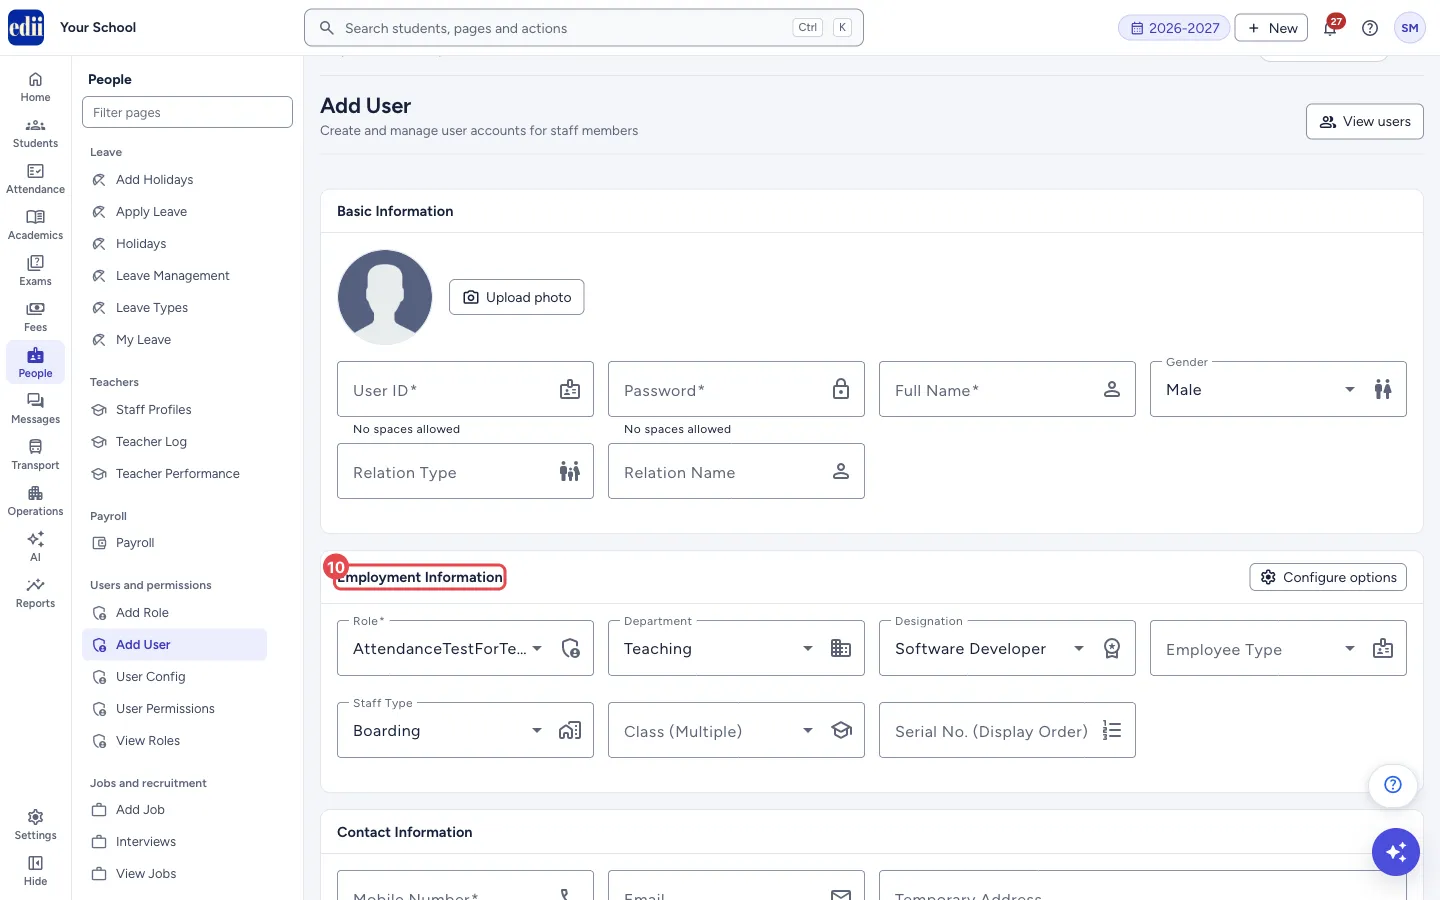
Section titled “2. Choose the role and employment details”In Employment Information choose the Role (required), the Department, the Designation, the Employee Type and the Staff Type. Class (Multiple) lets you pick several classes. Serial No. (Display Order) accepts digits only.
If a department, designation or employee type you need is missing, select Configure options. It opens User Config.
 Open a bigger pictureतस्वीर बड़ी करें
3. Enter the contact details
Section titled “3. Enter the contact details”Type the Mobile Number (exactly 10 digits, required). Add the Email, Temporary Address and Permanent Address if you have them.
4. Add identity, qualification, salary and bank details (optional)
Section titled “4. Add identity, qualification, salary and bank details (optional)”Identity & Personal Details: Aadhar Number (12 digits), PAN Number, Nationality (Indian or Other), Religion, Blood Group, Date of Birth (DD-MM-YYYY), Date of Joining and Date of Exit.
Qualification & Salary: Academic Qualification, Professional Qualification, National Code, Salary Amount and Previous Experience. Bank Details: Account Holder Name, Account Number, Bank Name, IFSC Code, PPP (Family ID) and Voter ID.
5. Link a biometric machine (optional)
Section titled “5. Link a biometric machine (optional)”In Biometric Information choose the Biometric Machine and type the Biometric Machine ID the person has on it. As you type, EDII tells you whether that ID is free (User ID <id> is available in machine) or already used (User ID <id> is already assigned).
6. Add class, section and subject permissions (optional)
Section titled “6. Add class, section and subject permissions (optional)”In Permissions select Add permission to add a row, then choose the Class, Section and Subject (or All), and tick Class Teacher on the row of the class this person is class teacher of. Tick rows and select Remove selected to delete them. You can also do this later on User Permissions.
7. Save the user
Section titled “7. Save the user”Select Add User at the bottom. The button stays disabled until the required fields are valid and the User ID is not a duplicate. When saved you see User Added Successfully, or User Added & Permissions Saved Successfully when permission rows were included, and Staff Profiles opens. Cancel leaves without saving.
Fields and filters
Section titled “Fields and filters”| Field | What it is | Notes |
|---|---|---|
| User ID | The sign-in name of the staff member. | Required. No spaces. Must not belong to another user. |
| Password | The sign-in password. | Required. No spaces. |
| Full Name | The staff member’s name. | Required. |
| Gender | Gender from the list. | Optional. |
| Relation Type, Relation Name | A relative’s relation and name, for example Father and the name. | Optional. |
| Role | The role that decides what the person can use in EDII. | Required. The list shows the roles of your school. |
| Department, Designation, Employee Type | From the lists kept on User Config. | Optional. |
| Staff Type | The kind of staff from the list. | Optional. |
| Class (Multiple) | One or more classes. | Optional. |
| Serial No. (Display Order) | A number that sets the order in which the person is listed. | Optional. Digits only. |
| Mobile Number | The person’s mobile number. | Required. Exactly 10 digits. Error: Valid 10-digit Mobile Number is required. |
| Email, Temporary Address, Permanent Address | Contact details. | Optional. |
| Aadhar Number | The 12-digit Aadhaar number. | Optional. Digits only. |
| Date of Birth (DD-MM-YYYY) | Typed as day-month-year, for example 05-07-1985. | Optional. Years 1900 to 2100. |
| Date of Joining, Date of Exit | Pick from the calendar. | Optional. |
| Salary Amount | The salary amount saved on the staff record. | Optional. |
| Biometric Machine, Biometric Machine ID | The attendance machine and the person’s ID on it. | Optional. |
| Comments | A free note. | Optional. |
Buttons
Section titled “Buttons”| Button | What it does | What happens next |
|---|---|---|
| View users | Opens Staff Profiles. | Staff Profiles opens. |
| Upload photo | Opens the photo window. Needs the User ID first. | Image uploaded successfully after you upload. |
| Configure options | Opens User Config. | User Config opens. |
| Add permission | Adds one empty permission row. | A row appears in Permissions. |
| Remove selected | Deletes the ticked permission rows from the form. | The rows disappear. If none are ticked you see Please select rows to remove. |
| Add User | Creates the staff member (and saves the permission rows, if any). | User Added Successfully and Staff Profiles opens. |
| Cancel | Leaves the form without saving. | Staff Profiles opens. |
After you save
Section titled “After you save”- The staff member appears on Staff Profiles and can sign in with the User ID and password, with the access of the role.
- If the user was saved but the permission rows could not be, you see User Added. Permissions could not be saved. (with the reason when known). Open User Permissions to add them.
Good to know
Section titled “Good to know”- The User ID is checked when you leave the box; a duplicate disables the Add User button.
- A space in the User ID or the password is refused: User ID cannot contain spaces and Password cannot contain spaces.
- Letters, numbers, spaces and the signs - @ & . , / _ # : can be typed in text boxes such as the name, password and comments; other symbols are blocked as you type.
- A user’s role can later be changed from Staff Profiles; permissions by class and subject can be changed on User Permissions.
Messages you may see
Section titled “Messages you may see”| Message | What it means | What to do |
|---|---|---|
| User Added Successfully | The staff member was created. | Nothing to do. |
| User Added & Permissions Saved Successfully | The staff member and the permission rows were saved. | Nothing to do. |
| Try a different User ID | That User ID already belongs to another user. | Type another User ID. |
| Please enter User ID first | Upload photo was used before typing the User ID. | Type the User ID, then upload. |
| Max File Size is 10 MB | The photo is too big. | Choose a smaller picture. |
| Please select a valid image file (JPEG, PNG, GIF) | The file is not a picture of those kinds. | Choose a JPEG, PNG or GIF file. |
| Bad/Slow Internet Connection, Please check your internet connection | A request did not reach EDII. | Check the internet and try again. |
- Give the lowest role that does the job; you can raise it later.
- Use the same User ID pattern for all staff (for example first name and a number) so it is easy to recall.
Did this page help?क्या इस पेज से मदद मिली?
Thanks! Glad it helped.धन्यवाद! अच्छा लगा कि काम बन गया।
Sorry about that. Ask in your own words, or write to us.माफ़ कीजिए। अपने शब्दों में पूछें, या हमें लिखें।