
Screen guide · Web app
Mark Attendance
Record one day's attendance for a class and section: mark each student present, absent, on leave or half-day, note the reason for absences, and let parents of absent students know.
यह पेज अंग्रेज़ी में है। कुछ समझ न आए तो ।
Mark Attendance is the daily register. You pick a class, a section and a date, load the students, mark each child, and save. One save stores the whole class for that day.
When the class loads, every student shows as Present unless the day was already marked, in which case you see the saved status again (absent, leave or half-day). That means a normal day only needs you to change the few children who are not there.
The page keeps a live count as you work: total students, present, absent, on leave, half-day, and how much of the class you have marked. A summary ring and an Absent Today list on the right update with every click, so you can check the numbers before you save.
Who uses it and when
Section titled “Who uses it and when”Class teachers and school administrators use this screen every school day, normally in the first period. Front-office staff use it to correct a day that was marked wrongly.
To fix an earlier day, change the Date before you press Load Students. The saved status for that day appears, and saving again replaces it.
Before you start
Section titled “Before you start”- Your role needs access to attendance. If Mark Attendance is not in your menu, ask your school admin to add it to your role.
- You may see an information note, New attendance experience is off. Toggle it from Settings., when the school has not switched on the new attendance setting. The screen still opens; an admin can change the setting in Settings.
- Your class and section must have students on the roll for the selected session.
Where to find it
Section titled “Where to find it”- Menu: Student › Mark Attendance
- Address:
/view/attendance-mark-new - If it is missing from your menu, your role does not include it. Ask your school admin.
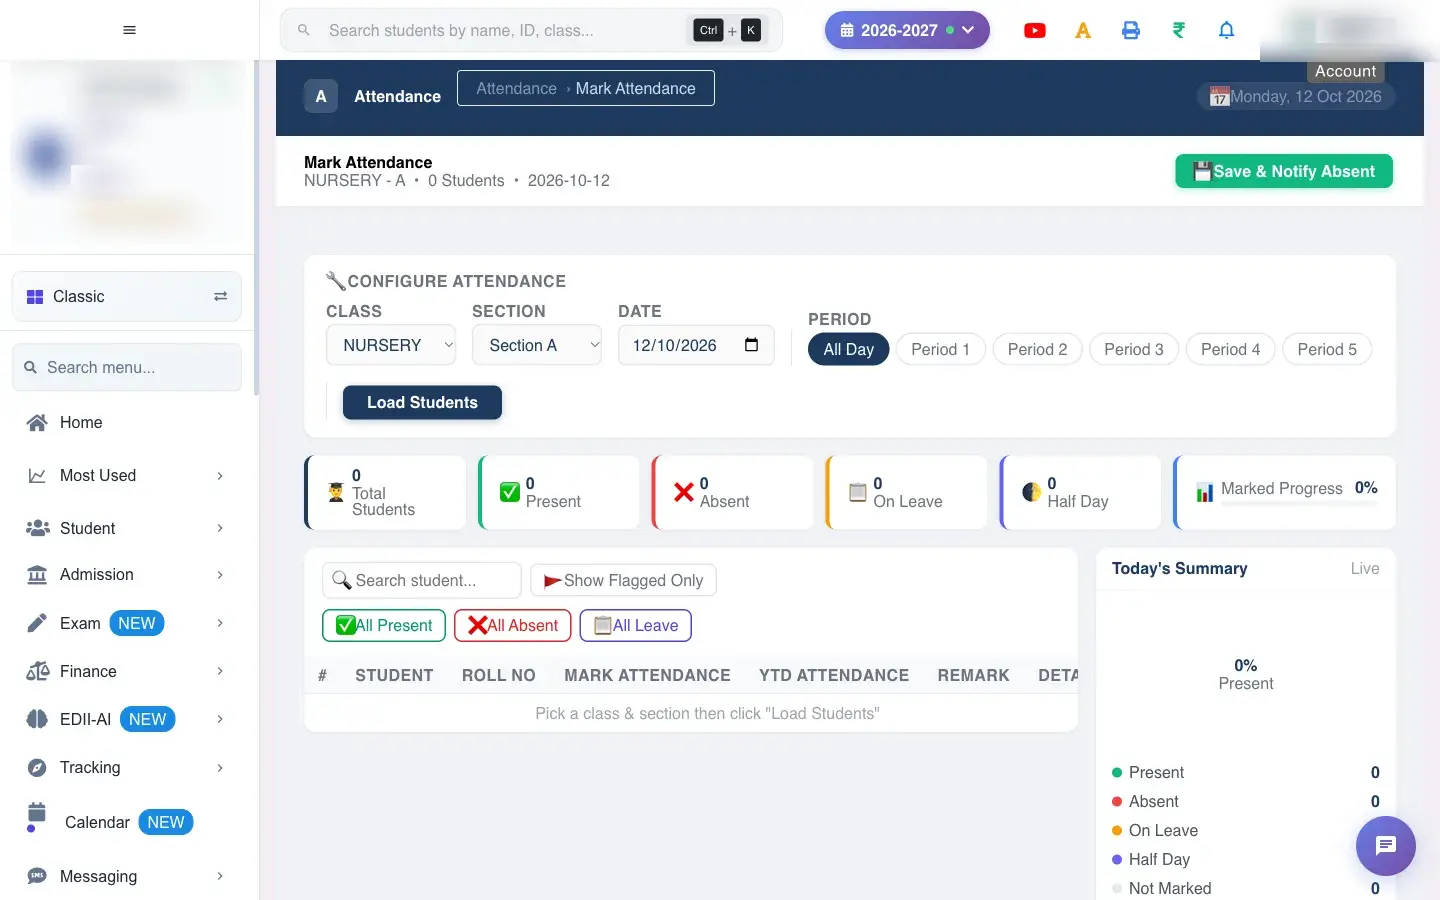 Open a bigger pictureतस्वीर बड़ी करें
Step by step
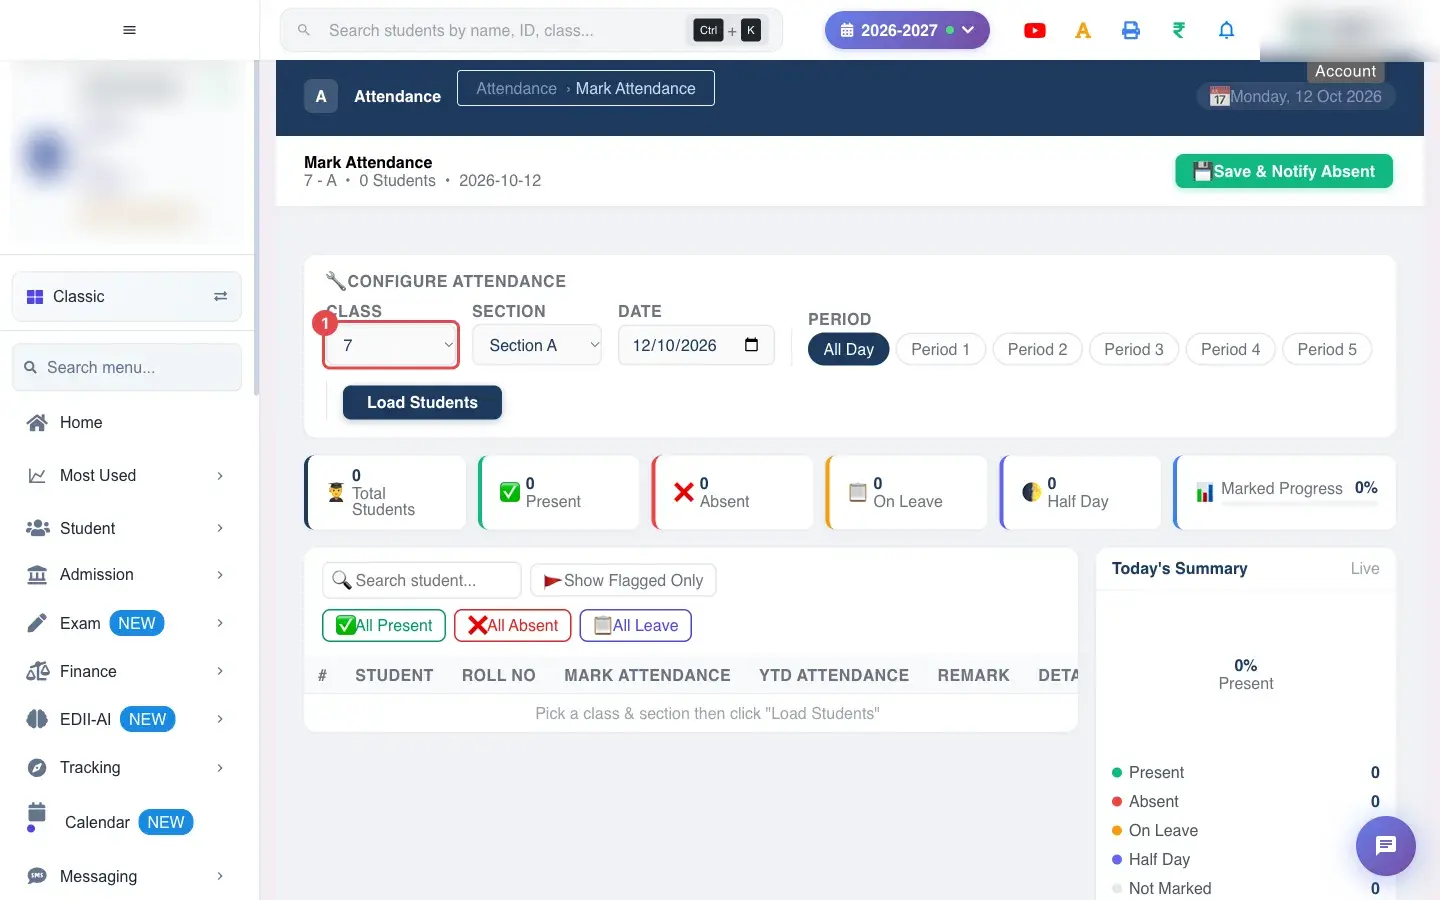
Section titled “Step by step”1. Choose the class
Section titled “1. Choose the class”Open the Class list in Configure Attendance and pick the class. The first class on your list is chosen for you.
 Open a bigger pictureतस्वीर बड़ी करें
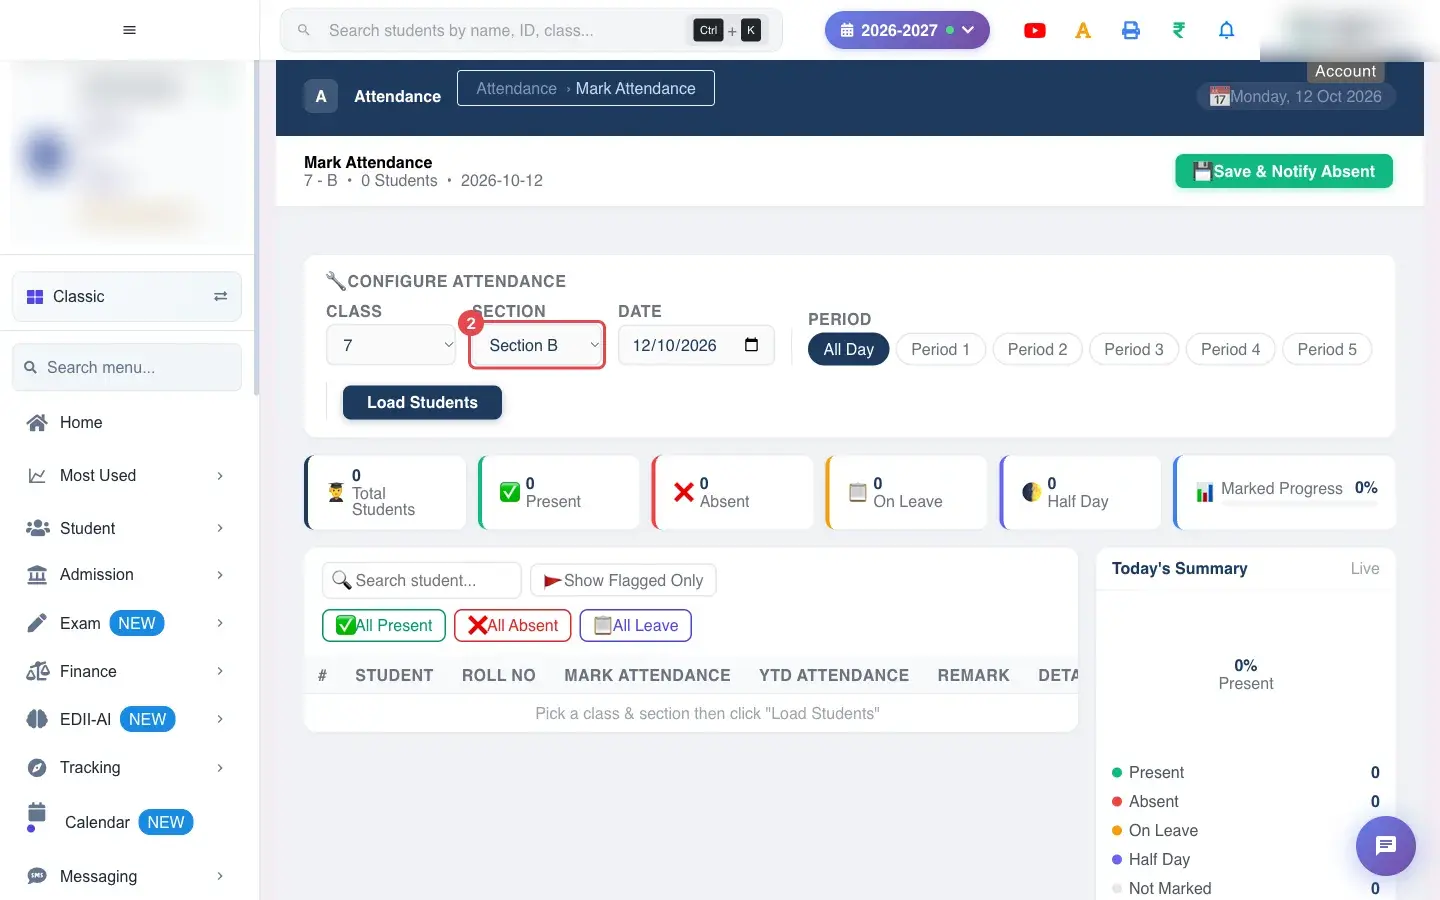
2. Choose the section
Section titled “2. Choose the section”Open Section and pick the section (the list reads Section A, Section B and so on). You must choose both a class and a section, or Load Students will say Select class and section first.
 Open a bigger pictureतस्वीर बड़ी करें
3. Set the date (optional)
Section titled “3. Set the date (optional)”Date is today by default. Change it only to mark or correct another day. The page title under Mark Attendance repeats the class, the number of students and the date, so you can confirm you are on the right day.
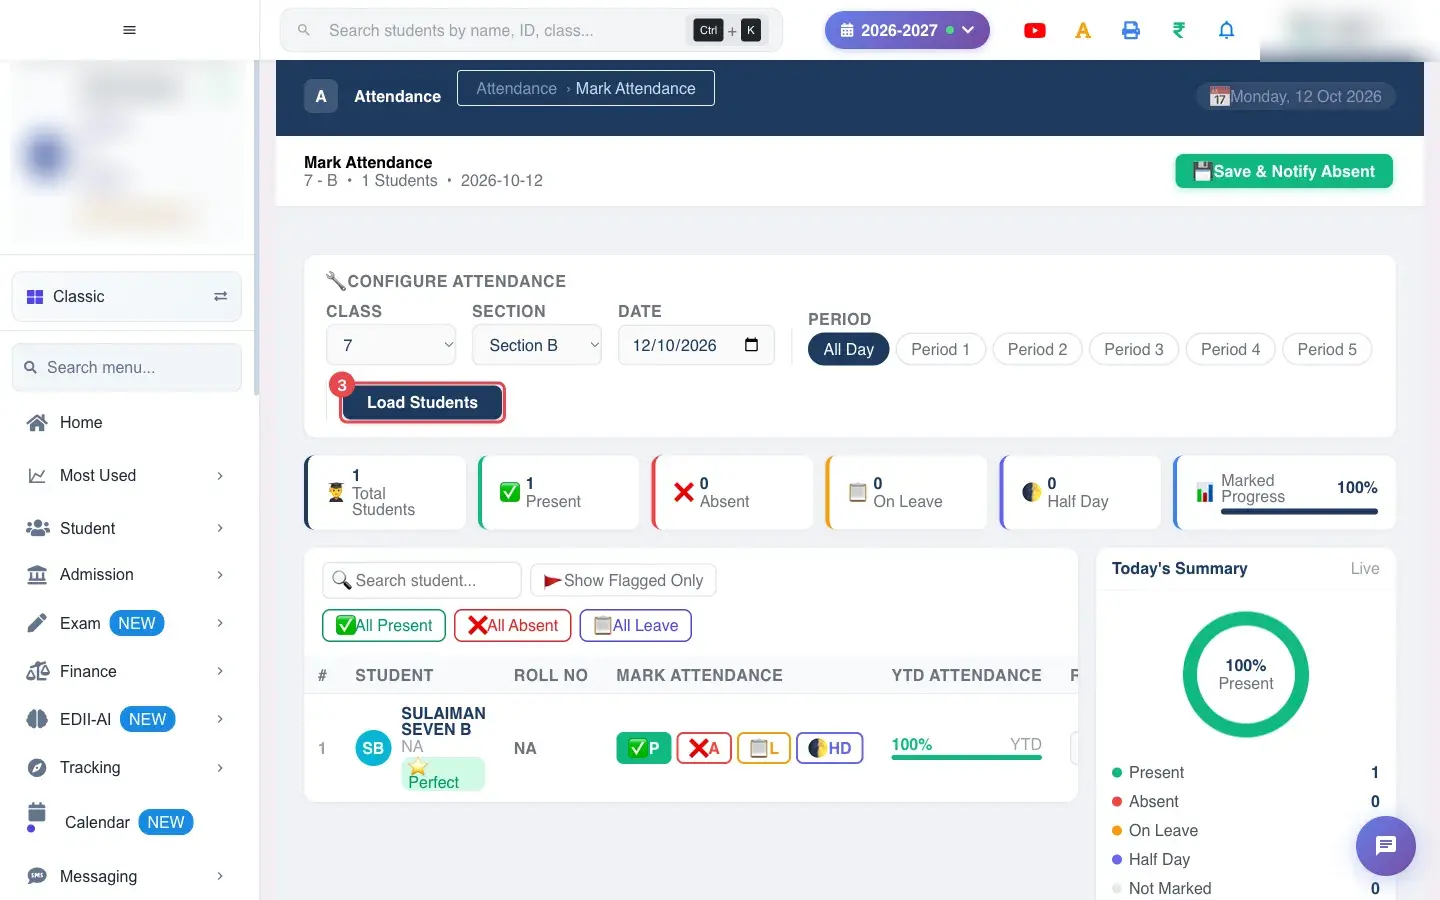
4. Load the students
Section titled “4. Load the students”Select Load Students. The roll appears with one row per student, showing name, roll number, the four attendance buttons, the year-to-date percentage and a remark box. The counters at the top fill in at the same time.
 Open a bigger pictureतस्वीर बड़ी करें
5. Mark each student
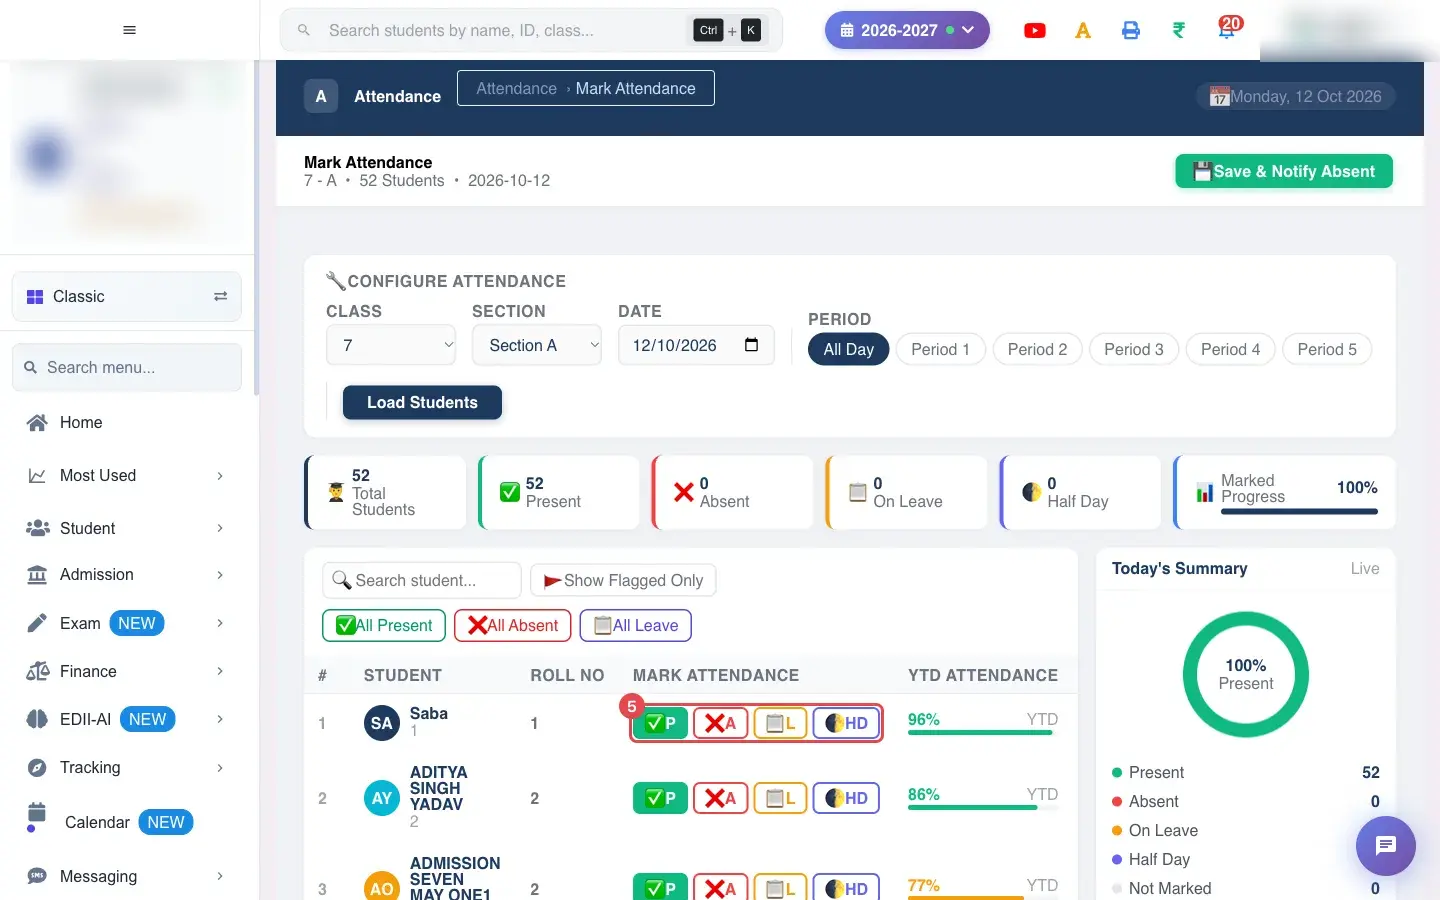
Section titled “5. Mark each student”In the Mark Attendance column each student has four buttons: P (present), A (absent), L (leave) and HD (half day). The selected button is highlighted and the row is tinted: red for absent, amber for leave, blue for half-day.
Everyone starts as present, so only click the children who are not. To change your mind, click another button on the same row.
 Open a bigger pictureतस्वीर बड़ी करें
6. Say why a student is absent
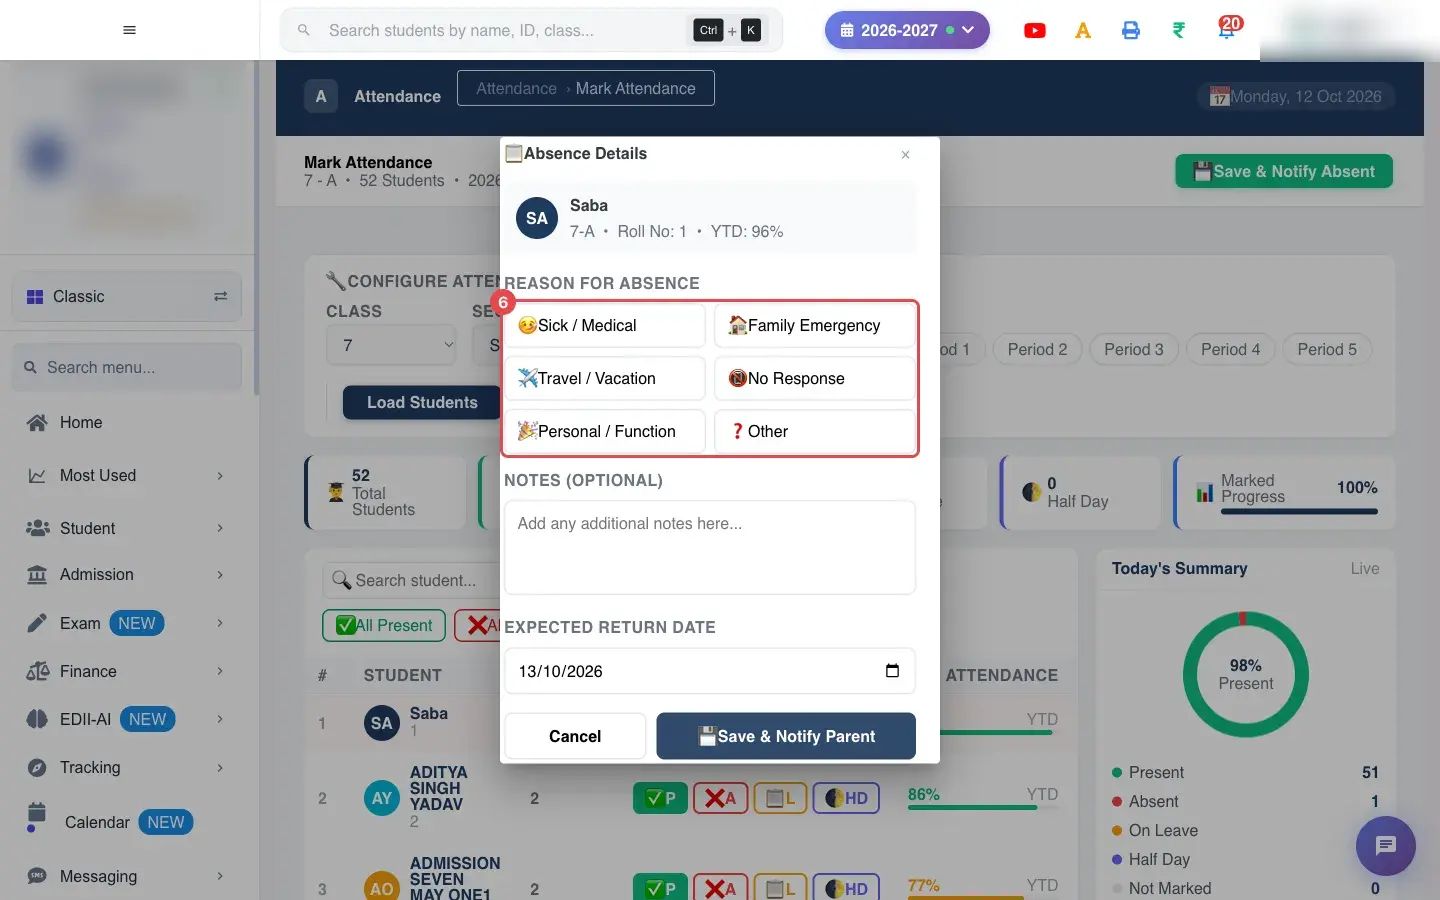
Section titled “6. Say why a student is absent”When you click A on a student who was not absent before, an Absence Details window opens. Pick one reason: Sick / Medical, Family Emergency, Travel / Vacation, No Response, Personal / Function or Other.
 Open a bigger pictureतस्वीर बड़ी करें
7. Add a note and a return date
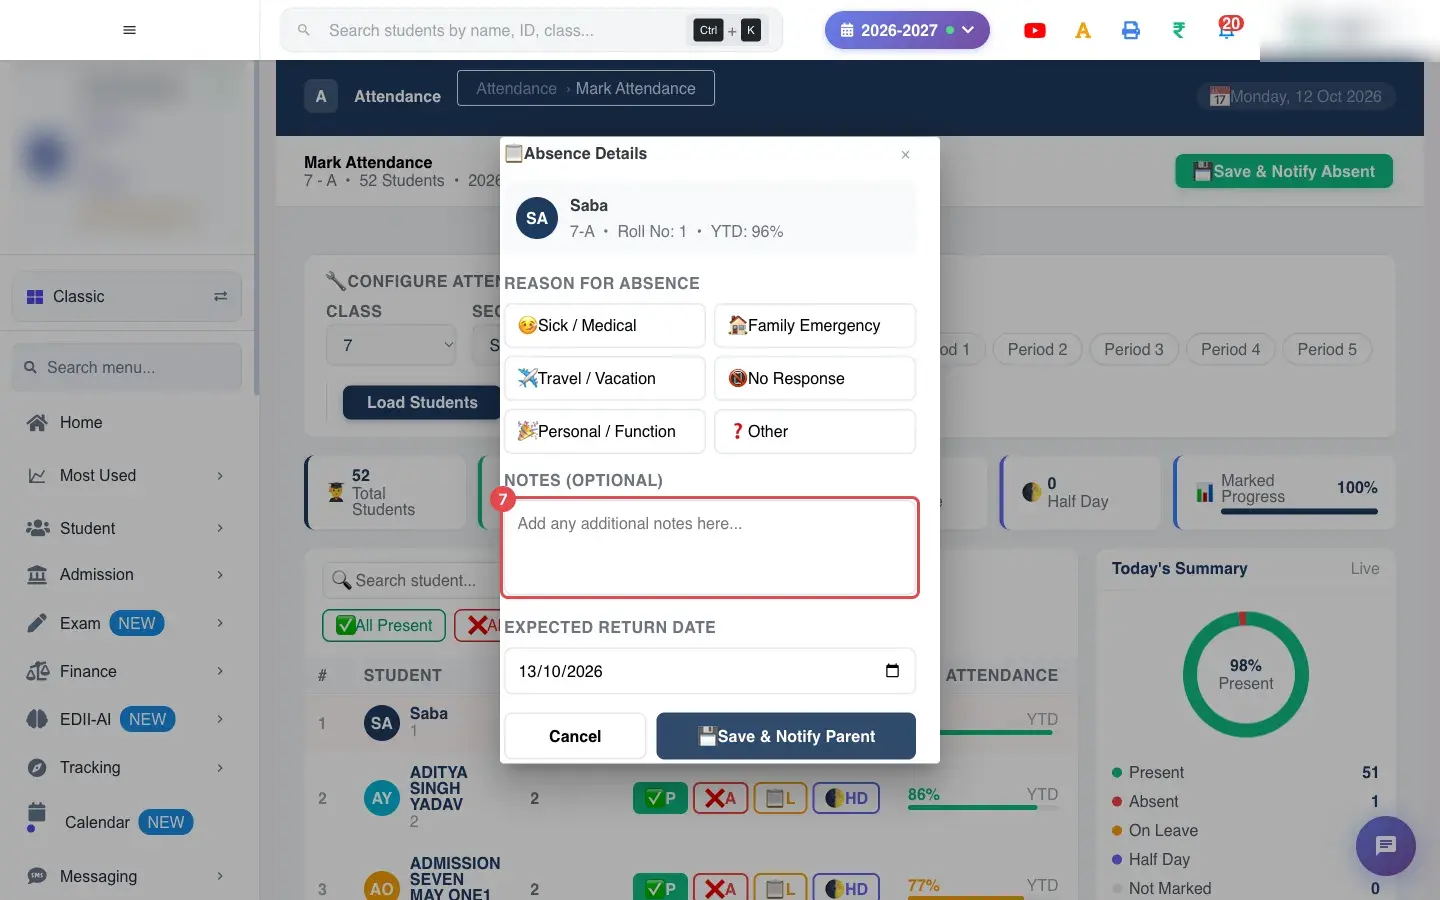
Section titled “7. Add a note and a return date”Add an optional note, for example which teacher the parent spoke to. Expected Return Date is set to tomorrow; change it if the parent told you otherwise. The note is copied into the student’s Remark box on the roll.
 Open a bigger pictureतस्वीर बड़ी करें
8. Save the reason and notify the parent
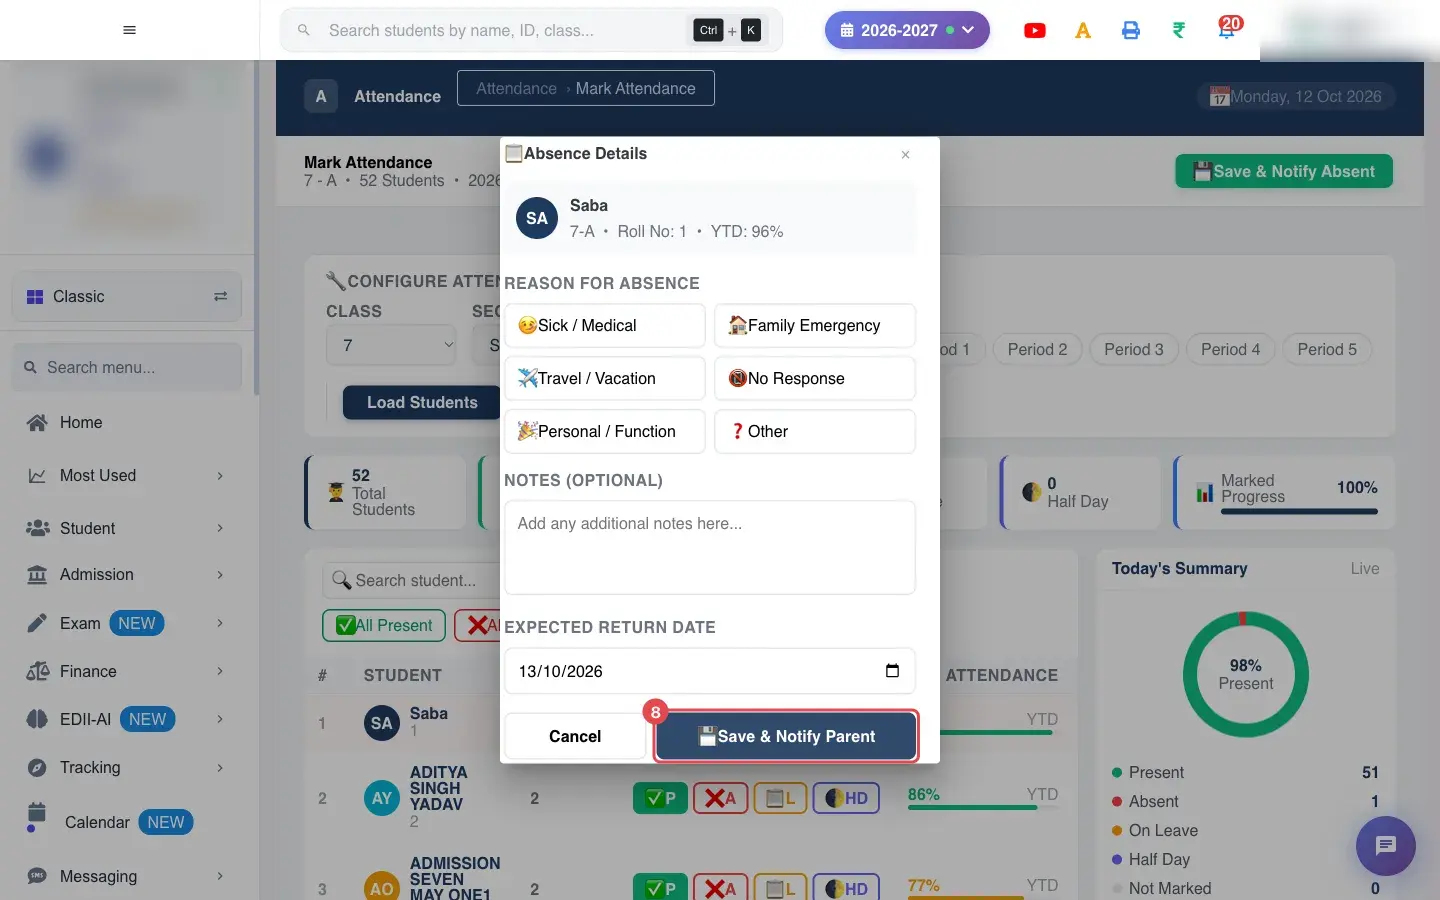
Section titled “8. Save the reason and notify the parent”Select Save & Notify Parent in the window. The reason is stored straight away in Attendance Follow-up, and an SMS is sent to the parent (Dear Parent, your child was marked absent on <date>. Please contact the school office.). Select Cancel to close the window without recording a reason; the student stays marked absent.
 Open a bigger pictureतस्वीर बड़ी करें
9. Mark everyone at once (optional)
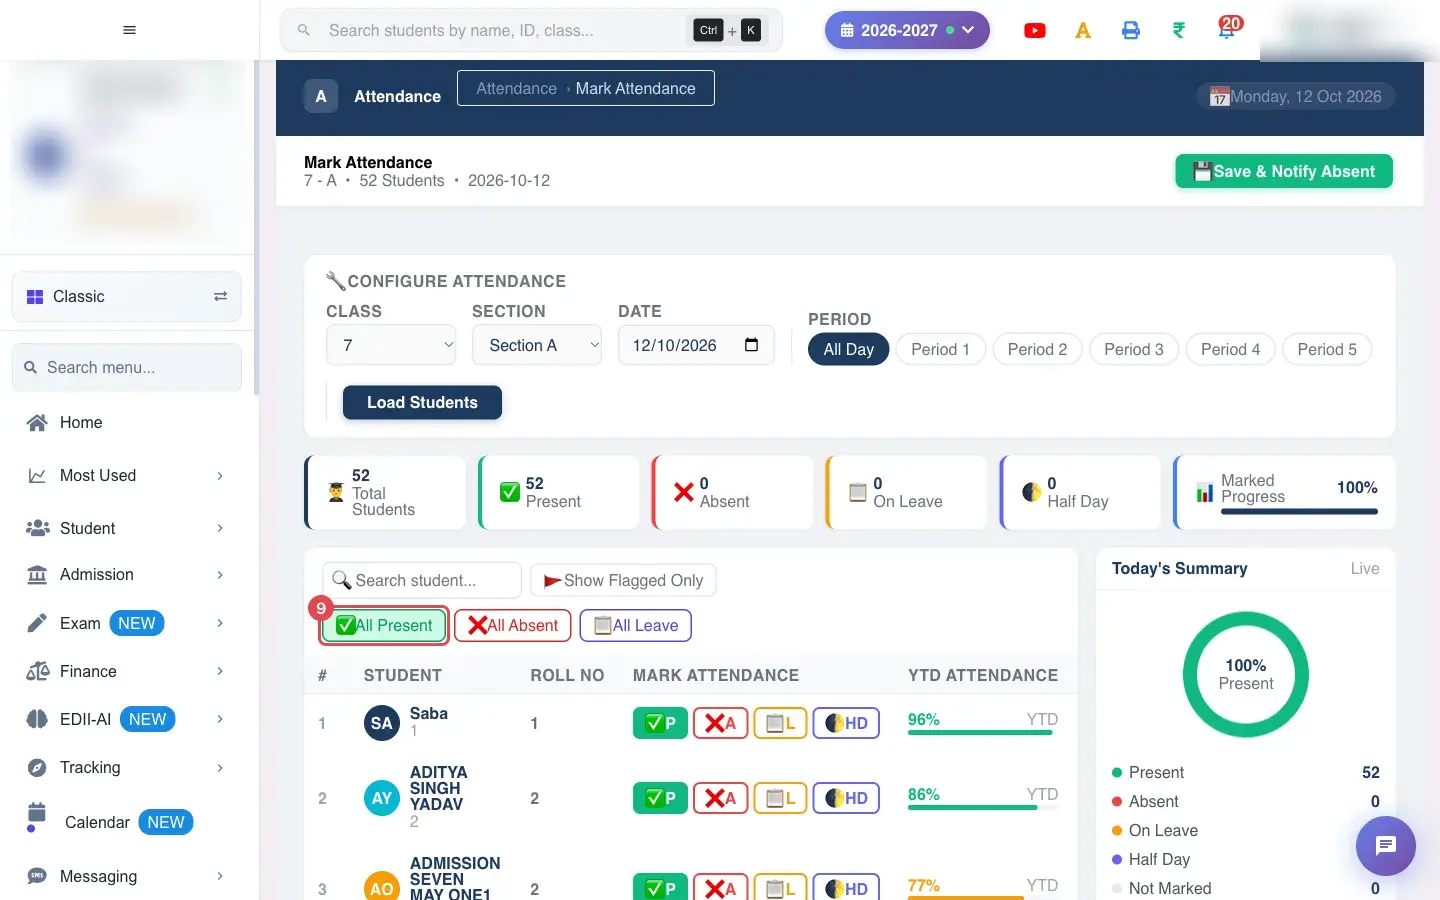
Section titled “9. Mark everyone at once (optional)”Above the roll, All Present, All Absent and All Leave set every student shown to that status in one click. If you have used Search student… or Show Flagged Only, only the students currently listed are changed. Use All Present to clear a wrong mark quickly, then fix individual children.
 Open a bigger pictureतस्वीर बड़ी करें
10. Check the counts
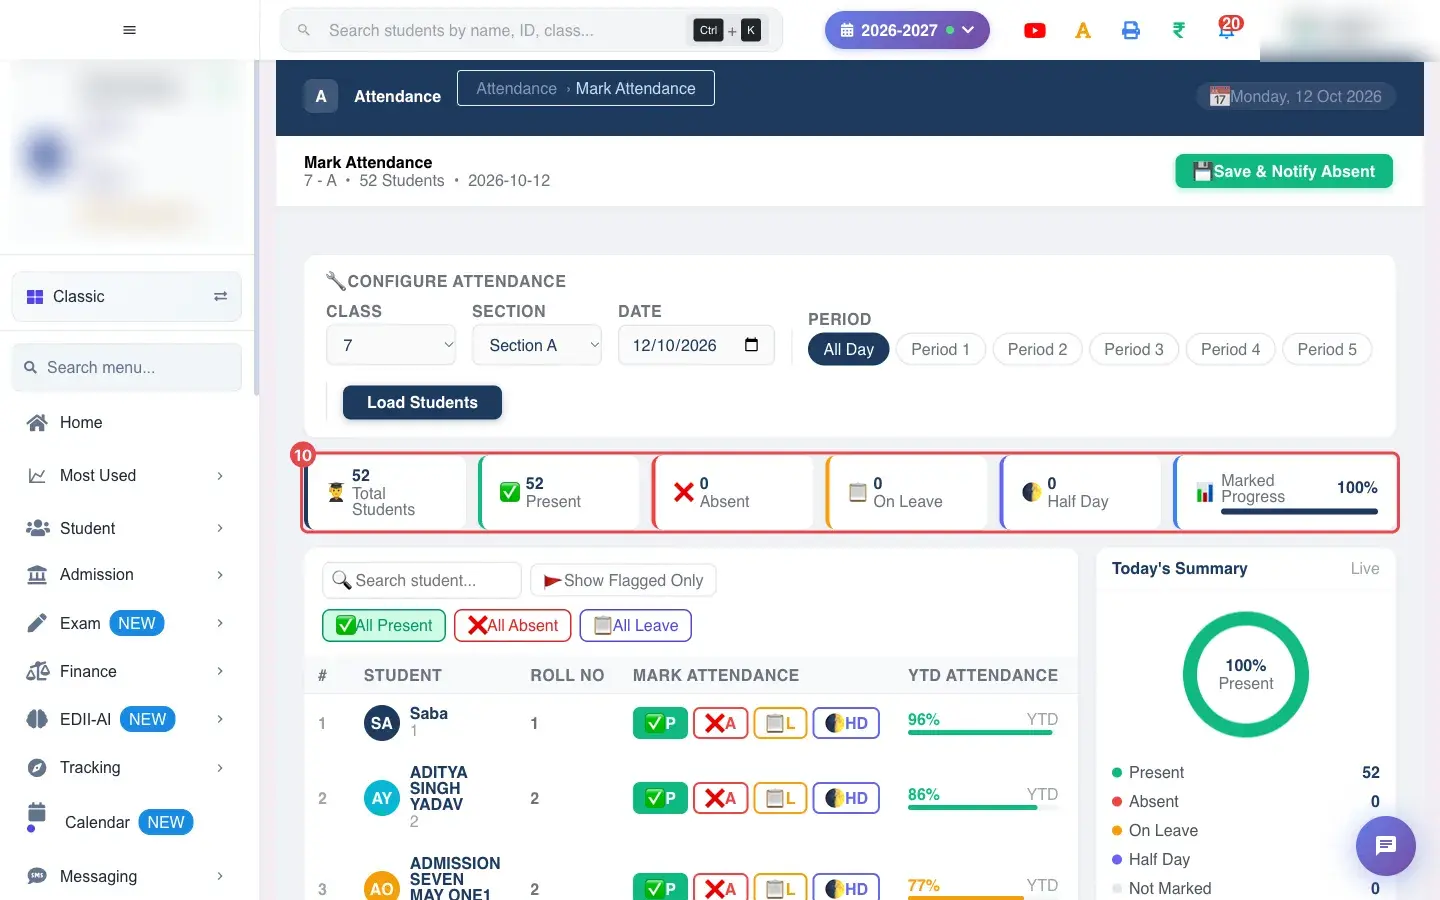
Section titled “10. Check the counts”Before saving, look at the tiles: Total Students, Present, Absent, On Leave, Half Day and Marked Progress. Every student should be marked (100%). The ring on the right shows the percentage present among the students you have marked, and Absent Today lists the absent children by name.
 Open a bigger pictureतस्वीर बड़ी करें
11. Save
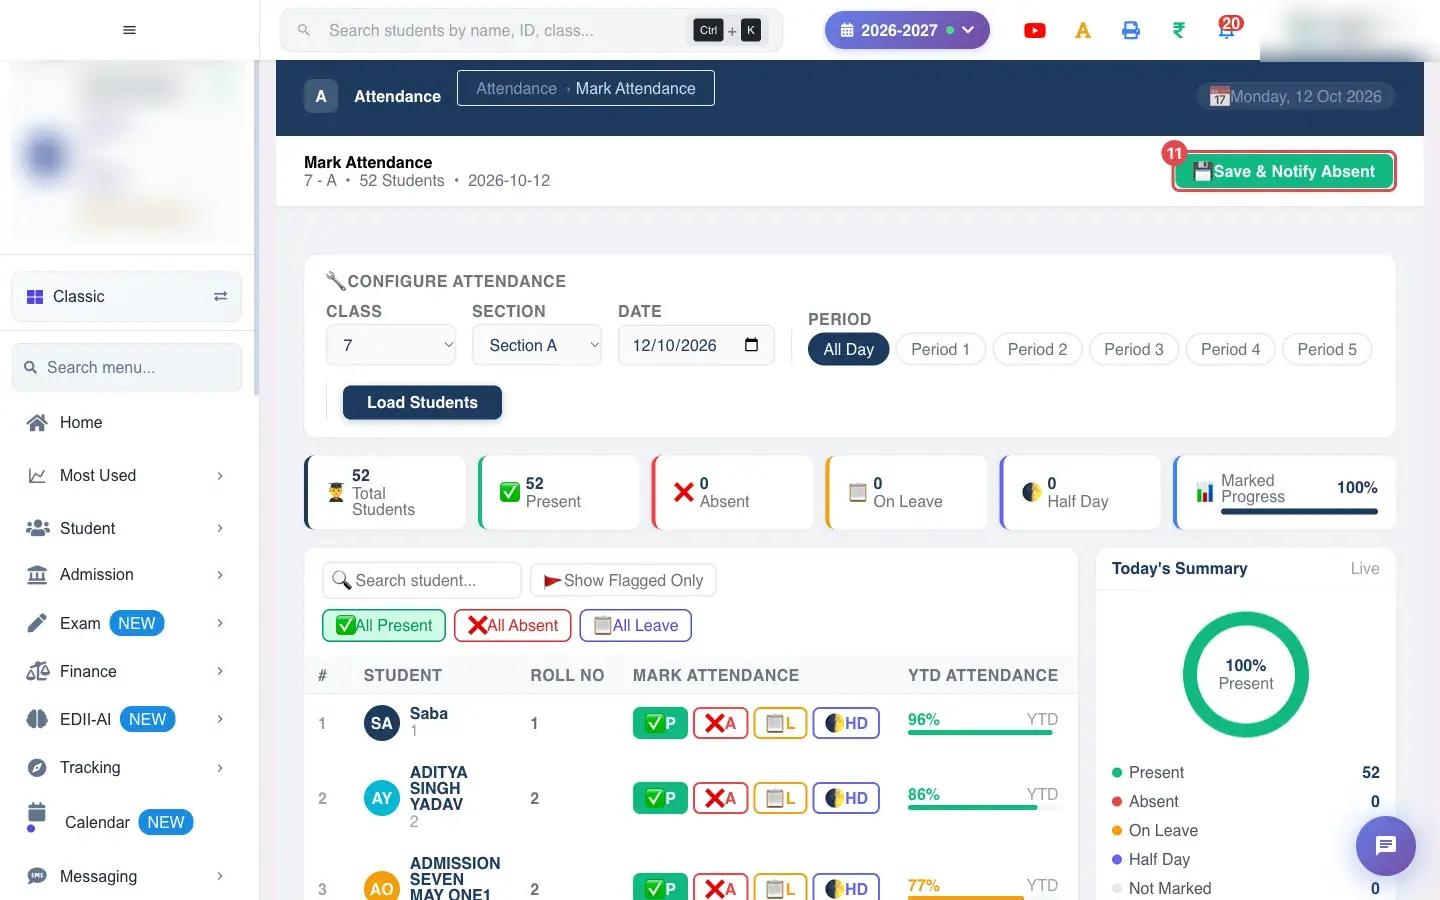
Section titled “11. Save”Select Save & Notify Absent at the top right. A green message, Attendance saved successfully, confirms that the day is stored. The parents of every absent student are notified at the same moment. If nothing is loaded you will see Load students first.
 Open a bigger pictureतस्वीर बड़ी करें
With data
Section titled “With data”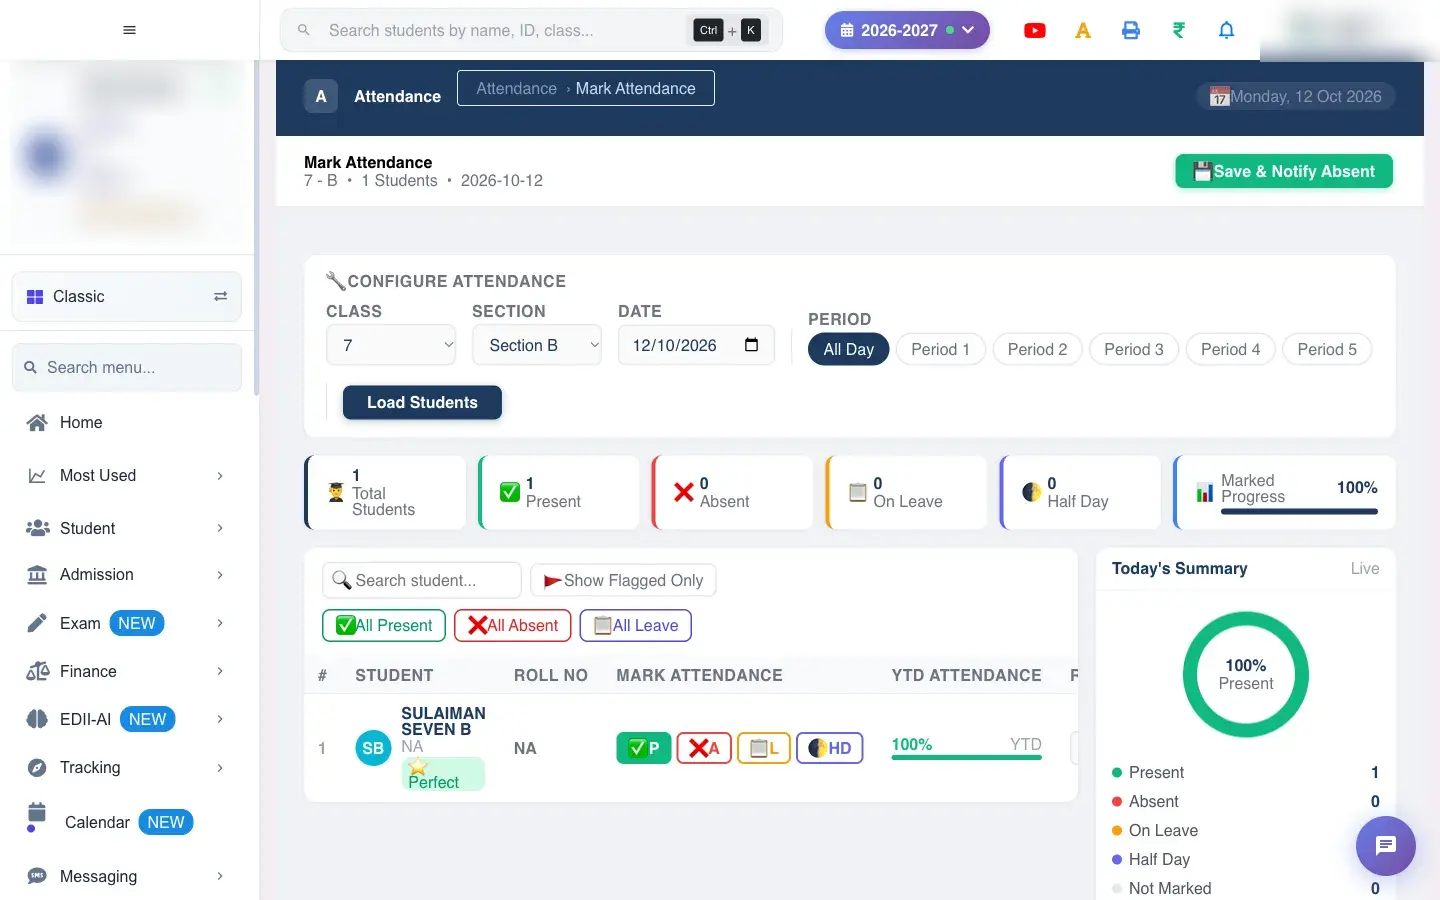 Open a bigger pictureतस्वीर बड़ी करें
Fields and filters
Section titled “Fields and filters”| Field | What it is | Notes |
|---|---|---|
| Class | The class whose attendance you are marking. | Required. Defaults to the first class on your list. |
| Section | The section of that class. | Required. Must be chosen before students can load. |
| Date | The day you are marking. | Defaults to today. Pick another date to correct a past day. |
| Period | Buttons for All Day and Period 1 to Period 5. | Attendance on this screen is saved for the whole day. The period buttons do not store separate period registers. |
| Search student… | Filters the roll by name or roll number as you type. | Hides other rows but does not unmark them. Saving still includes every student. |
| Remark (per student) | A free-text note stored with that student’s attendance for the day. | Filled automatically from the absence note. |
| Reason for Absence | Sick / Medical, Family Emergency, Travel / Vacation, No Response, Personal / Function, Other. | Chosen in the Absence Details window. If you save without picking one, it is recorded as Other. |
| Expected Return Date | When the student is expected back. | Defaults to tomorrow. |
Buttons
Section titled “Buttons”| Button | What it does | What happens next |
|---|---|---|
| Load Students | Fetches the roll for the chosen class, section and date. | The roll and counters appear. Needs both class and section. |
| P / A / L / HD | Marks one student present, absent, on leave or half-day. | Counters, ring and Absent Today update. Choosing A opens the Absence Details window. |
| All Present / All Absent / All Leave | Marks every listed student with one click. | Only affects the rows currently shown, so clear any search or flag filter first if you want the whole class. |
| Show Flagged Only | Shows only students with a flag next to their name: Below 75% (year-to-date attendance under 75%) or Perfect (100% with no absence). | Click again to show everyone. |
| 🔍 (Detail) | Opens that student’s attendance follow-up history. | Takes you to the Attendance Follow-up screen for that student. Save your work first. |
| Save & Notify Absent | Stores the day’s attendance and notifies the parents of absent students. | See After you save below. |
Columns
Section titled “Columns”| Column | Meaning |
|---|---|
| # | Row number in the list you are looking at. |
| Student | Name with a flag when attendance is below 75% (Below 75%) or perfect (Perfect). |
| Roll No | The student’s roll number, or a dash when none is set. |
| Mark Attendance | The P, A, L and HD buttons for that student. |
| YTD Attendance | Present percentage so far this session, with a bar: green from 85%, amber from 75%, red below 75%. |
| Remark | A note saved with today’s attendance. |
| Detail | Opens the student’s follow-up history. |
After you save
Section titled “After you save”- The day’s attendance is stored for the class: students not listed as absent, leave or half-day are recorded as present, and every remark is saved.
- A Last saved time appears and the activity list on the right records what was saved (for example 2 absent, 1 leave, 0 half-day).
- Each absent student gets an entry in Attendance Follow-up. If you recorded a reason the entry starts as reason received; otherwise it is not contacted so someone can call the family.
- With Save & Notify Absent, each absent student’s parent receives an SMS at the number registered for them: Dear Parent, your child was marked absent on <date>. Please contact the school office. Each message is written into the student’s contact log in Attendance Follow-up as Sent, or as Failed when the parent has no registered number or the SMS could not be sent. Delivery also depends on the school’s SMS balance.
- Marking the same class and date again later replaces the earlier record.
Good to know
Section titled “Good to know”- A class and a section are both required before the roll can load.
- Nothing is saved until you press Save & Notify Absent. Changing buttons, searching or filtering only changes what is on screen.
- Search and Show Flagged Only only change what you see; the save covers every loaded student.
- Attendance is stored per day, not per period.
- Leave and half-day can be marked here, and they are stored as leave and half-day (not as absent), so they do not trigger absence messages.
Messages you may see
Section titled “Messages you may see”| Message | What it means | What to do |
|---|---|---|
| New attendance experience is off. Toggle it from Settings. | An information note: the school’s new-attendance setting is off. The screen still opens and works. | Ask an admin to switch the setting on in Settings if you want it to stop appearing. |
| Select class and section first | You pressed Load Students without choosing both. | Choose a class and a section, then load again. |
| Could not load students | The roll could not be fetched, usually a connection problem or the class has no students for the session. | Check the internet and the session in the top bar, then try again. |
| Load students first | You pressed Save before loading a class. | Press Load Students, mark attendance, then save. |
| Attendance saved successfully | The day has been stored. | Nothing to do. |
| Notifying parents of … absent students | The notifications for absent students are being sent. | Nothing to do. |
| Could not save attendance | The save did not reach EDII. | Check the internet and press Save & Notify Absent again. Your marks stay on screen. |
| Attendance reset | All marks, reasons and notes on screen were cleared. | Mark the class again; nothing was saved or deleted. |
- Mark attendance early in the first period so absence messages reach parents while they can still act on them.
- Use Show Flagged Only to see which children are below 75% before you call their parents.
- If you marked the wrong child absent, click P on that row, then save again.
- Record a reason whenever a parent tells you why: it saves the follow-up team a call.
Stuck? Try this
Section titled “Stuck? Try this”| Problem | Likely cause | What to do |
|---|---|---|
| I can’t find my class or section | The lists only show classes and sections your role can access. | Ask an admin to check your class and section access under Users and Roles. |
| Every student is Present after loading | Nothing was saved for that day yet, so everyone starts as present. | Mark the absent students, then save. |
| Parents did not get a message | The day was saved with the plain save, or the SMS settings or balance do not allow sending. | Save with Save & Notify Absent. Then open Attendance Follow-up and look at the student’s contact log: Failed means the parent has no registered mobile number or the SMS could not be sent. Also ask an admin to check the SMS balance. |
| I saved the wrong day | The date was not changed before loading. | Pick the correct date, load the class, mark, and save again. The latest save replaces the earlier one for that date. |
Did this page help?क्या इस पेज से मदद मिली?
Thanks! Glad it helped.धन्यवाद! अच्छा लगा कि काम बन गया।
Sorry about that. Ask in your own words, or write to us.माफ़ कीजिए। अपने शब्दों में पूछें, या हमें लिखें।