
Screen guide · Web app
Fee Receipts by date range
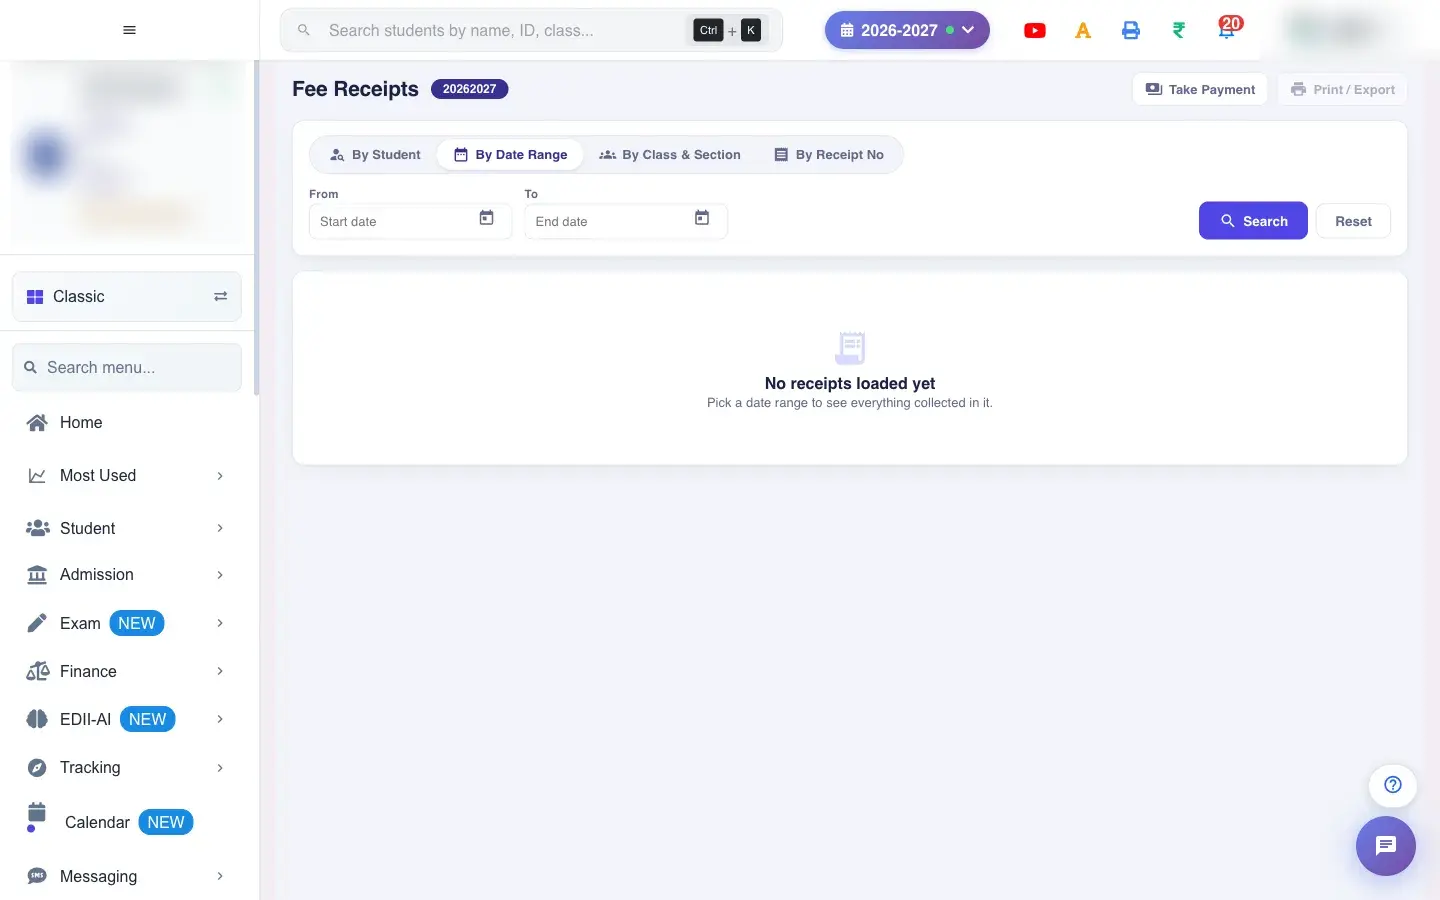
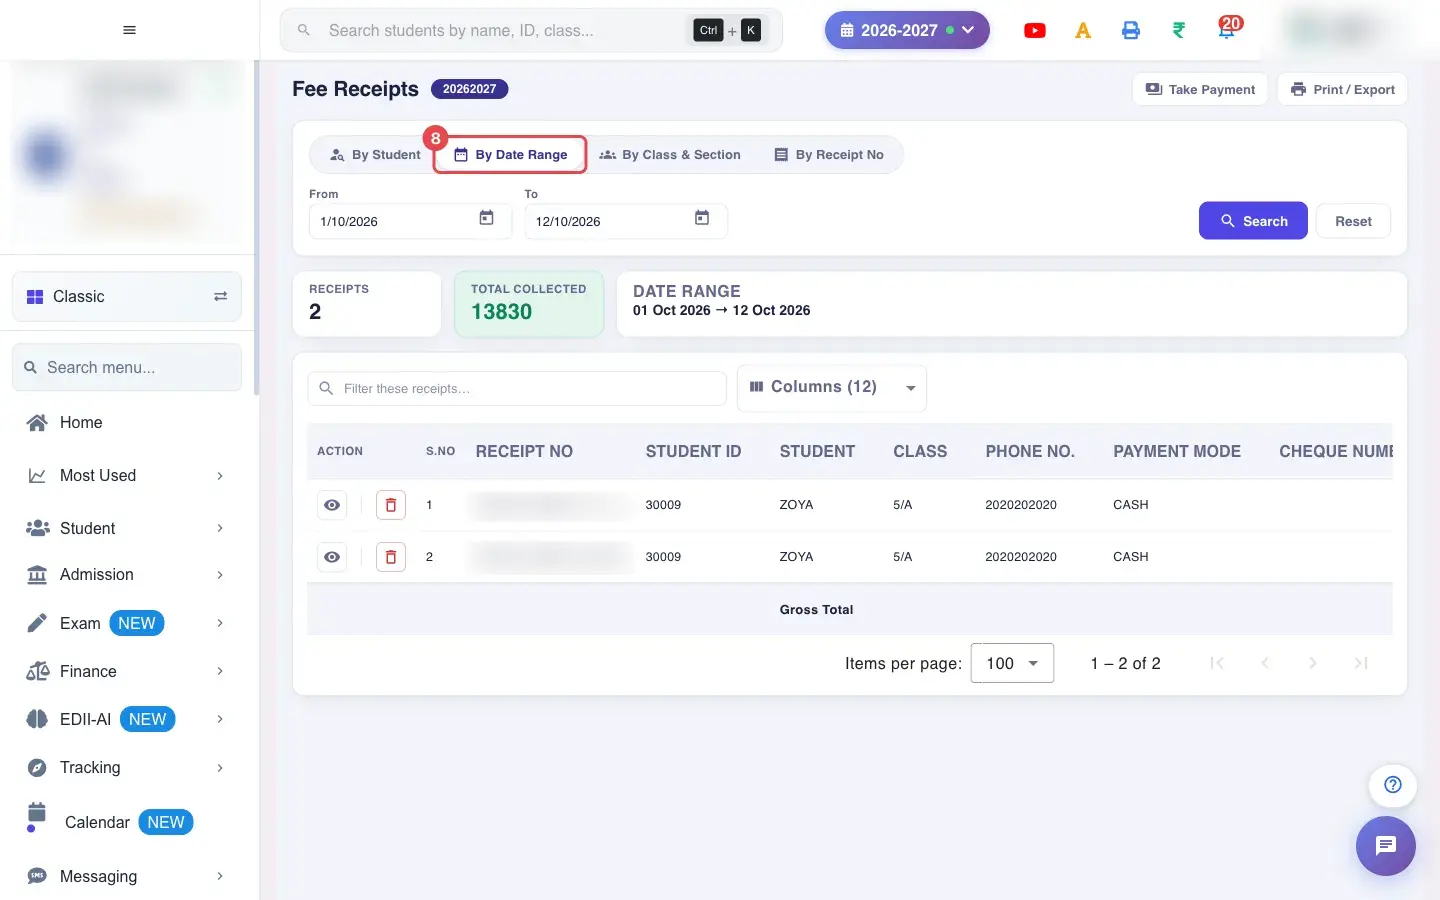
The Fee Receipts screen opened from the Report menu on the By Date Range tab: list every receipt collected between two dates.
यह पेज अंग्रेज़ी में है। कुछ समझ न आए तो ।
This address opens the same Fee Receipts screen as Finance › Fee Receipts. The By Date Range tab is ready for you: pick From and To, press Search, and every receipt collected in that period appears with Total Collected. The other tabs (By Student, By Class & Section, By Receipt No) work exactly as on the Fee Receipts page.
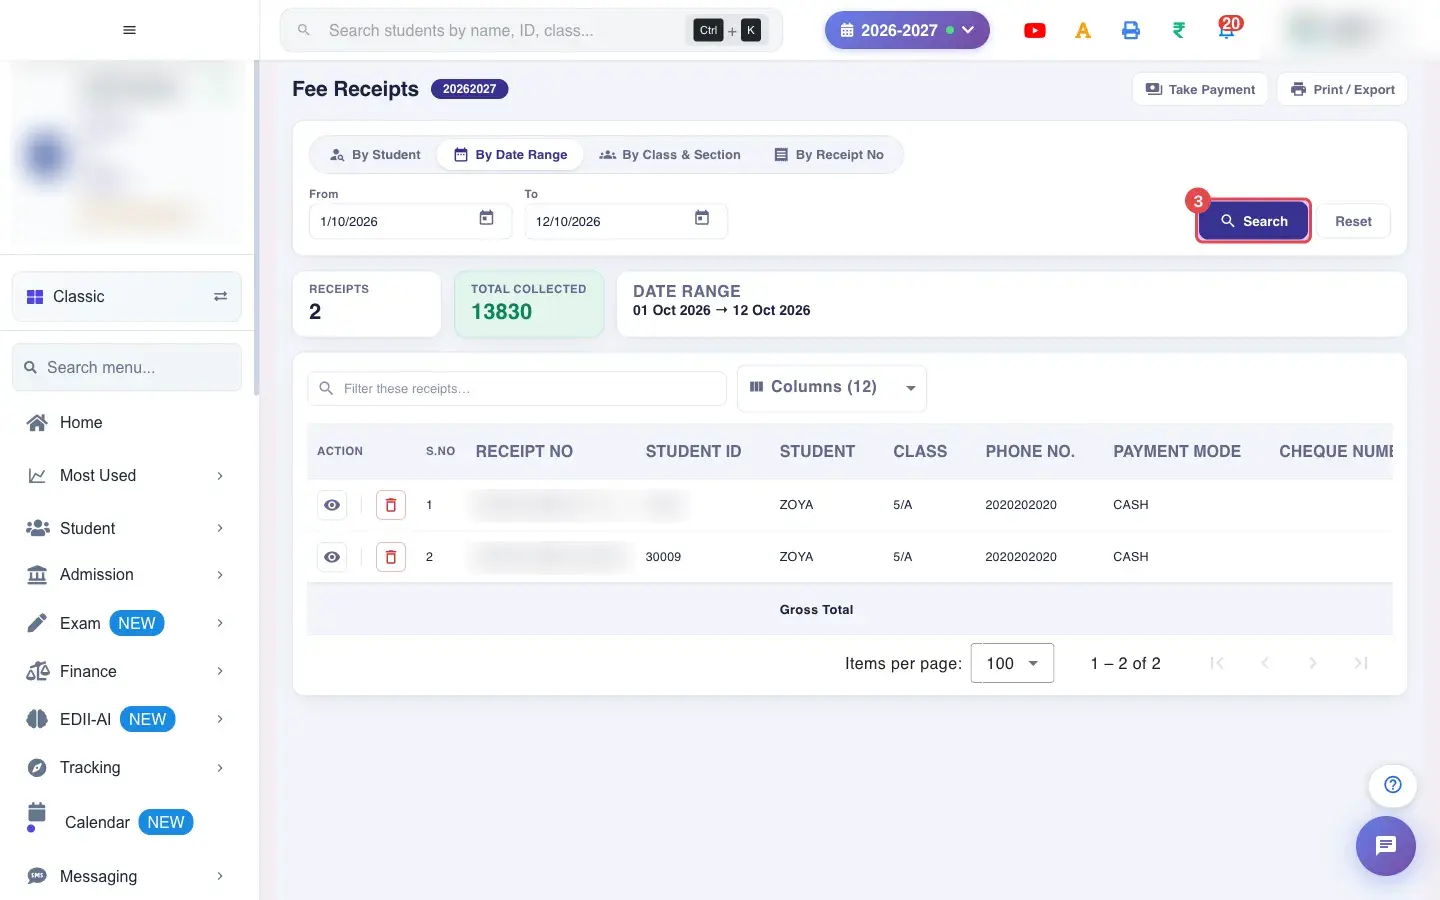
The results table shows each receipt with its numbers, payer, mode, month, date and amount, and a Total Collected figure for what is shown. Each row has View (the receipt) and Delete.
Who uses it and when
Section titled “Who uses it and when”The accountant uses it to reprint a lost receipt, to reconcile the day’s cash, and to correct a receipt made in error.
Before you start
Section titled “Before you start”- Pick the tab that matches what you know. For By Student, type enough of the name, ID or roll number to choose the student.
Where to find it
Section titled “Where to find it”- This screen opens from another screen, not from the menu.
- Address:
/view/fees-report-date - If it is missing from your menu, your role does not include it. Ask your school admin.
 Open a bigger pictureतस्वीर बड़ी करें
Step by step
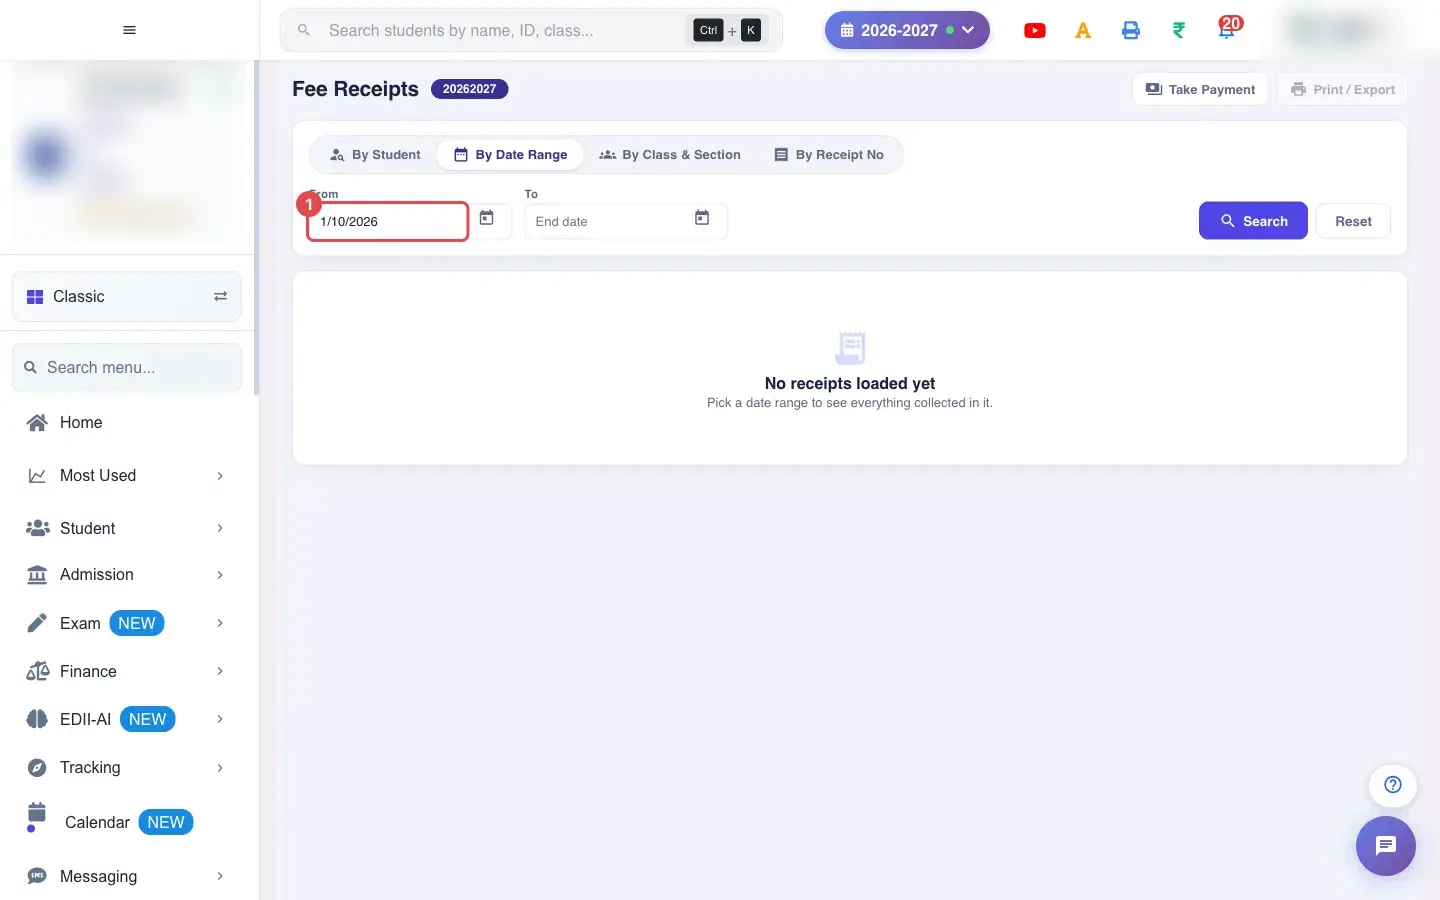
Section titled “Step by step”1. Pick a date in From
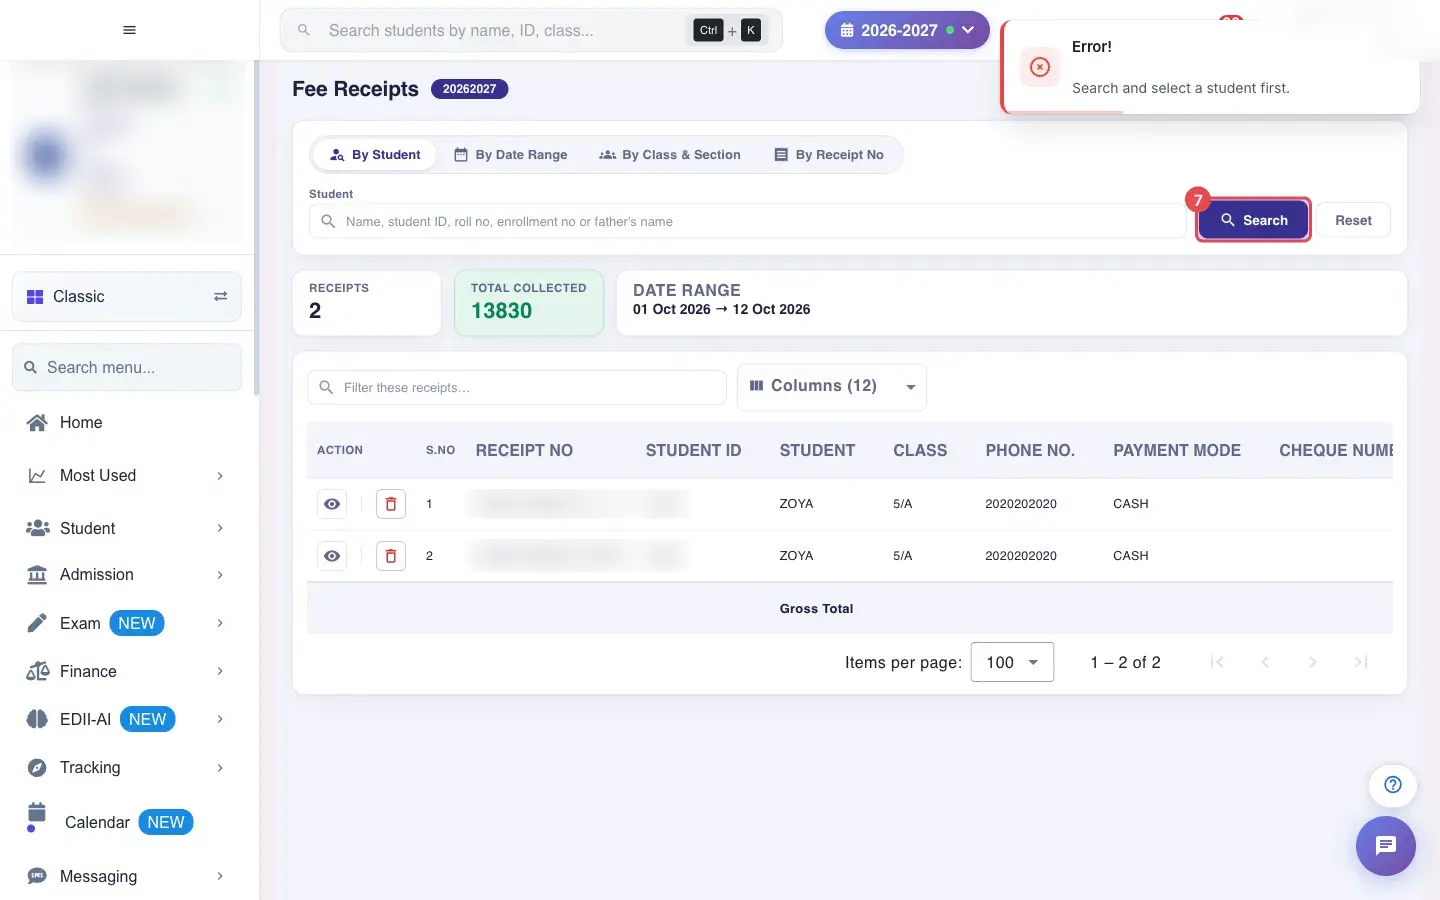
Section titled “1. Pick a date in From”By Student: select Search after choosing the student. Search and select a student first. appears if you forgot.
 Open a bigger pictureतस्वीर बड़ी करें
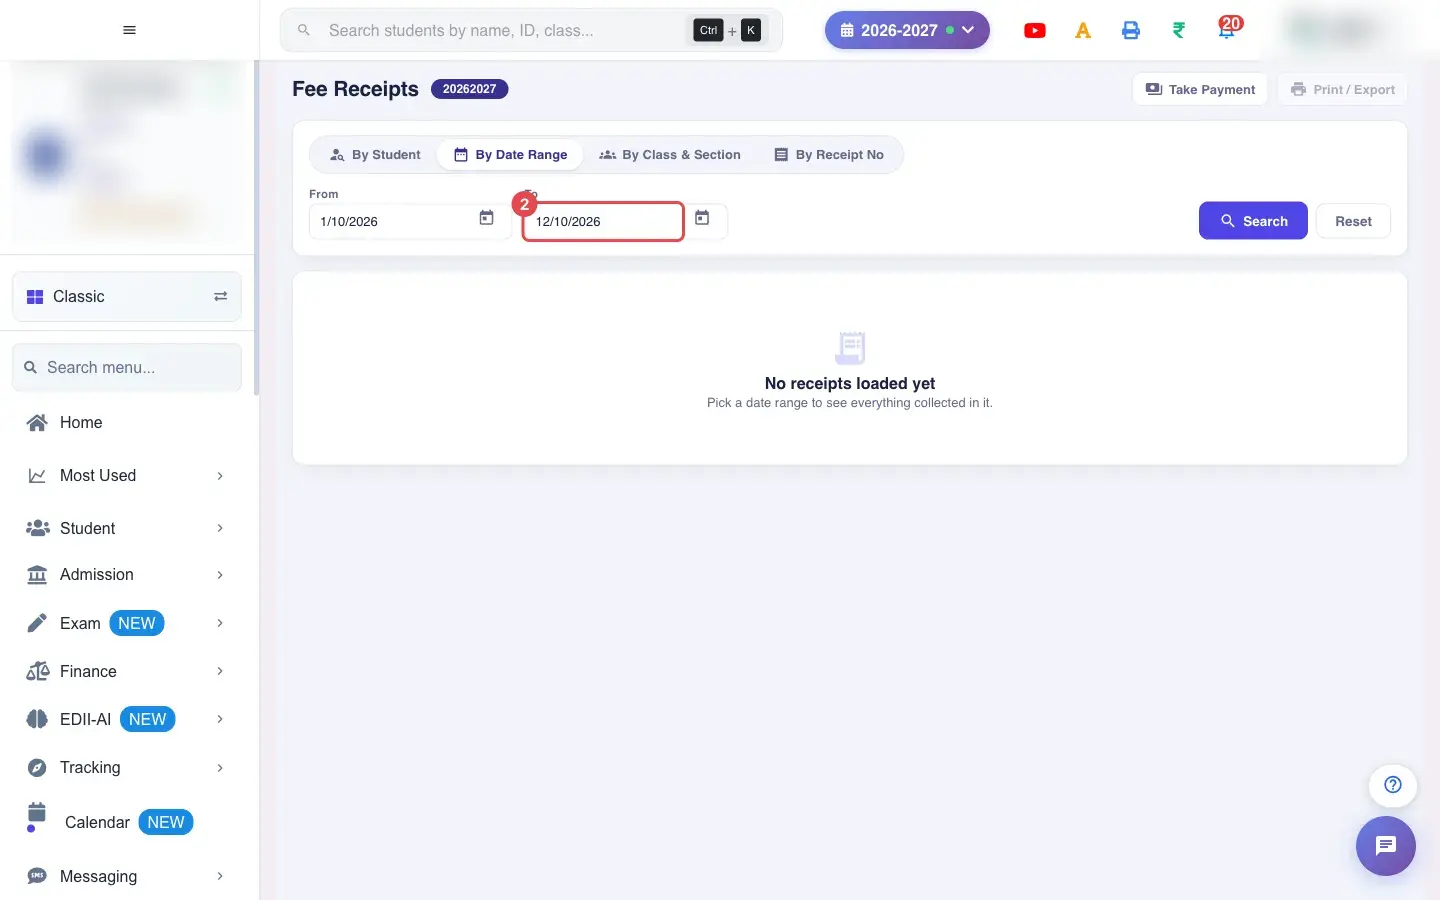
2. Pick a date in To
Section titled “2. Pick a date in To”Open By Date Range.
 Open a bigger pictureतस्वीर बड़ी करें
3. Select Search
Section titled “3. Select Search”Pick From date.
 Open a bigger pictureतस्वीर बड़ी करें
4. Open the By Student tab
Section titled “4. Open the By Student tab”Pick To date.
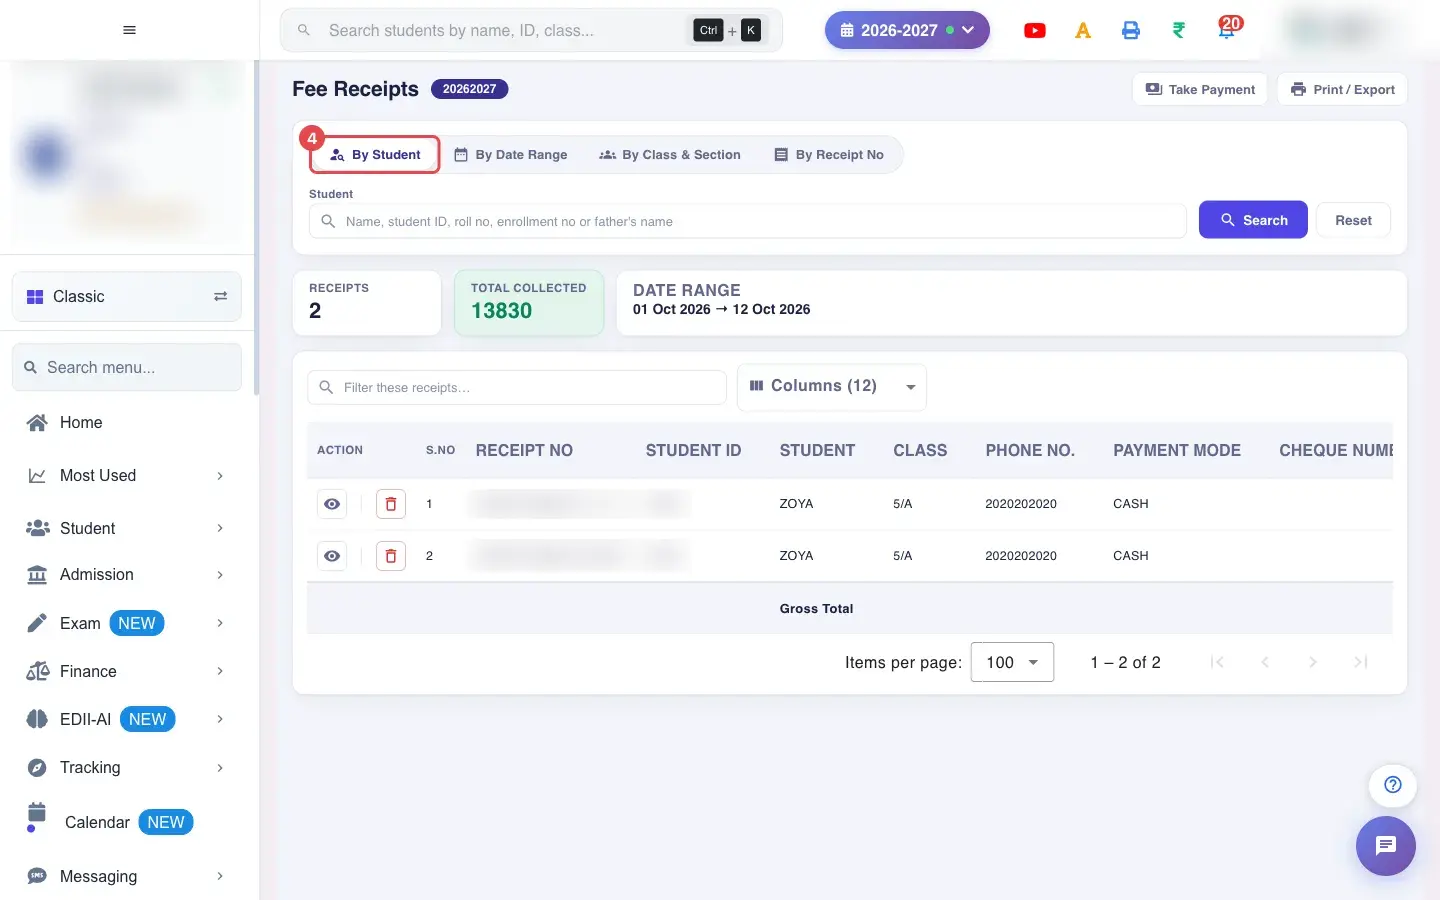 Open a bigger pictureतस्वीर बड़ी करें
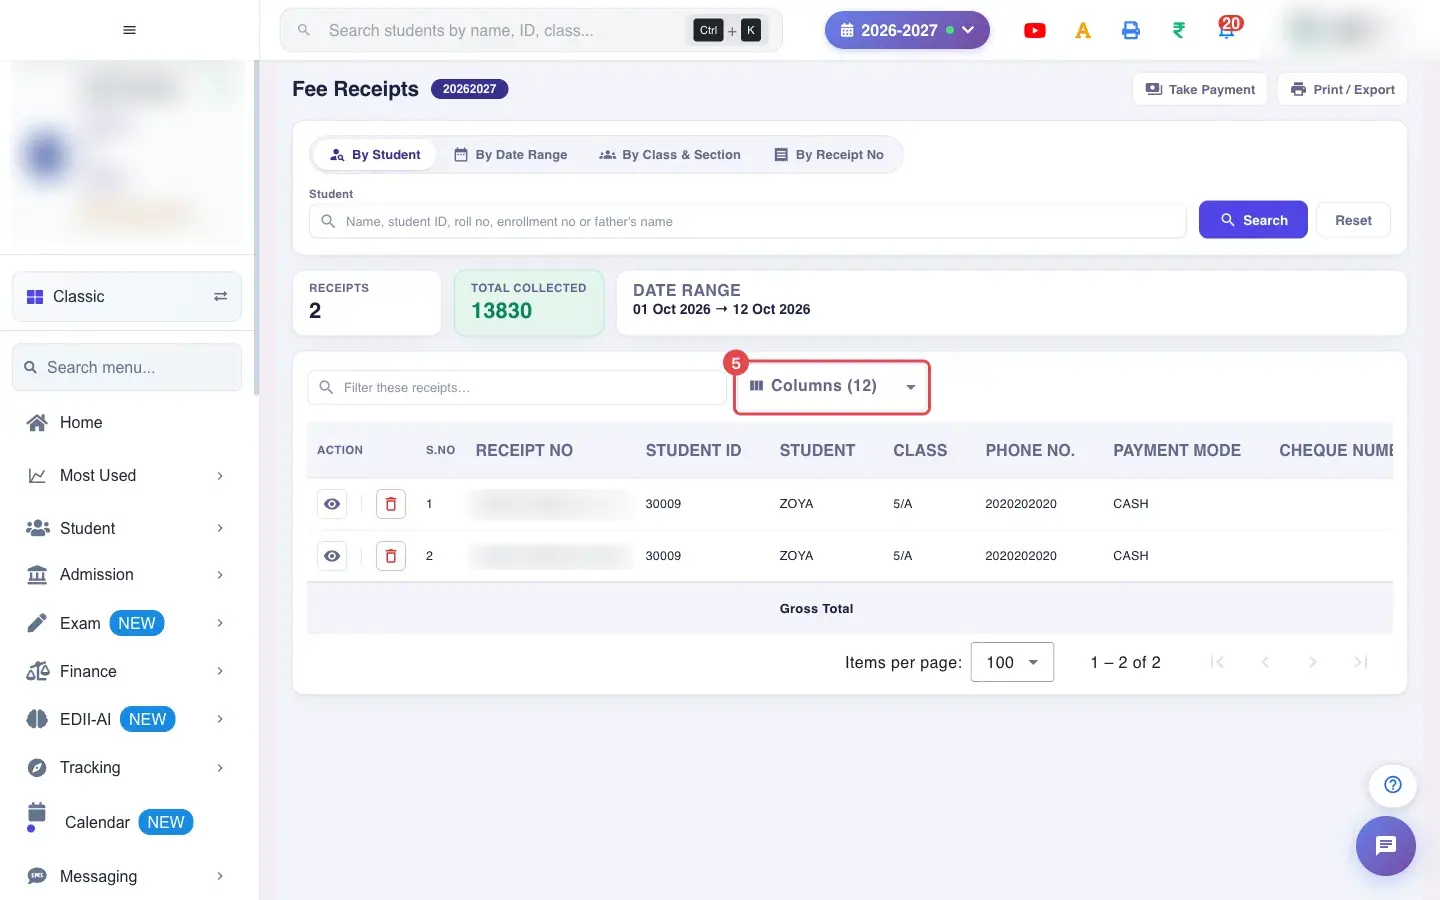
5. Choose Columns (for example view_column
Section titled “5. Choose Columns (for example view_column”Columns (12))
Select Search. You must pick both dates (Select both a start date and an end date.).
 Open a bigger pictureतस्वीर बड़ी करें
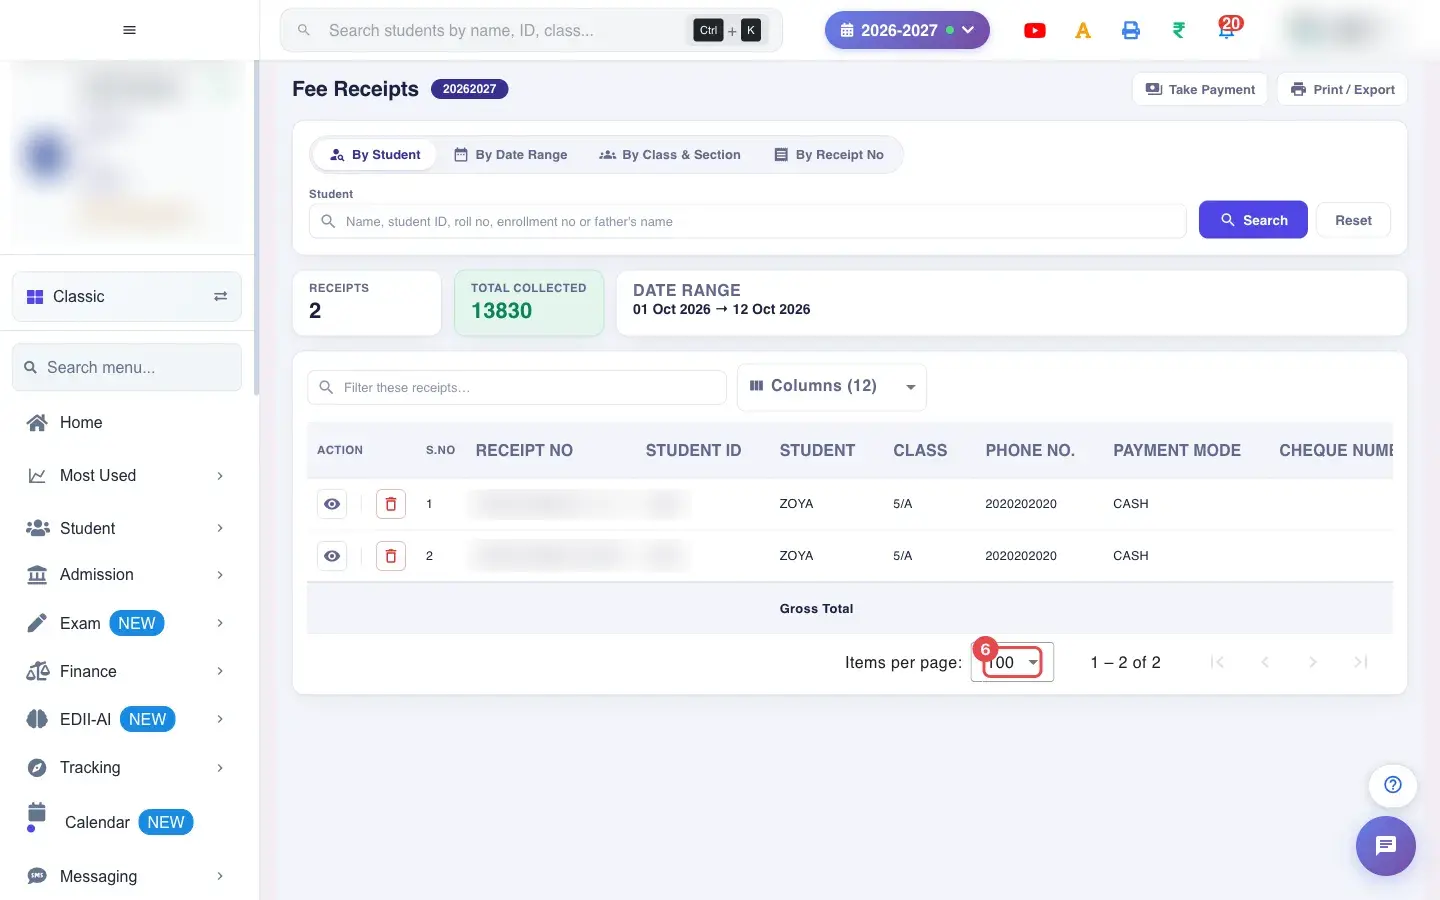
6. Choose 100 (for example 100)
Section titled “6. Choose 100 (for example 100)”Open By Class & Section.
 Open a bigger pictureतस्वीर बड़ी करें
7. Select Search
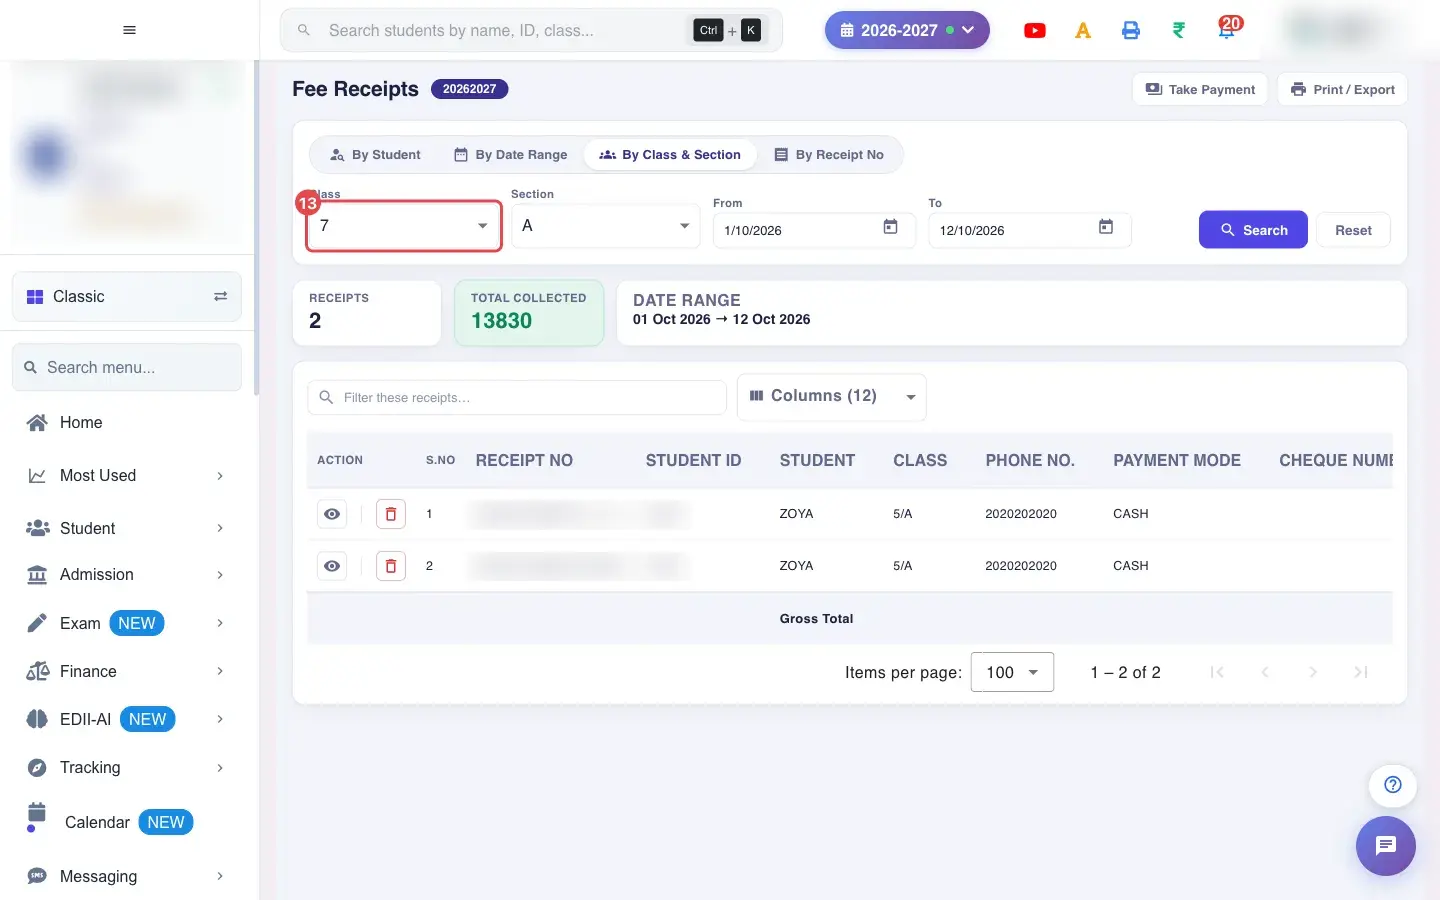
Section titled “7. Select Search”Choose the Class.
 Open a bigger pictureतस्वीर बड़ी करें
8. Open the By Date Range tab
Section titled “8. Open the By Date Range tab”Choose the Section.
 Open a bigger pictureतस्वीर बड़ी करें
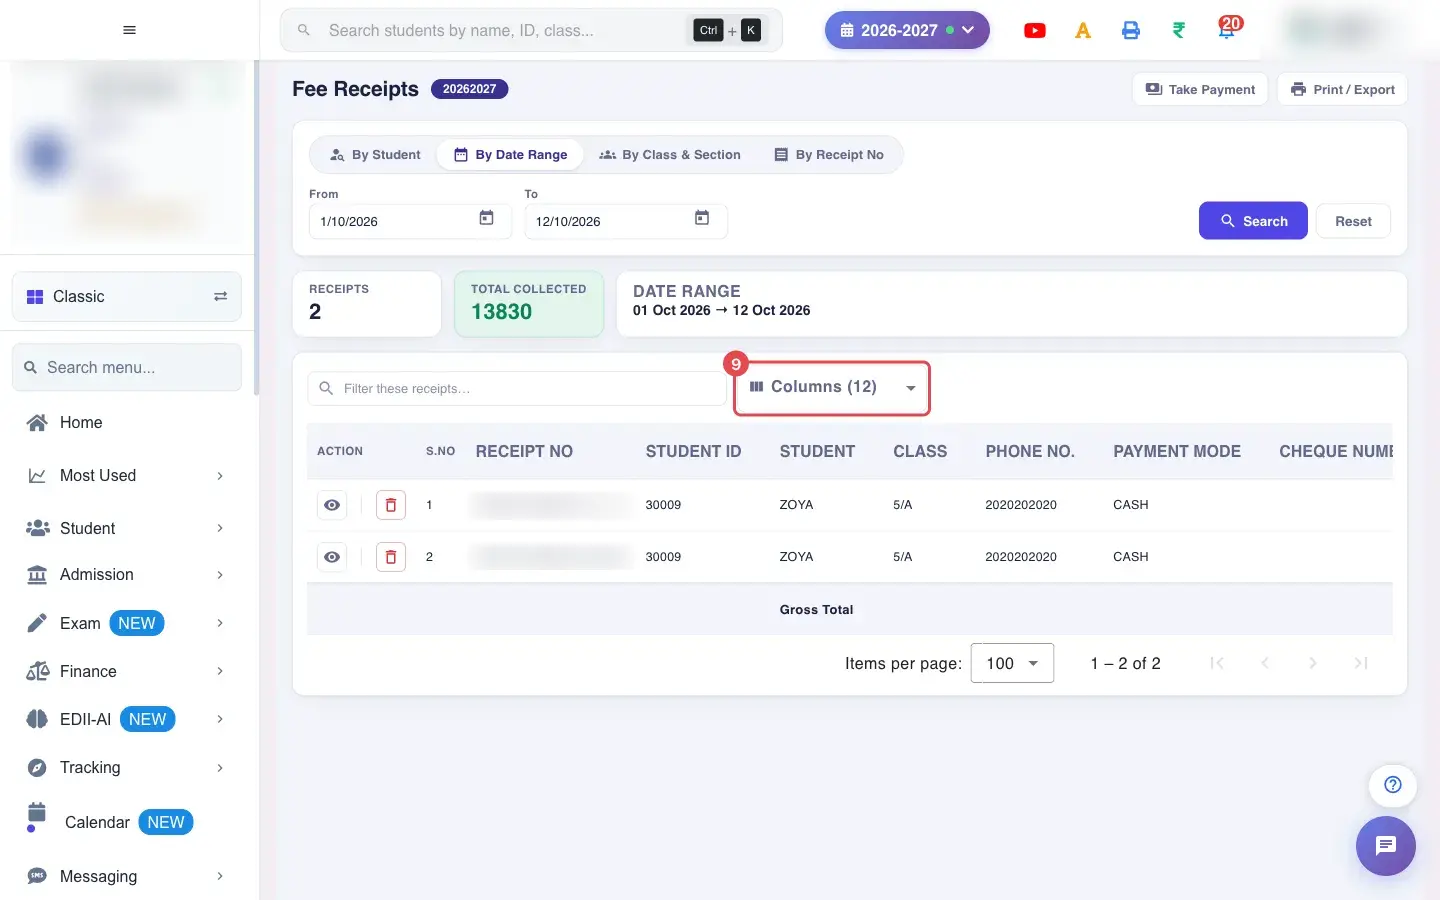
9. Choose Columns (for example view_column
Section titled “9. Choose Columns (for example view_column”Columns (12))
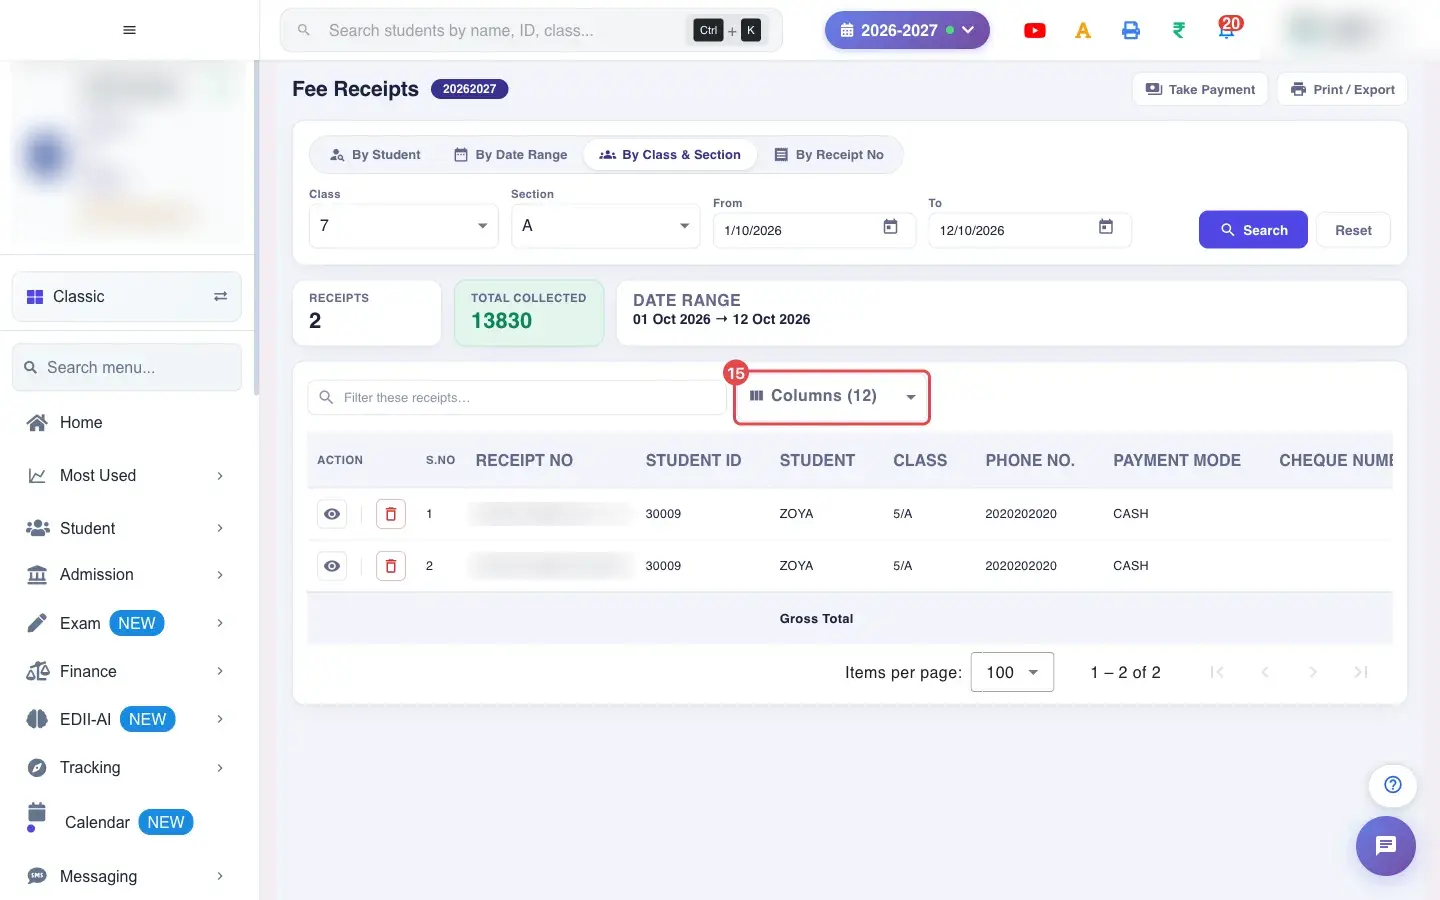
Columns chooses which columns the table shows (12 by default).
 Open a bigger pictureतस्वीर बड़ी करें
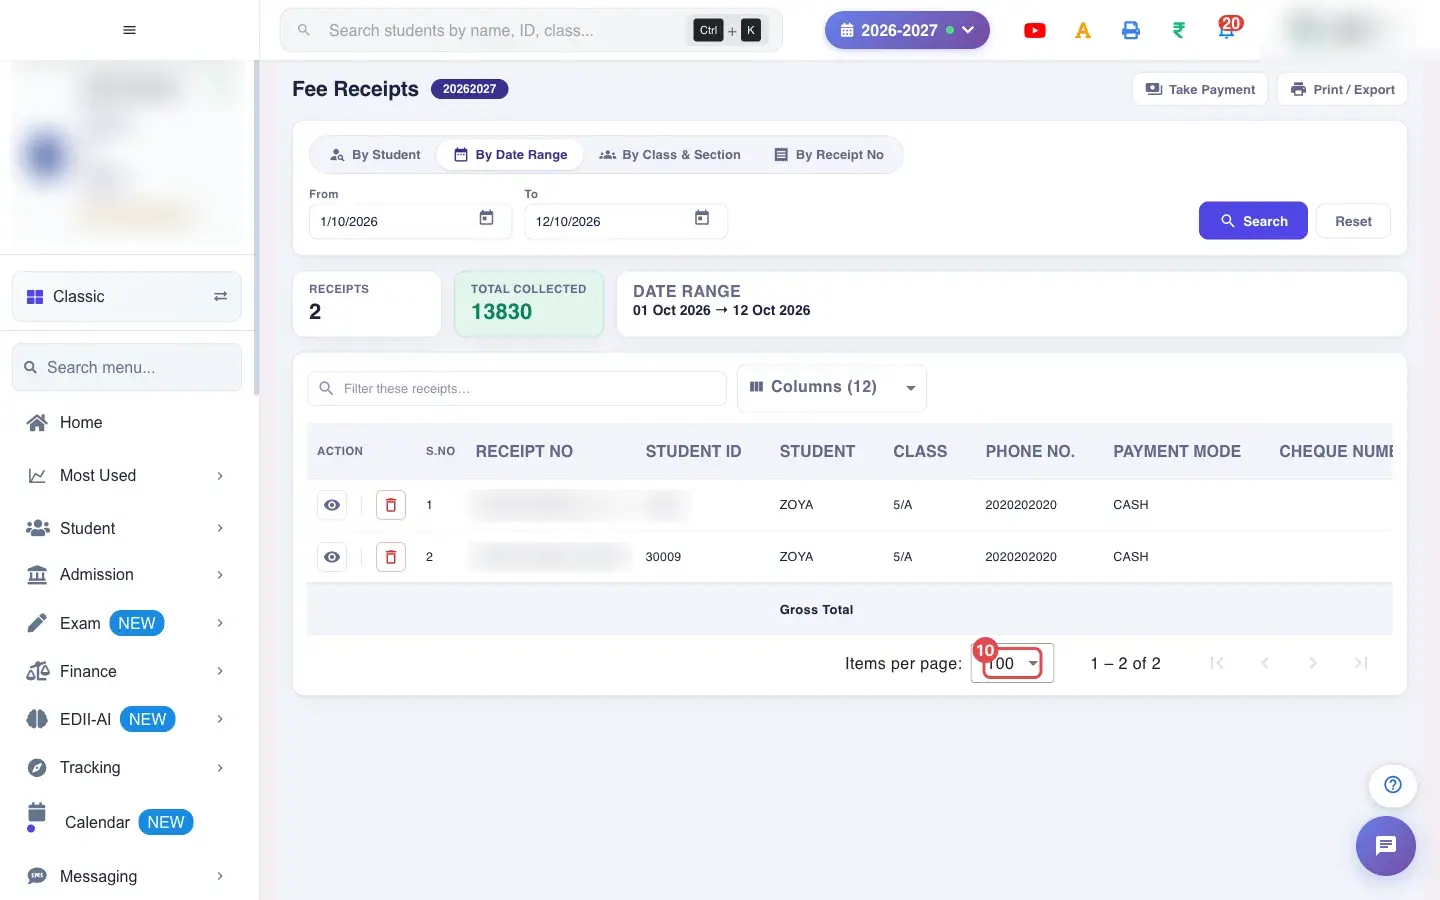
10. Choose 100 (for example 100)
Section titled “10. Choose 100 (for example 100)”Choose how many rows per page.
 Open a bigger pictureतस्वीर बड़ी करें
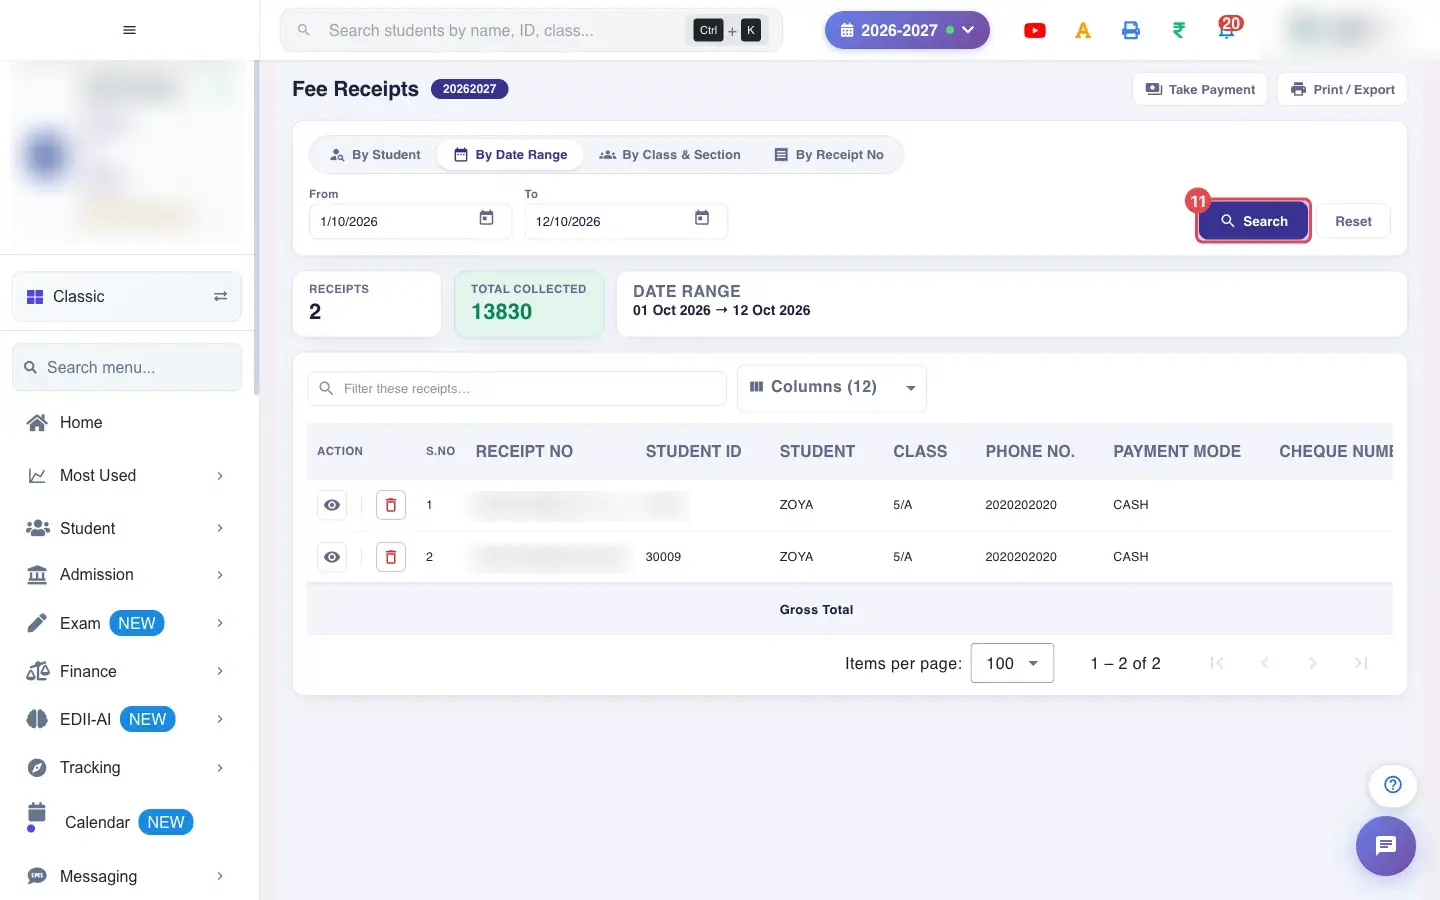
11. Select Search
Section titled “11. Select Search”Select Search. A class and a section are required (Select a class and a section.).
 Open a bigger pictureतस्वीर बड़ी करें
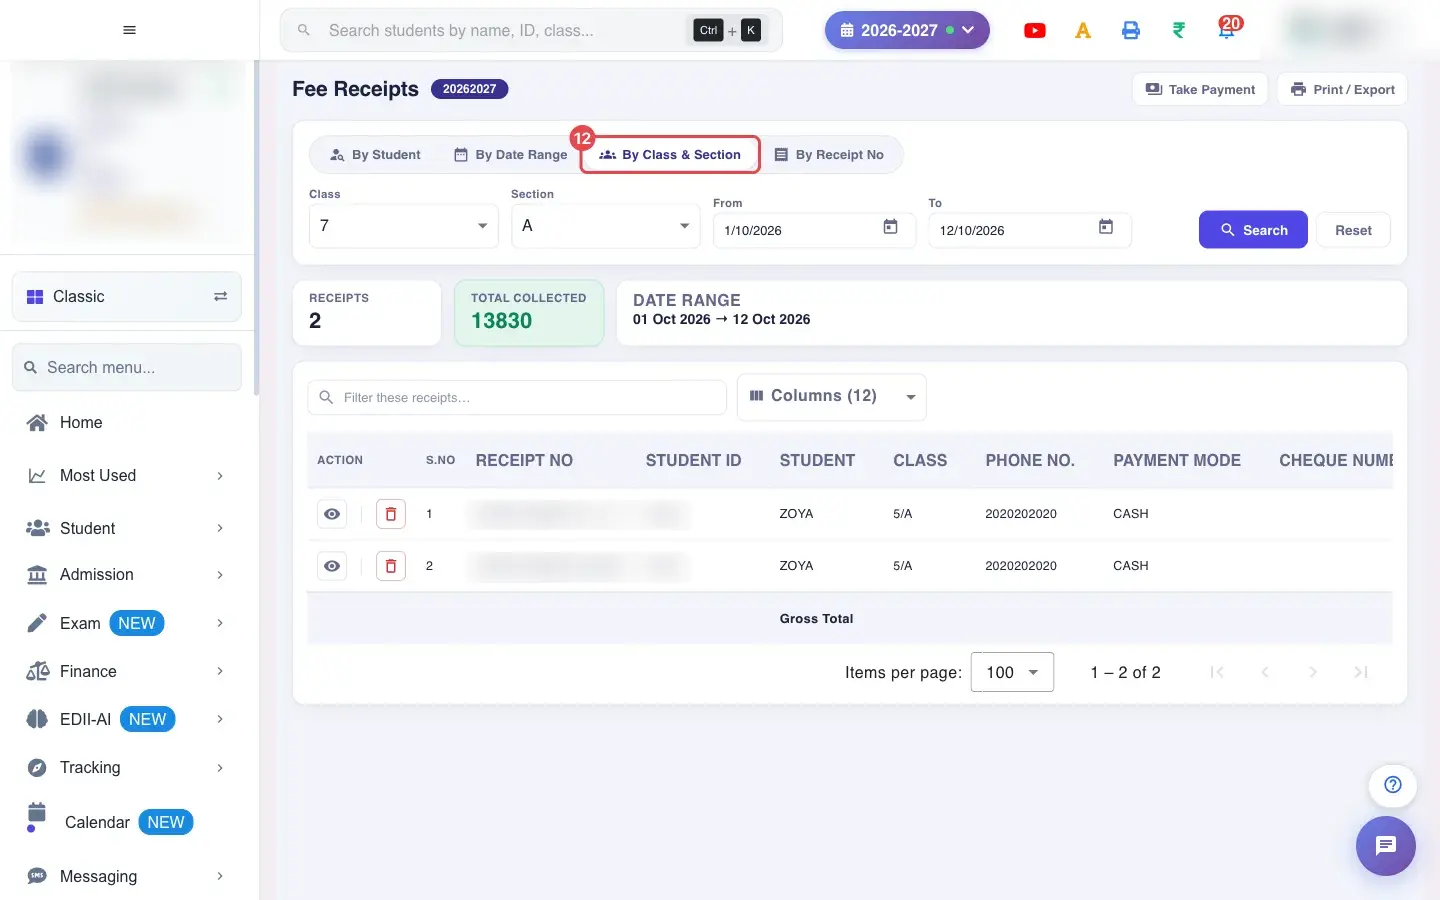
12. Open the By Class & Section tab
Section titled “12. Open the By Class & Section tab”Open By Receipt No.
 Open a bigger pictureतस्वीर बड़ी करें
13. Choose Class (for example 7)
Section titled “13. Choose Class (for example 7)”Type the receipt number and select Search (Enter the receipt number printed on the slip.).
 Open a bigger pictureतस्वीर बड़ी करें
14. Choose Section (for example A)
Section titled “14. Choose Section (for example A)”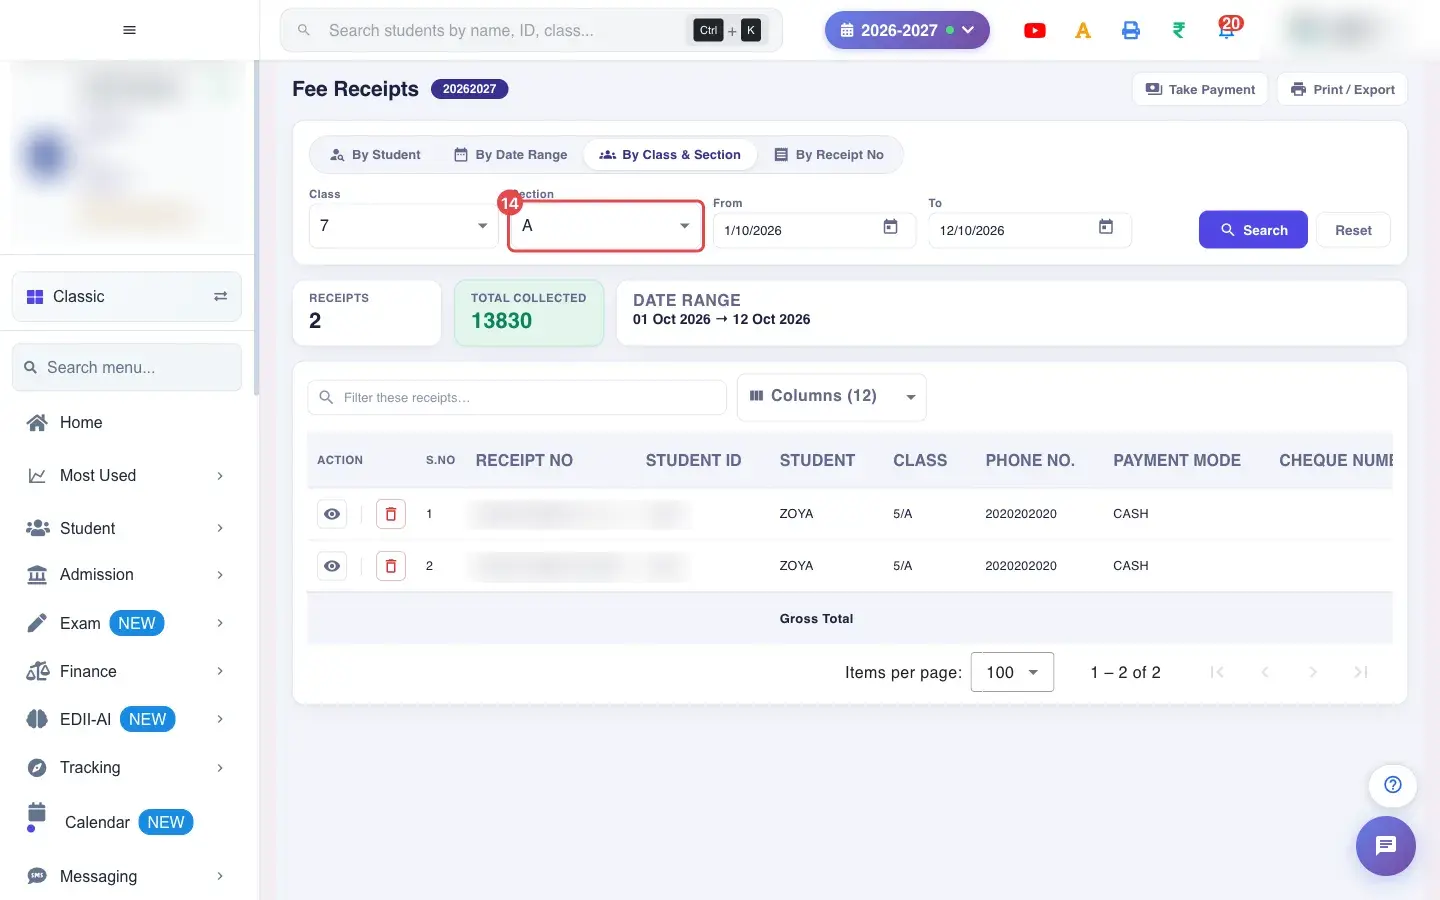 Open a bigger pictureतस्वीर बड़ी करें
15. Choose Columns (for example view_column
Section titled “15. Choose Columns (for example view_column”Columns (12))
 Open a bigger pictureतस्वीर बड़ी करें
16. Choose 100 (for example 100)
Section titled “16. Choose 100 (for example 100)”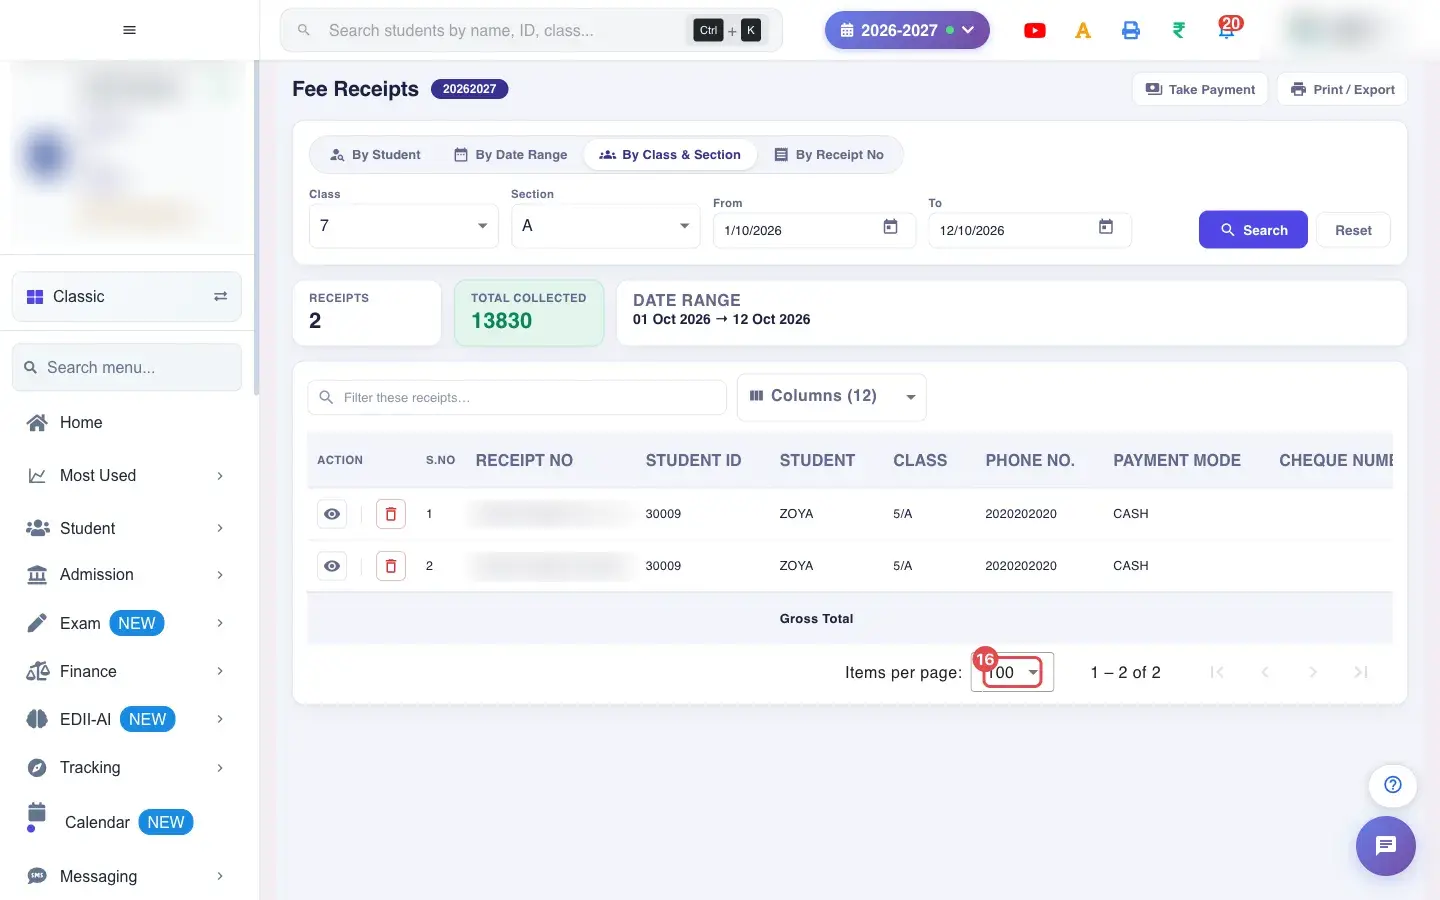 Open a bigger pictureतस्वीर बड़ी करें
17. Select Search
Section titled “17. Select Search”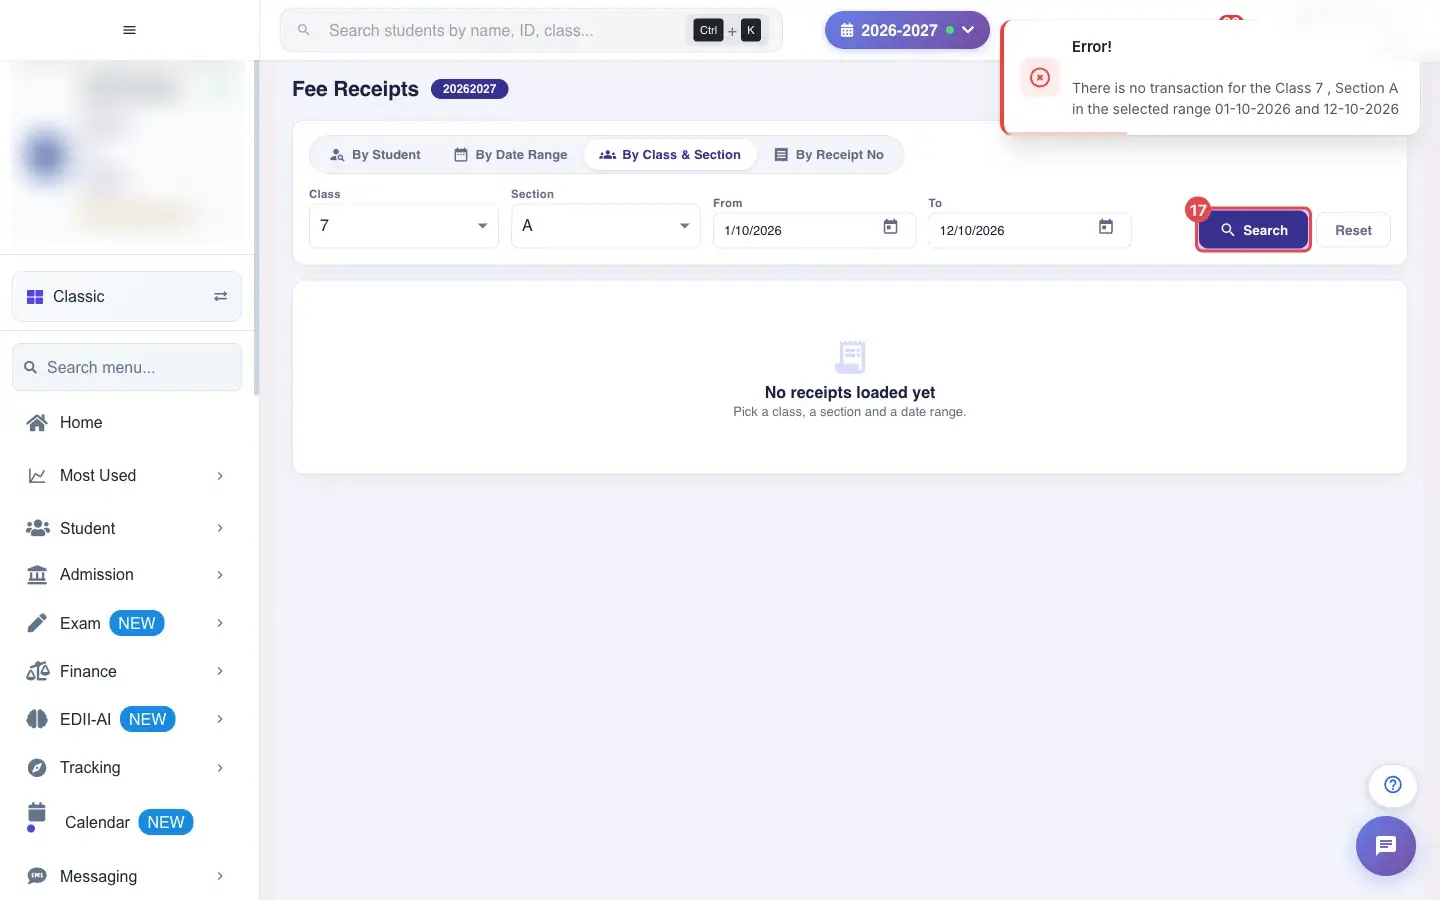 Open a bigger pictureतस्वीर बड़ी करें
18. Open the By Receipt No tab
Section titled “18. Open the By Receipt No tab”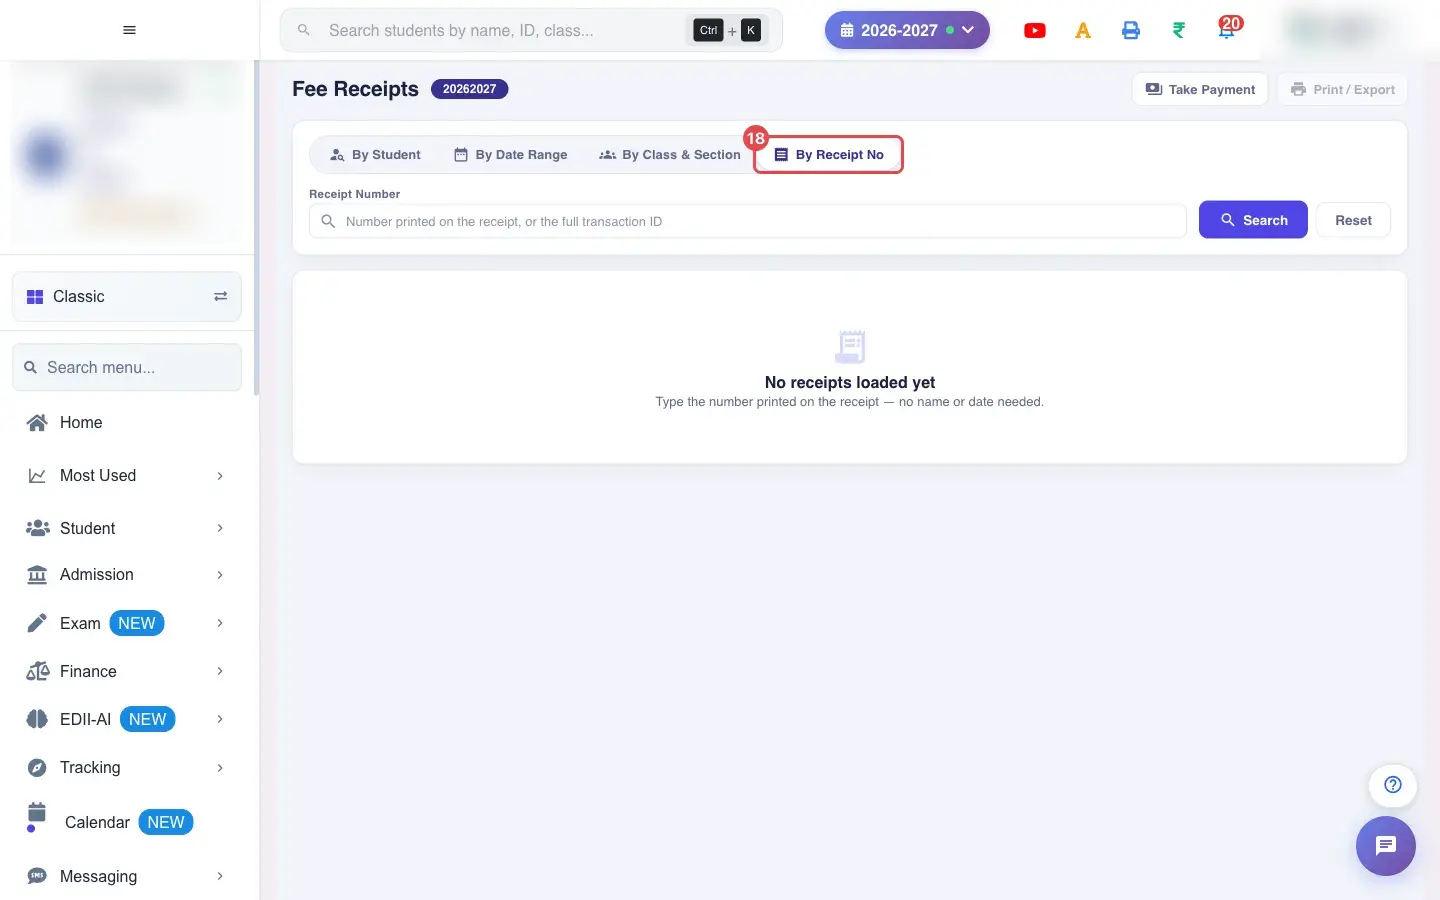 Open a bigger pictureतस्वीर बड़ी करें
19. Read the table
Section titled “19. Read the table”Columns: S.No, Receipt No, Printed Receipt No, Student ID, Father Name, Phone No., Payment Mode, Cheque Number, Cheque Bank, Fee For Month, Paid On, Amount Paid and Action. Total Collected shows the sum for the filtered receipts. If nothing matches you see No receipts match this search.
20. View or reprint a receipt
Section titled “20. View or reprint a receipt”The eye icon opens the receipt (FeeReceipt Fetched), ready to print.
21. Print all receipts
Section titled “21. Print all receipts”Print All Receipts (4 per A4 page) prints every receipt in the current results, four to an A4 sheet. It needs Receipt Type 8 under Configuration › Preferences › Receipt Type; otherwise you see This print needs Receipt Type 8. Set it under Configuration > Preferences > Receipt Type. Run a search first, or you see No transactions to print. Run a search first.
22. Delete a wrong receipt
Section titled “22. Delete a wrong receipt”The bin icon opens a confirmation. Delete only a receipt that was made in error; deleted receipts are listed under Deleted Receipts.
23. Take a payment or export
Section titled “23. Take a payment or export”Take Payment opens the fee counter. Print / Export offers Download Excel File, Download Text File, Download CSV File and Print with Report Generated On.
With data
Section titled “With data”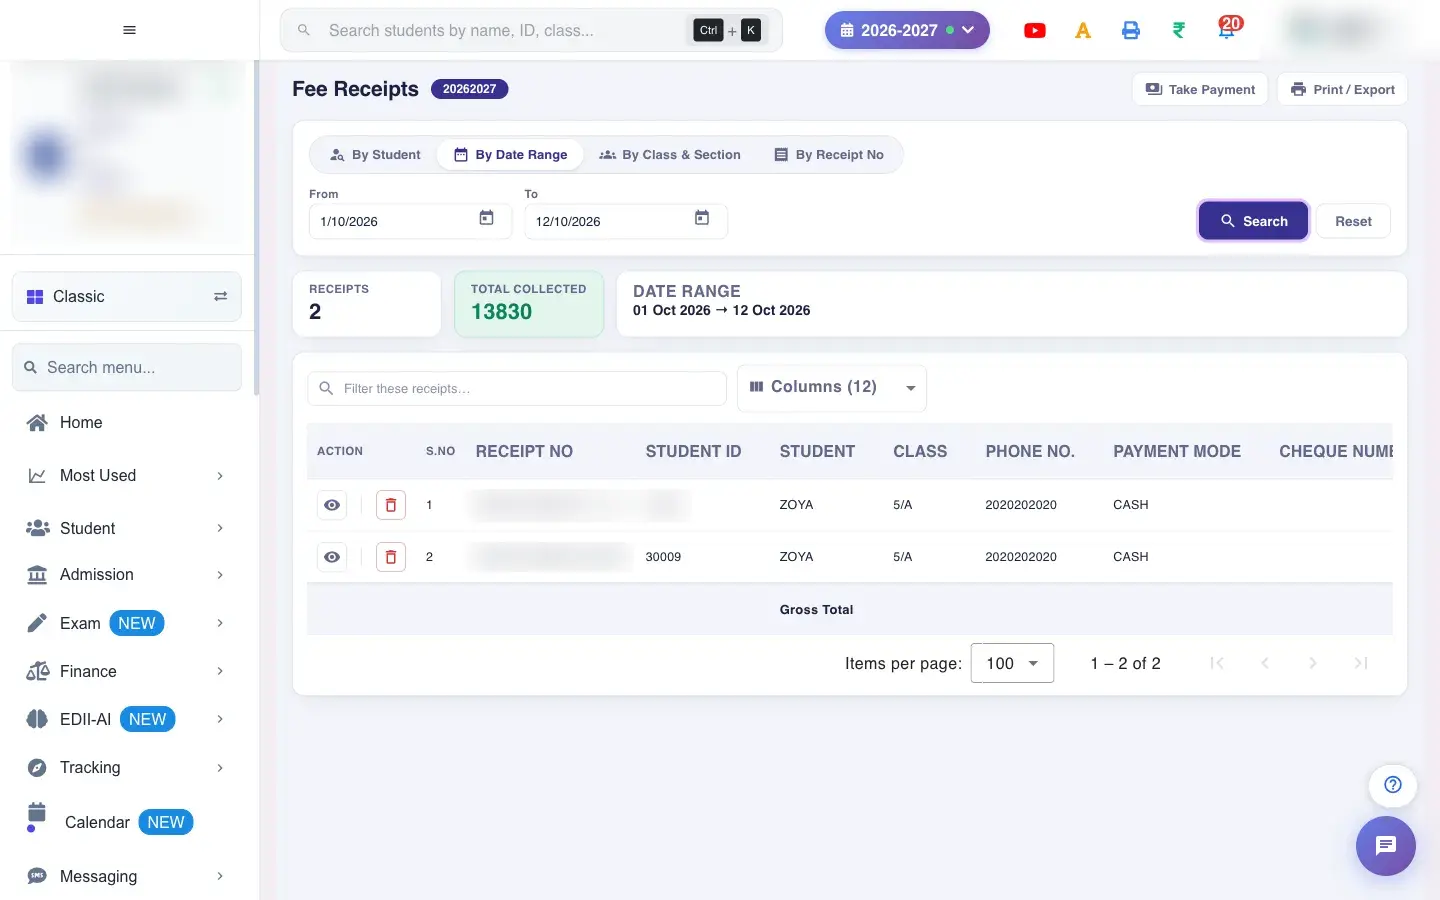 Open a bigger pictureतस्वीर बड़ी करें
Fields and filters
Section titled “Fields and filters”| Field | What it is | Notes |
|---|---|---|
| Student | Pick a student for By Student. | Keep typing to narrow matches. |
| From / To | Date range. | Both required. |
| Class / Section | For By Class & Section. | Both required. |
| Receipt Number | The number printed on the slip. | Required for By Receipt No. |
| Columns | Visible columns. | View only. |
Buttons
Section titled “Buttons”| Button | What it does | What happens next |
|---|---|---|
| Search | Loads receipts for the tab. | Shows Transactions Fetched on success. |
| View (eye) | Opens a receipt. | FeeReceipt Fetched. |
| Delete (bin) | Deletes a receipt after confirmation. | Fees become due again. |
| Print All Receipts (4 per A4 page) | Prints all listed receipts. | Needs Receipt Type 8. |
| Take Payment | Opens fee collection. | You leave this screen. |
Columns
Section titled “Columns”| Column | Meaning |
|---|---|
| Receipt No / Printed Receipt No | The system number and the number printed on the slip. |
| Payment Mode / Cheque Number / Cheque Bank | How it was paid. |
| Fee For Month / Paid On / Amount Paid | What month, when, and how much. |
After you save
Section titled “After you save”- Searching and viewing change nothing. Deleting a receipt cancels that payment and the fees become due again; deleted receipts are kept in Deleted Receipts.
Good to know
Section titled “Good to know”- Both dates are required for a date range.
- Class and section are required for By Class & Section.
- Print All needs Receipt Type 8.
Messages you may see
Section titled “Messages you may see”| Message | What it means | What to do |
|---|---|---|
| Search and select a student first. | No student chosen. | Pick one. |
| Enter the receipt number printed on the slip. | The number is empty. | Type it. |
| Select both a start date and an end date. | A date is missing. | Pick both. |
| Select a class and a section. | A choice is missing. | Choose both. |
| Transactions Fetched / FeeReceipt Fetched | The data loaded. | Nothing to do. |
| No transactions to print. Run a search first. | Print All needs results. | Search first. |
| This print needs Receipt Type 8. Set it under Configuration > Preferences > Receipt Type. | The school’s receipt type does not support it. | Ask an admin to set Receipt Type 8. |
- Use By Receipt No for the quickest lookup.
- Reconcile cash by searching today’s date range and comparing Total Collected.
Stuck? Try this
Section titled “Stuck? Try this”| Problem | Likely cause | What to do |
|---|---|---|
| A receipt is missing | It was deleted or belongs to another session. | Check Deleted Receipts and the session. |
Did this page help?क्या इस पेज से मदद मिली?
Thanks! Glad it helped.धन्यवाद! अच्छा लगा कि काम बन गया।
Sorry about that. Ask in your own words, or write to us.माफ़ कीजिए। अपने शब्दों में पूछें, या हमें लिखें।