
Screen guide · Web app
Add Student
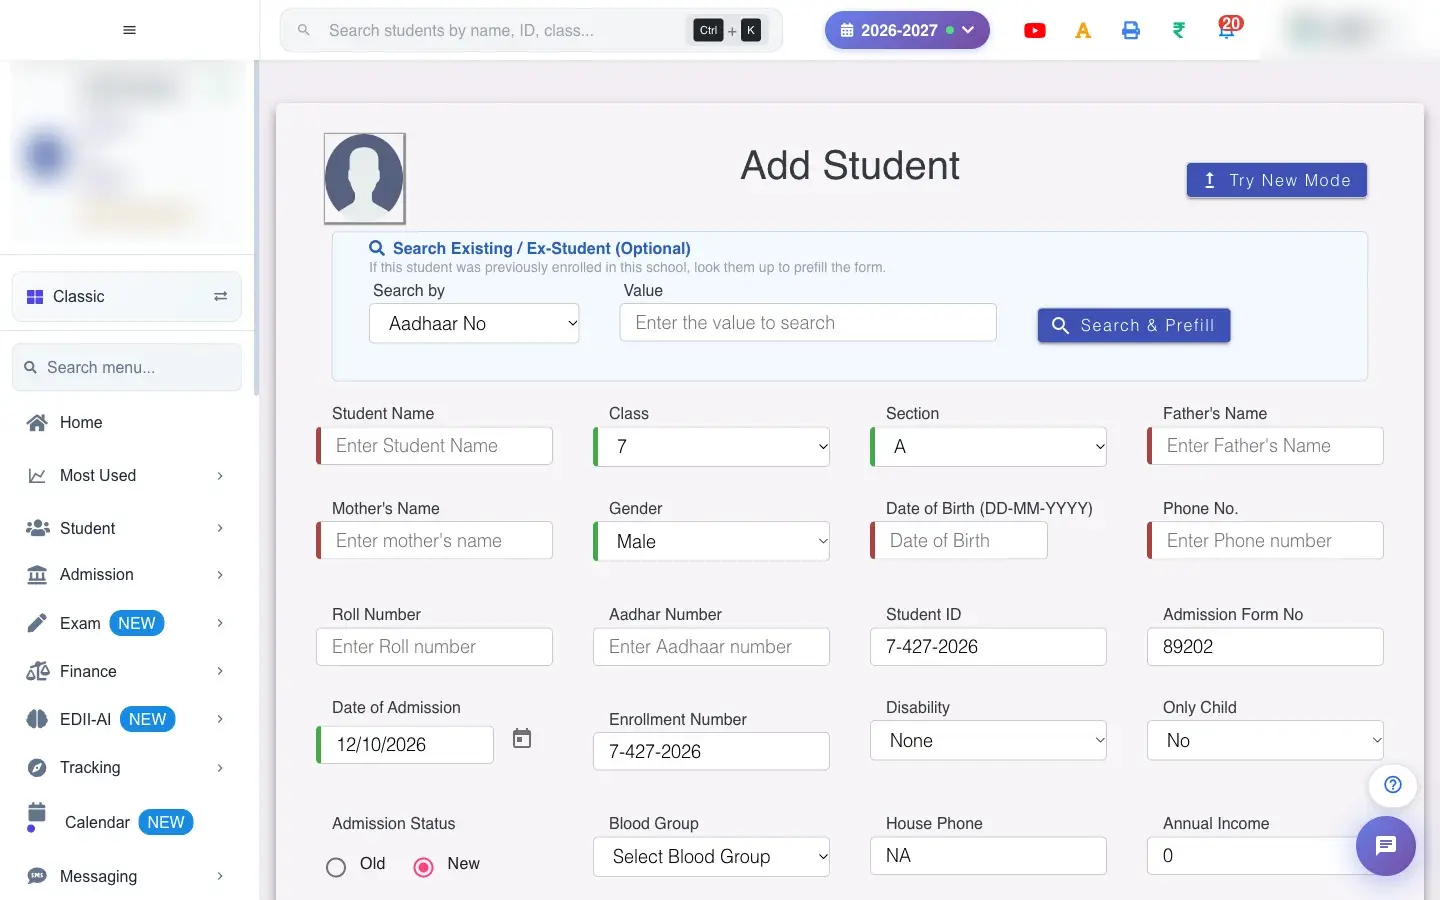
The classic single-page admission form for a new student, with an optional lookup of a former student, duplicate and PEN checks, photo, fees and discounts.
यह पेज अंग्रेज़ी में है। कुछ समझ न आए तो ।
Add Student is the older, one-page admission form. Everything is on a single scrolling page instead of tabs: student and parent details, contact, identifiers, health, category, previous school and, where your school collects fees at admission, Special Fees and Special Discount. The newer stepped form is Add New Student; the button Try New Mode switches to it.
Like the new form it can look up a former student first to prefill the form, and it warns you if a student with the same name, father’s name and class already exists.
Who uses it and when
Section titled “Who uses it and when”The admission office uses it for each new admission, mainly schools that prefer the single-page form.
Before you start
Section titled “Before you start”- Classes, sections, houses and categories must exist. Student ID and admission form number are generated by the school’s settings.
Where to find it
Section titled “Where to find it”- This screen opens from another screen, not from the menu.
- Address:
/add/add-student - If it is missing from your menu, your role does not include it. Ask your school admin.
 Open a bigger pictureतस्वीर बड़ी करें
Step by step
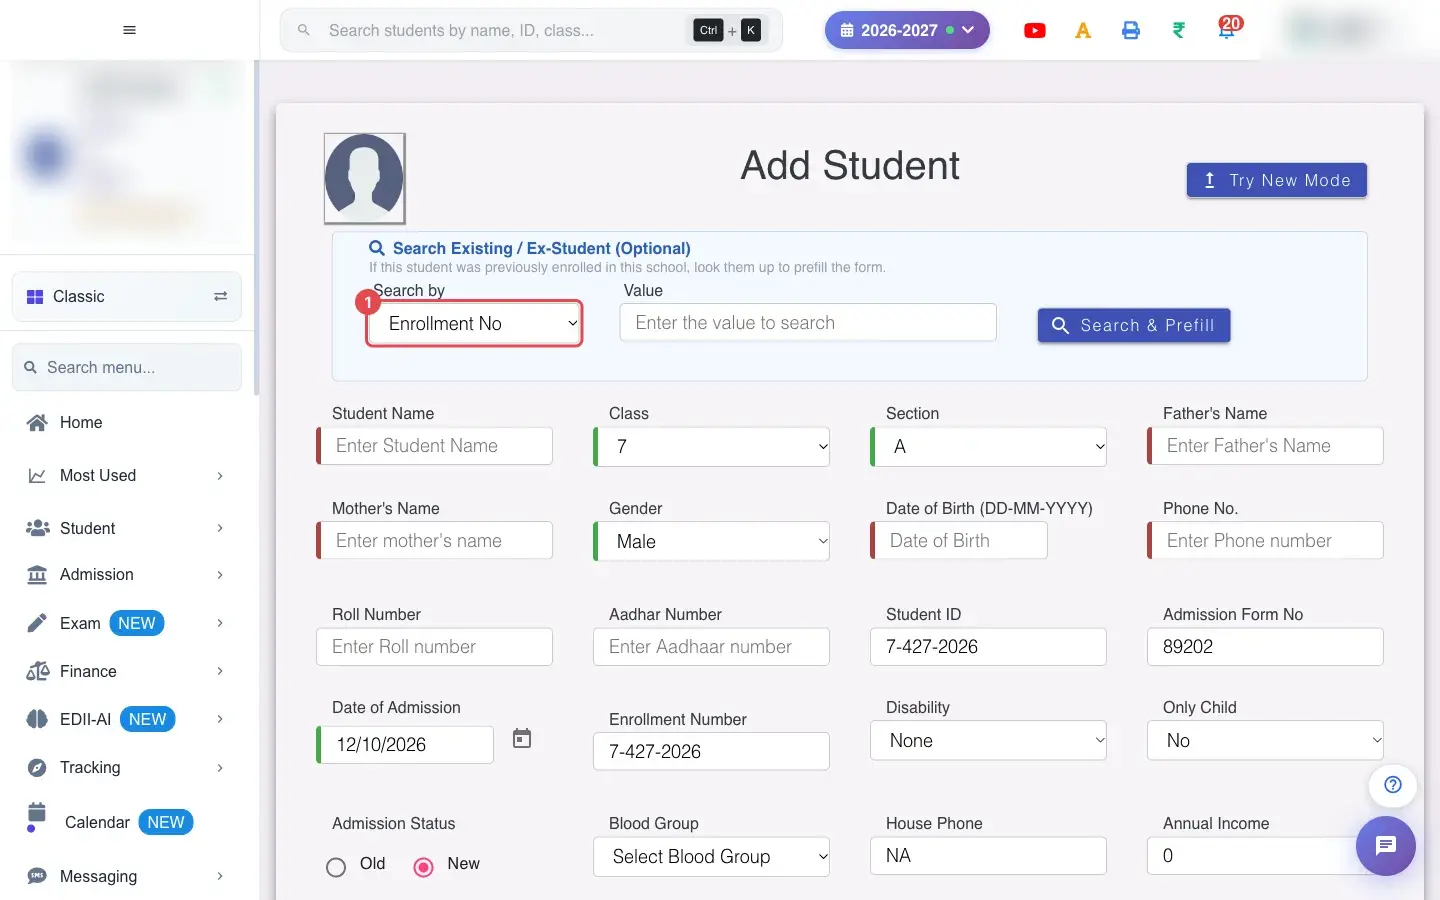
Section titled “Step by step”1. Choose Search by (for example Enrollment No)
Section titled “1. Choose Search by (for example Enrollment No)”In Search Existing / Ex-Student (Optional) choose what to search by, for example Enrollment No, and type the Value, then select Search & Prefill.
 Open a bigger pictureतस्वीर बड़ी करें
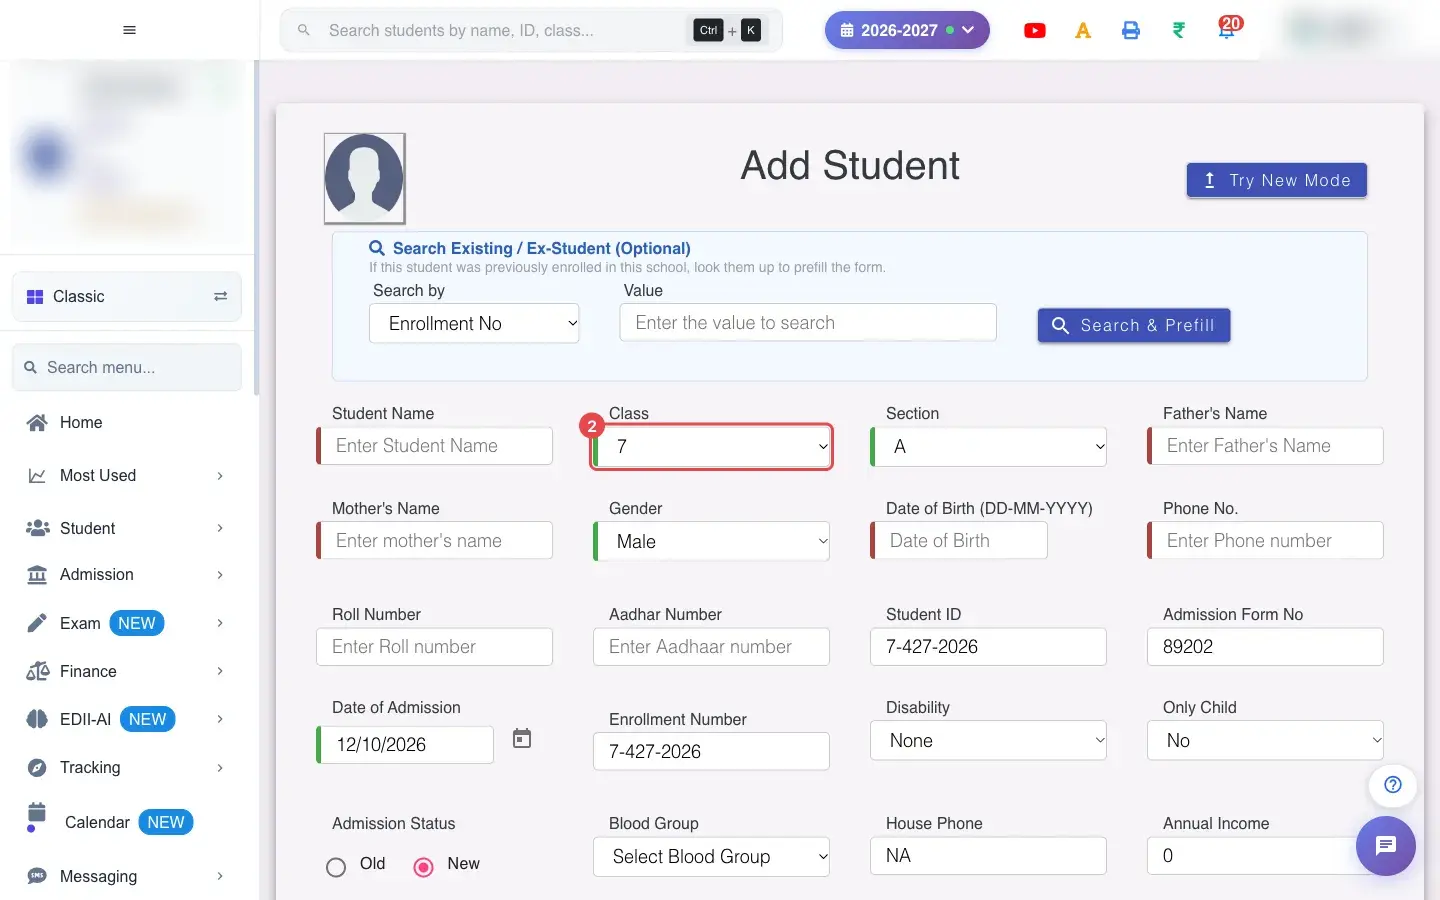
2. Choose Class (for example 7)
Section titled “2. Choose Class (for example 7)”Choose the Class.
 Open a bigger pictureतस्वीर बड़ी करें
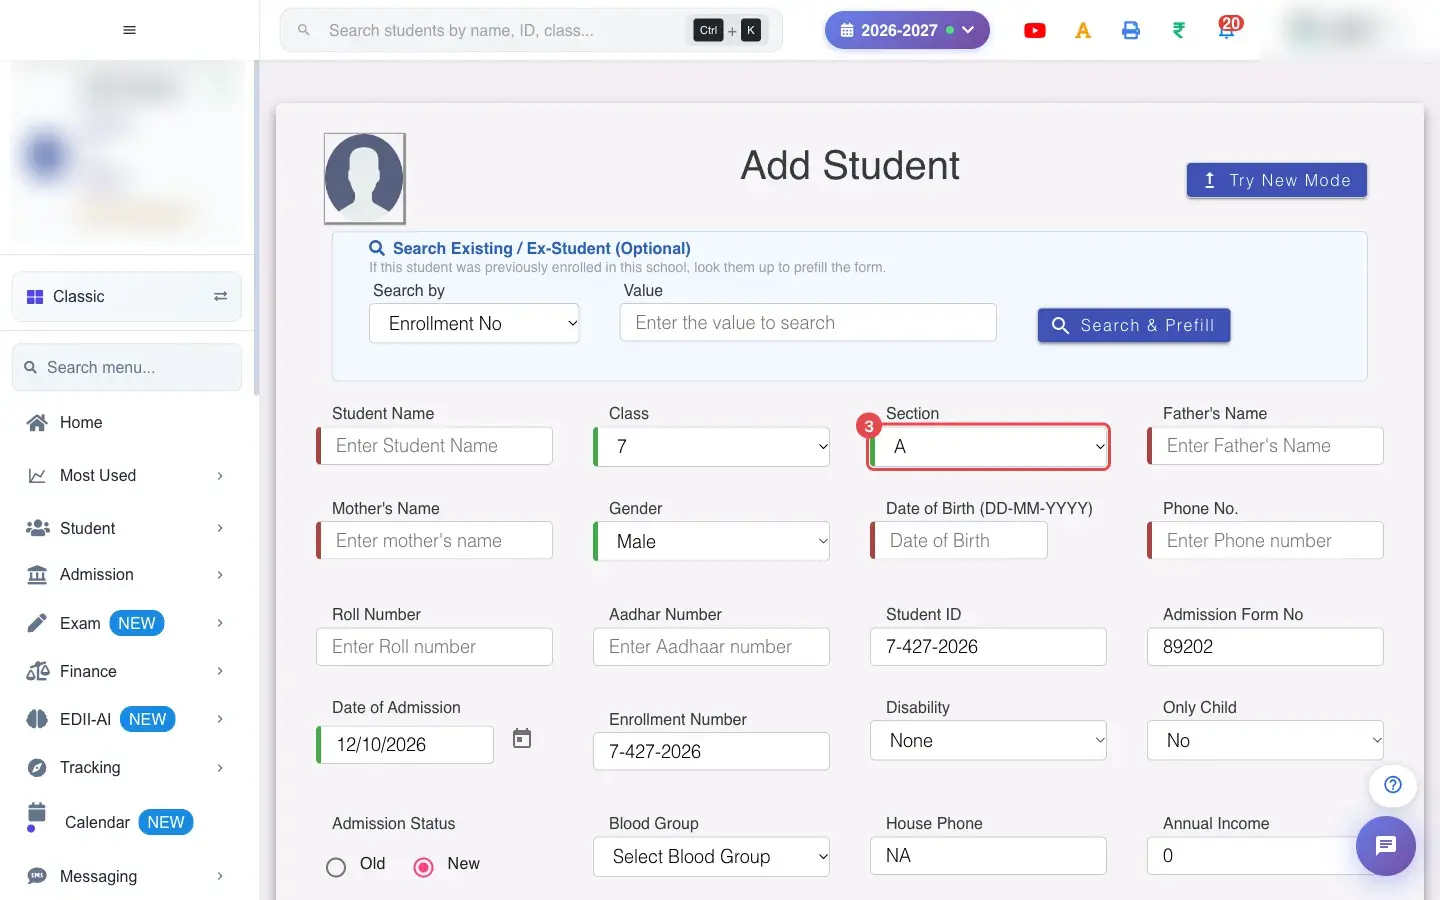
3. Choose Section (for example A)
Section titled “3. Choose Section (for example A)”Choose the Section.
 Open a bigger pictureतस्वीर बड़ी करें
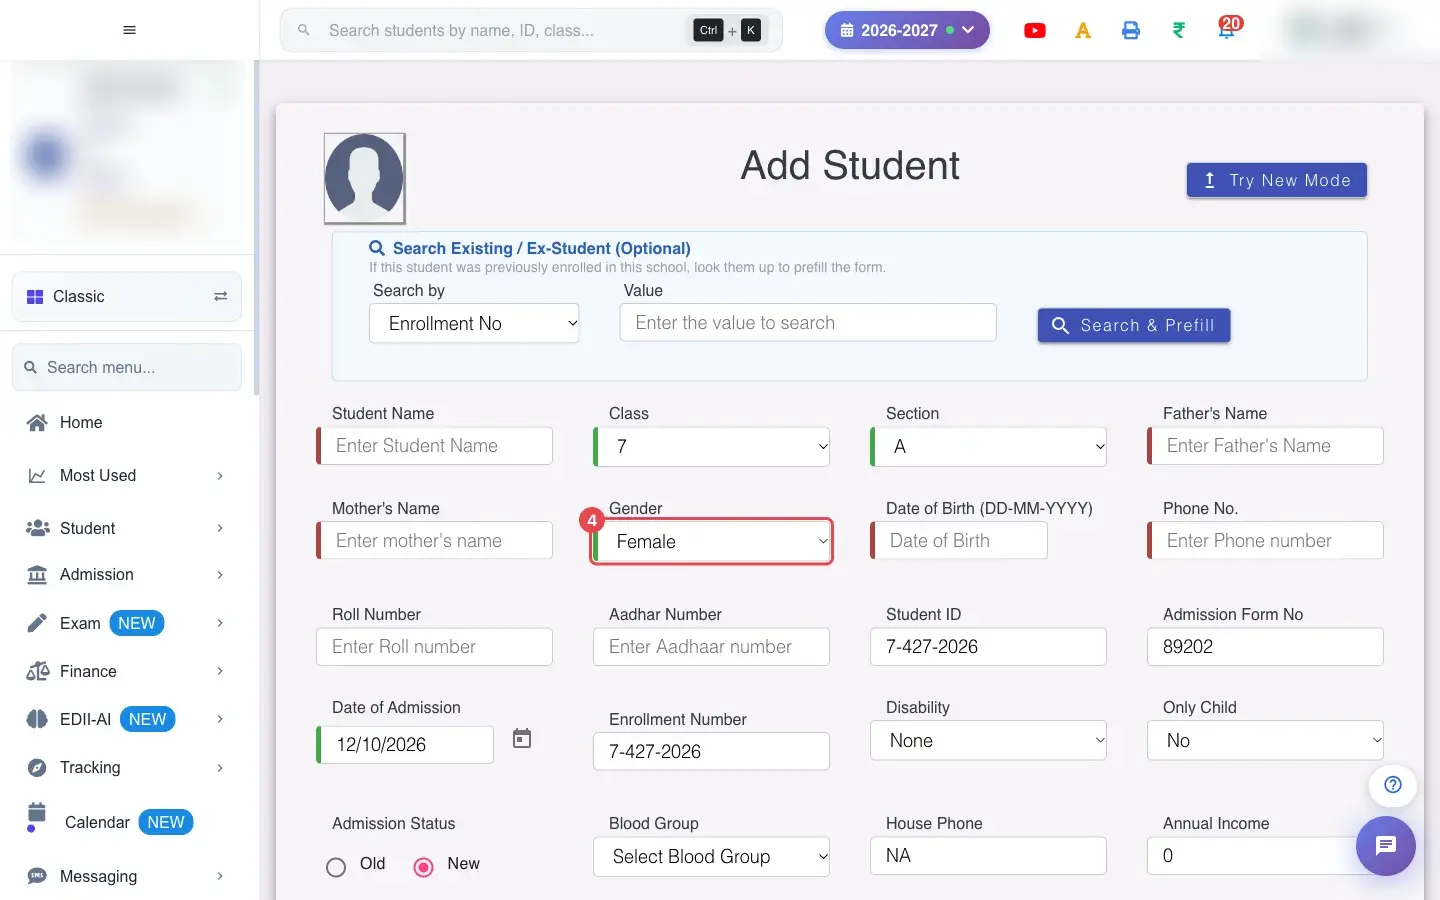
4. Choose Gender (for example Female)
Section titled “4. Choose Gender (for example Female)”Choose the Gender.
 Open a bigger pictureतस्वीर बड़ी करें
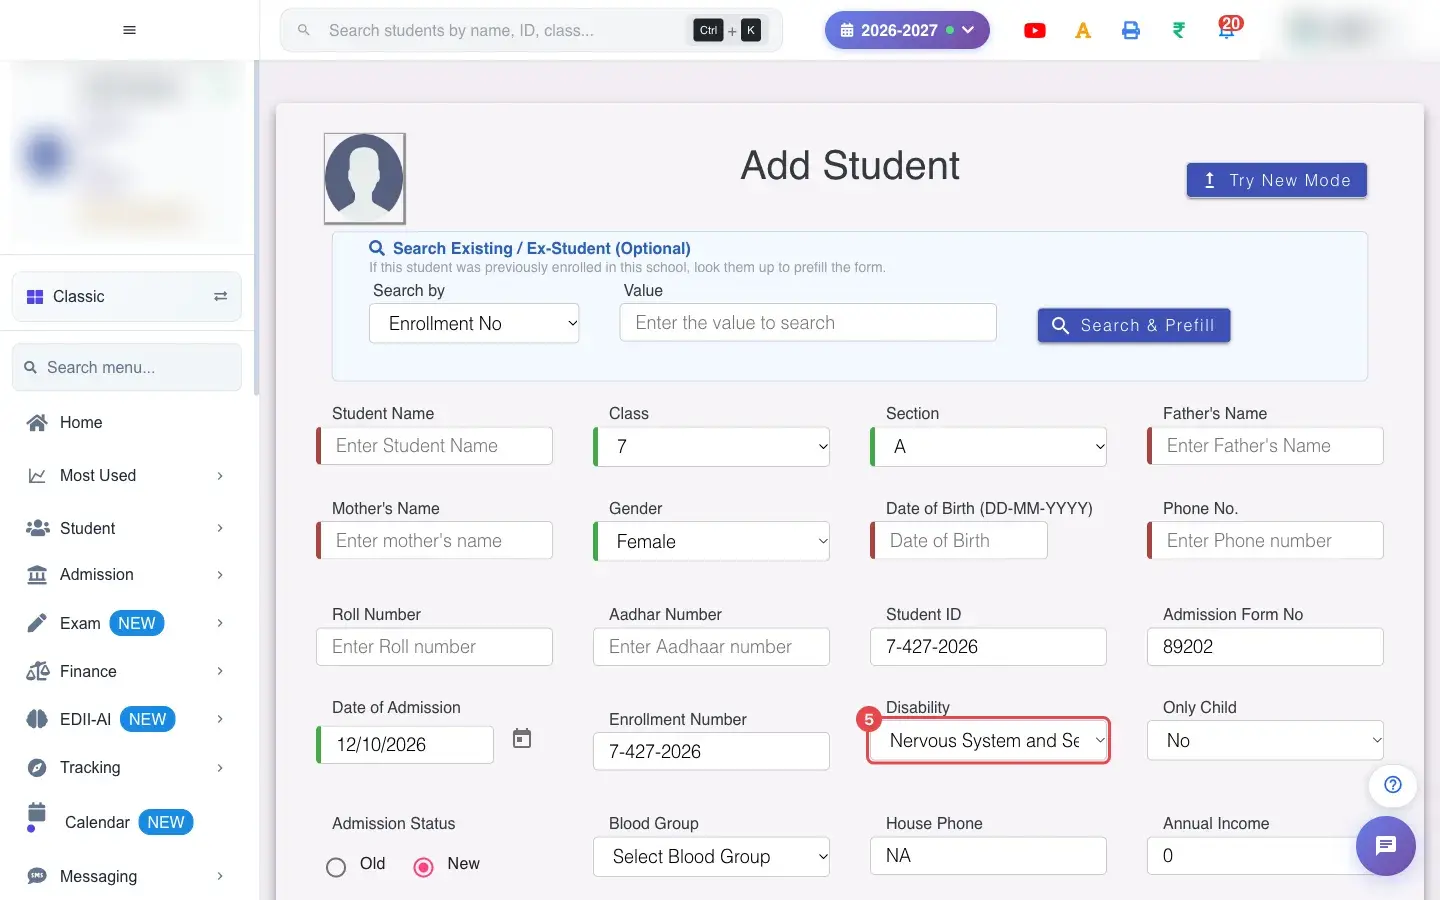
5. Choose Disability (for example Nervous System and Sense Organs)
Section titled “5. Choose Disability (for example Nervous System and Sense Organs)”Choose a Disability category if it applies.
 Open a bigger pictureतस्वीर बड़ी करें
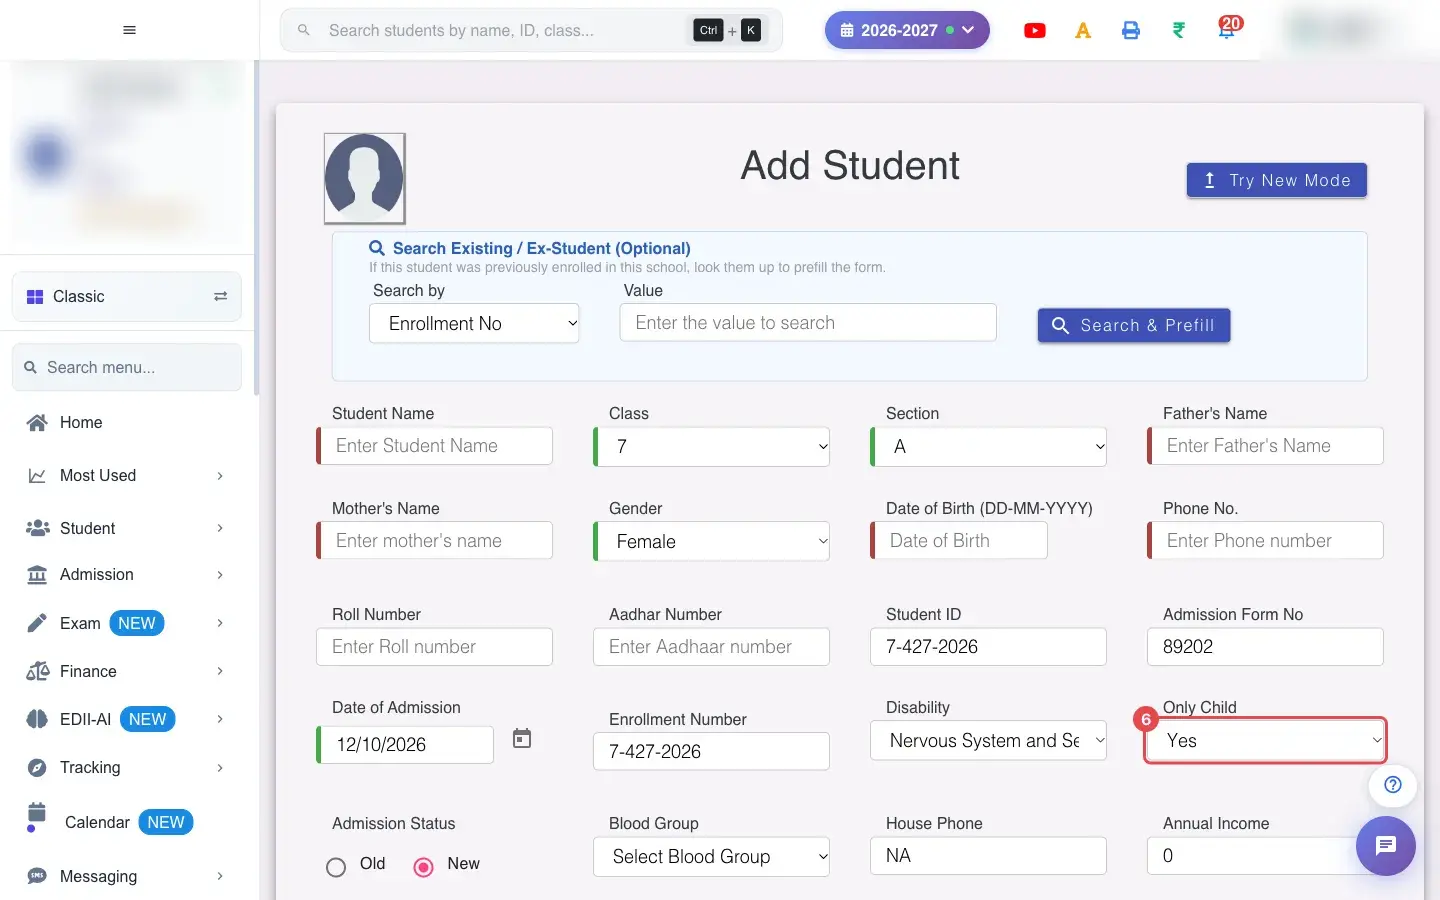
6. Choose Only Child (for example Yes)
Section titled “6. Choose Only Child (for example Yes)”Say whether the child is an Only Child.
 Open a bigger pictureतस्वीर बड़ी करें
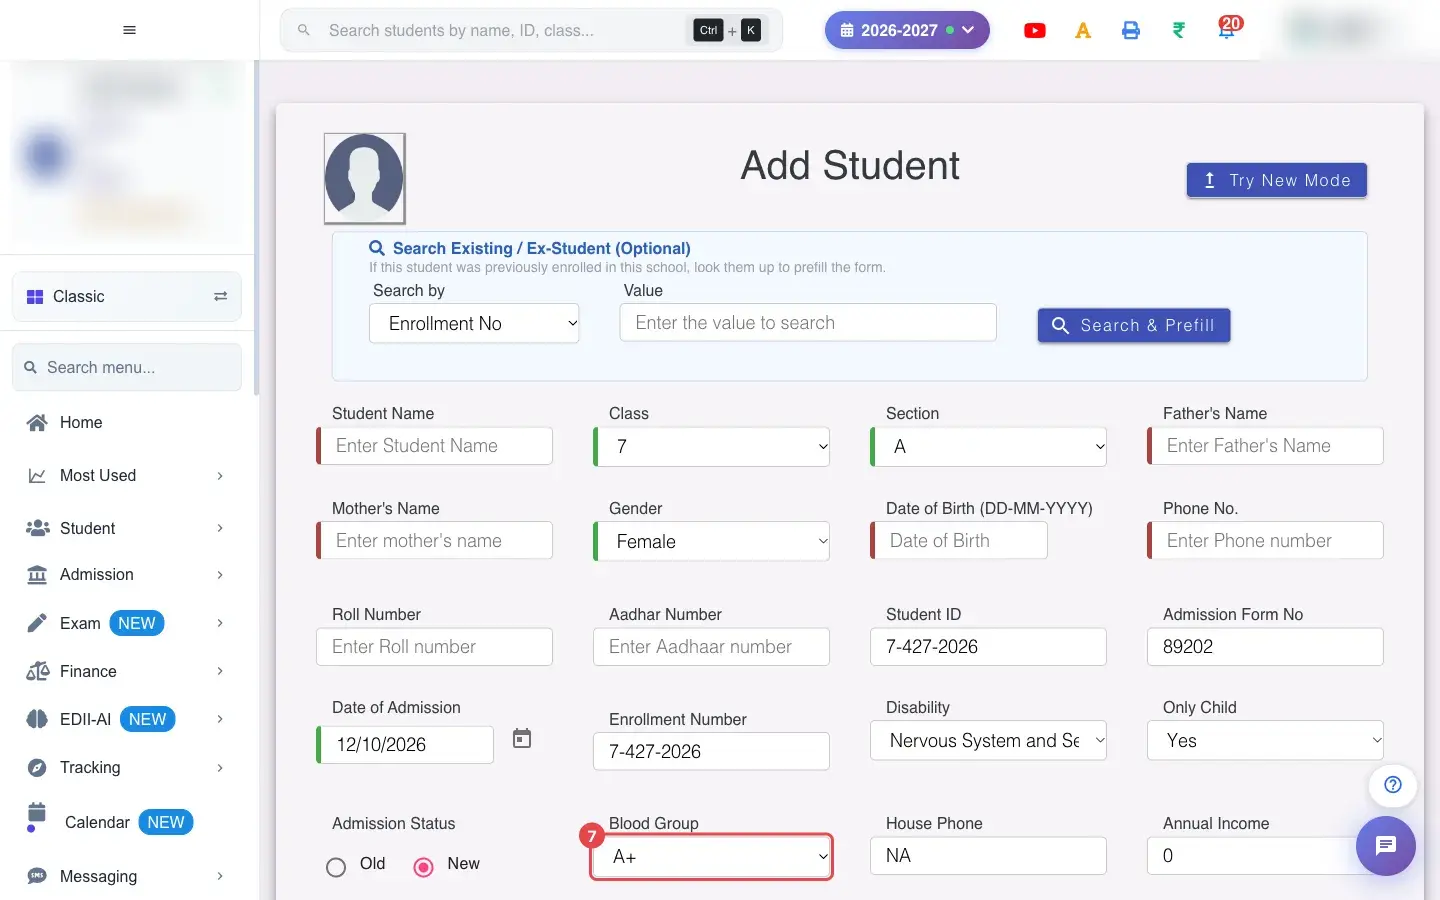
7. Choose Blood Group (for example A+)
Section titled “7. Choose Blood Group (for example A+)”Choose the Blood Group (required).
 Open a bigger pictureतस्वीर बड़ी करें
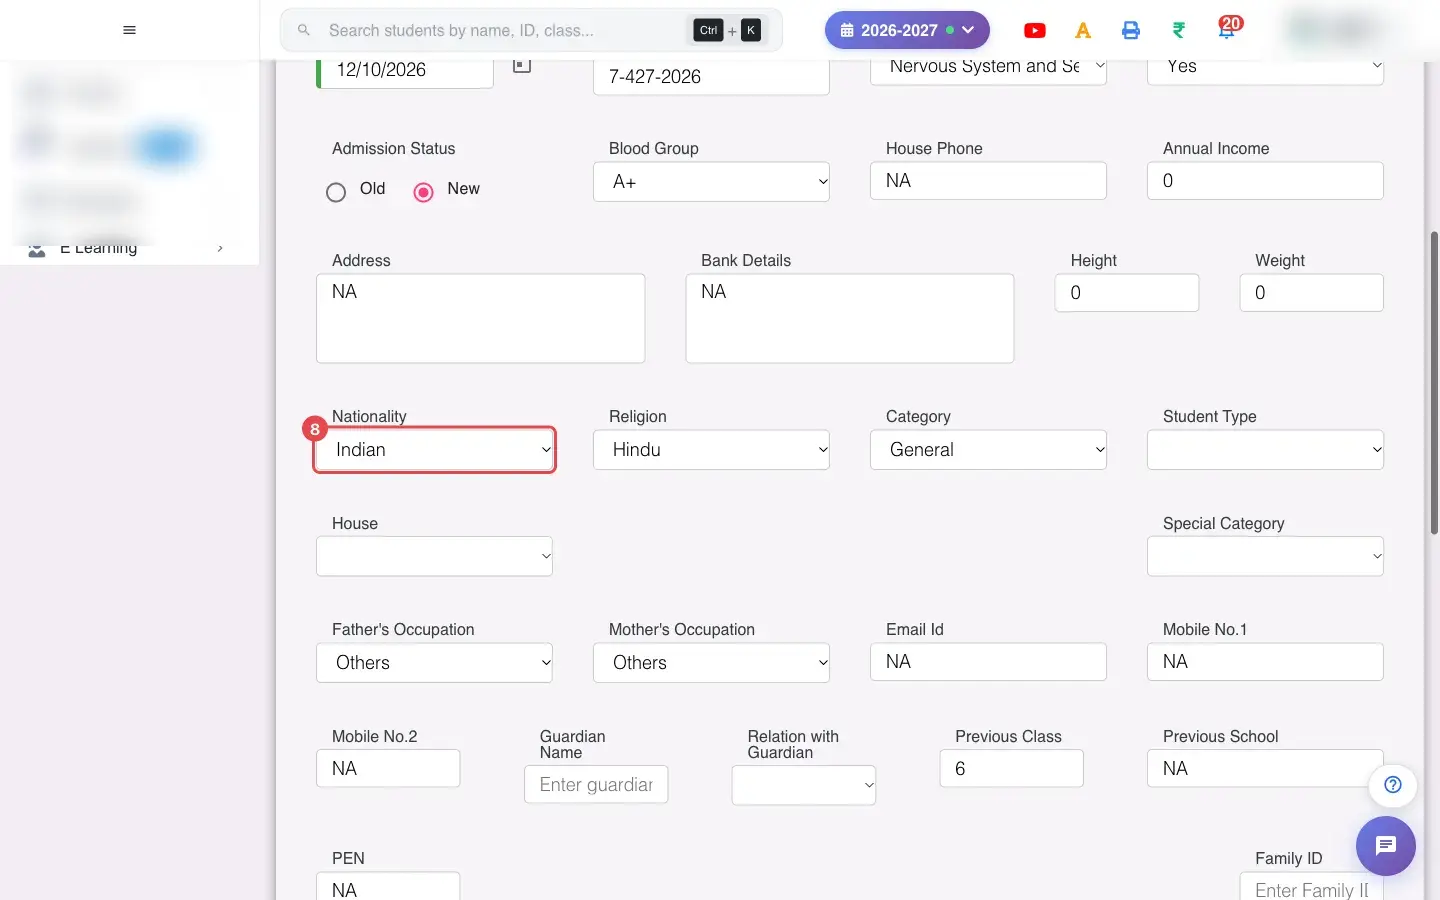
8. Choose Nationality (for example Indian)
Section titled “8. Choose Nationality (for example Indian)”Choose the Nationality.
 Open a bigger pictureतस्वीर बड़ी करें
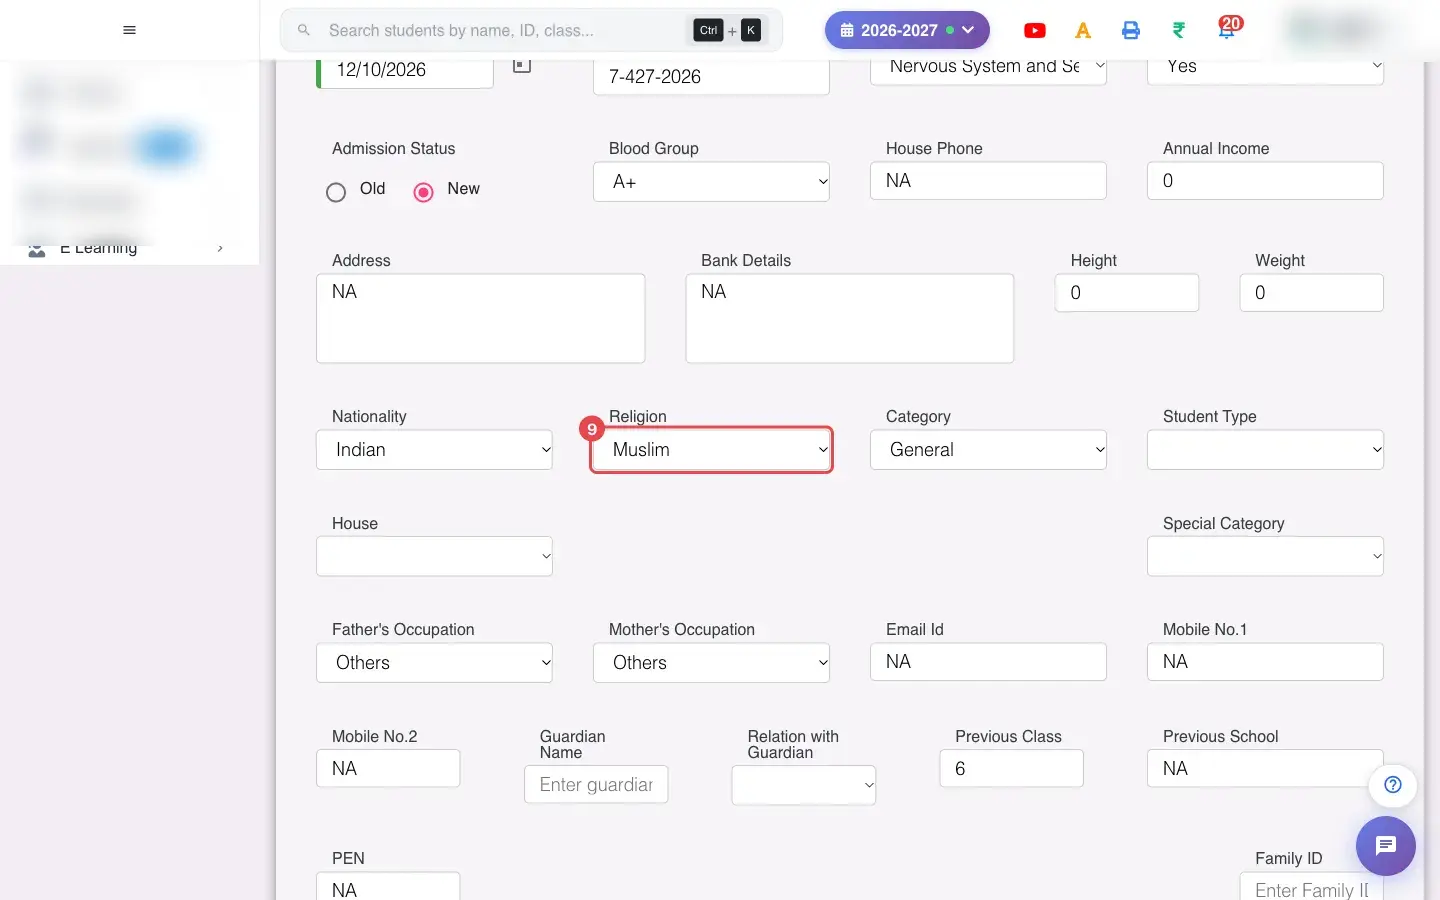
9. Choose Religion (for example Muslim)
Section titled “9. Choose Religion (for example Muslim)”Choose the Religion.
 Open a bigger pictureतस्वीर बड़ी करें
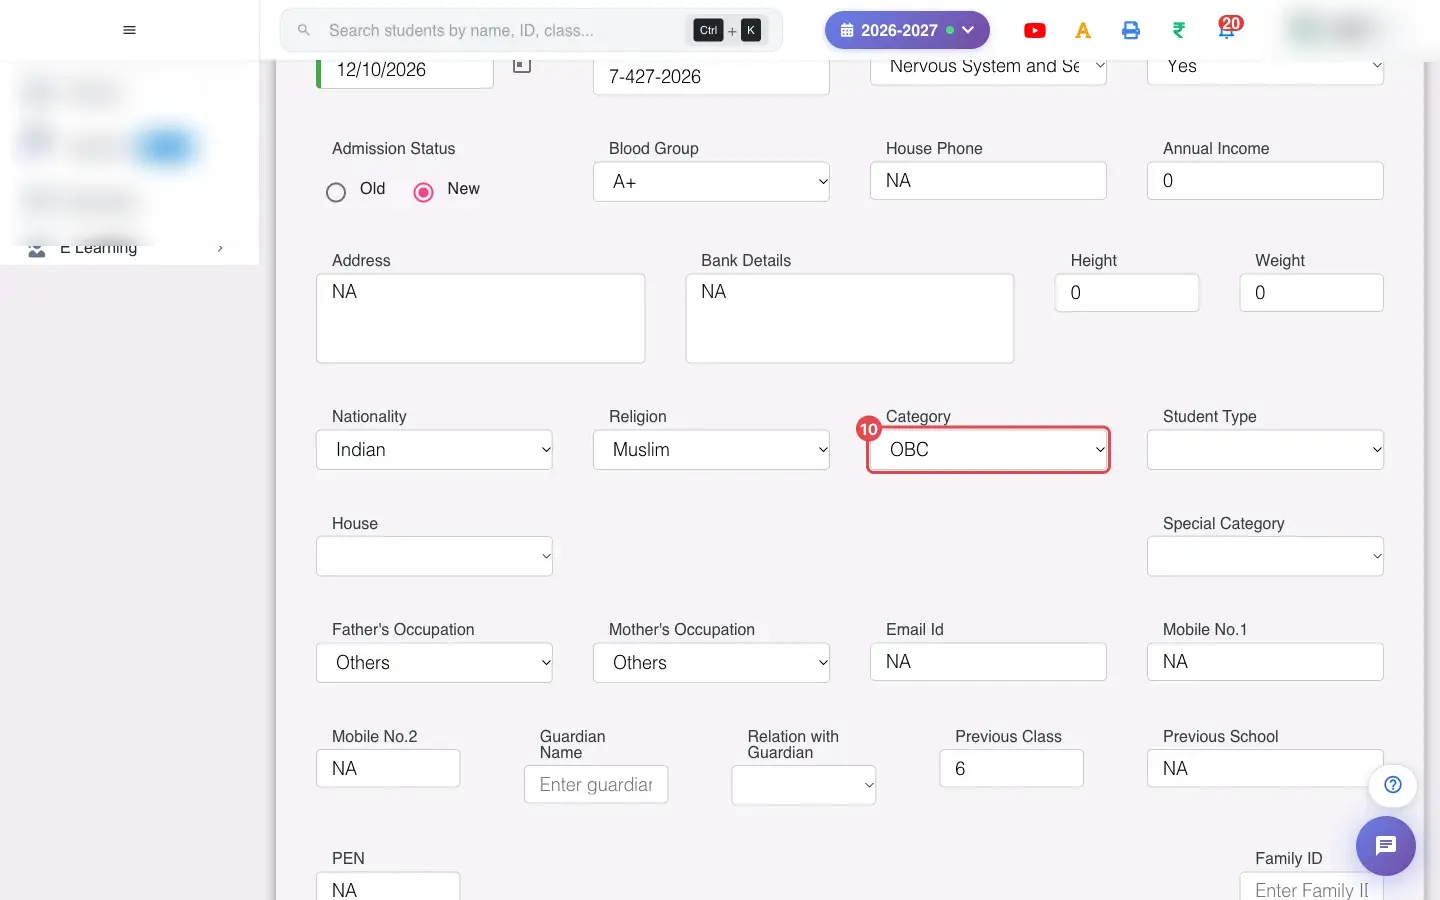
10. Choose Category (for example OBC)
Section titled “10. Choose Category (for example OBC)”Choose the Category.
 Open a bigger pictureतस्वीर बड़ी करें
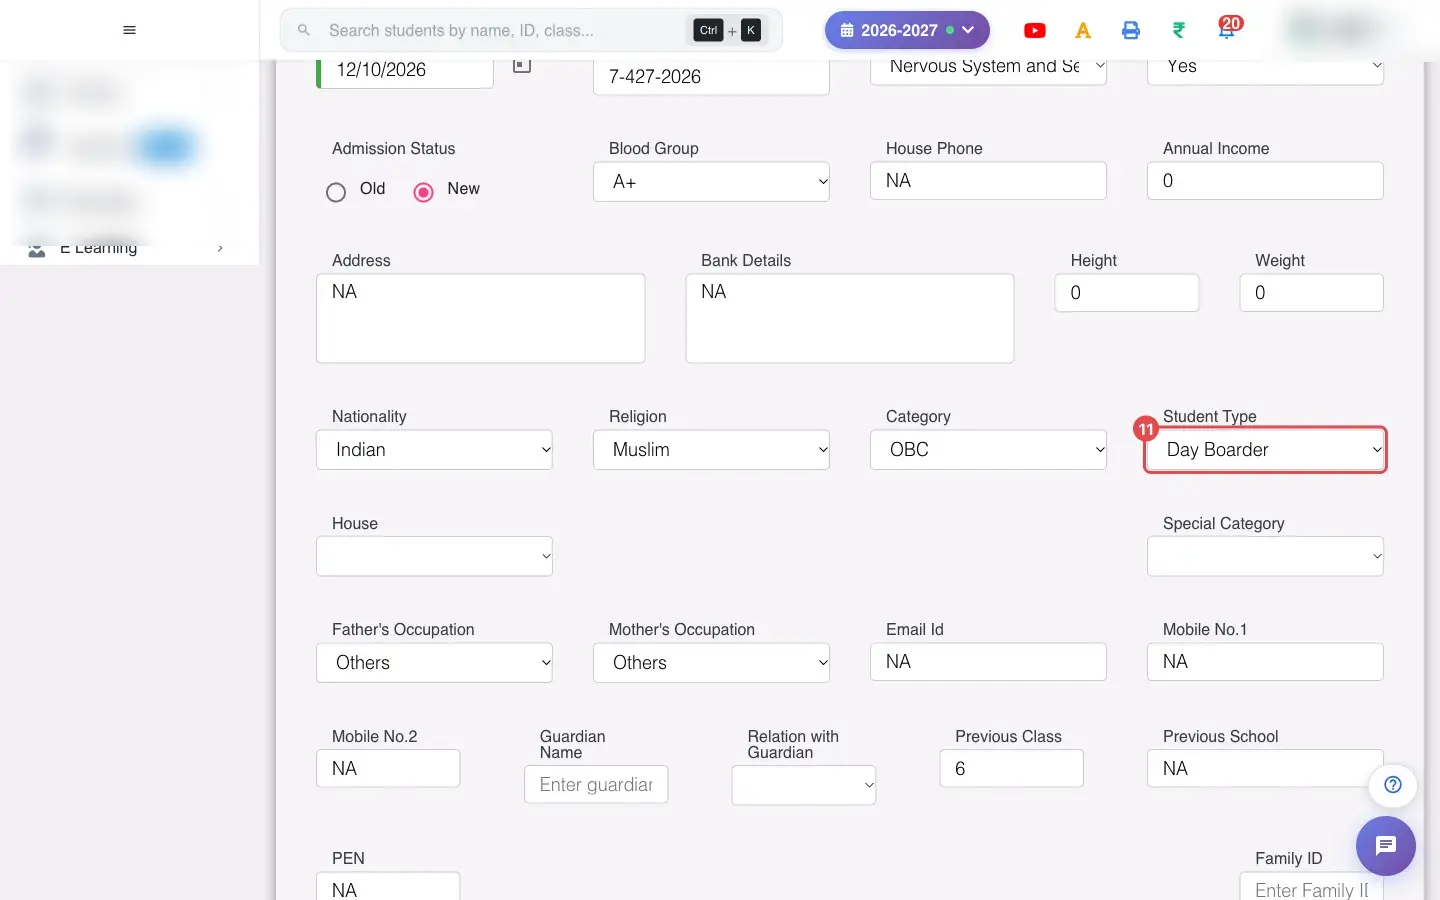
11. Choose Student Type (for example Day Boarder)
Section titled “11. Choose Student Type (for example Day Boarder)”Choose the Student Type.
 Open a bigger pictureतस्वीर बड़ी करें
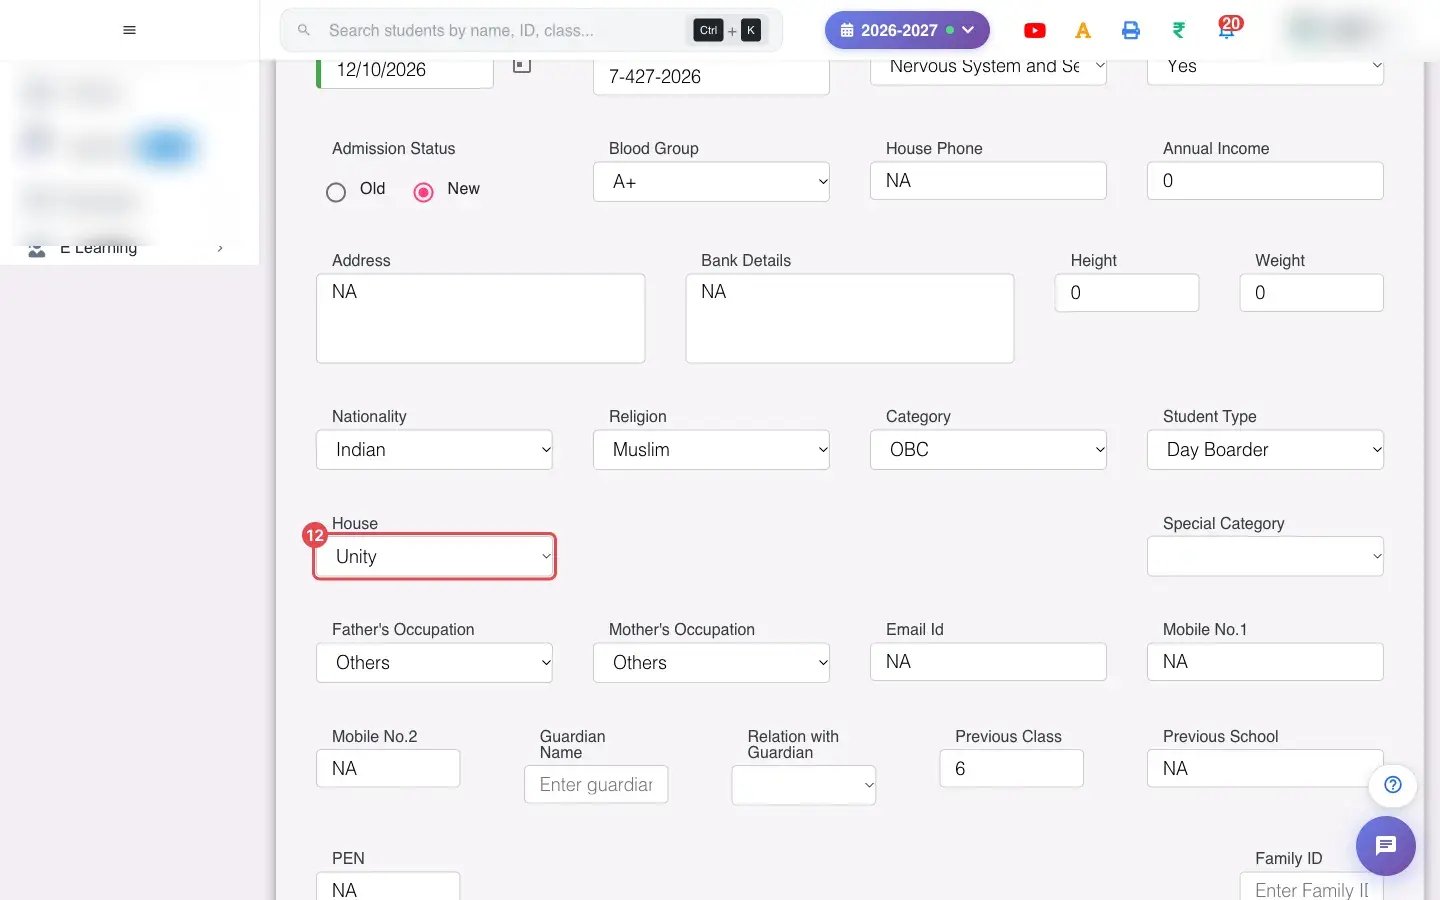
12. Choose House (for example Unity)
Section titled “12. Choose House (for example Unity)”Choose the House.
 Open a bigger pictureतस्वीर बड़ी करें
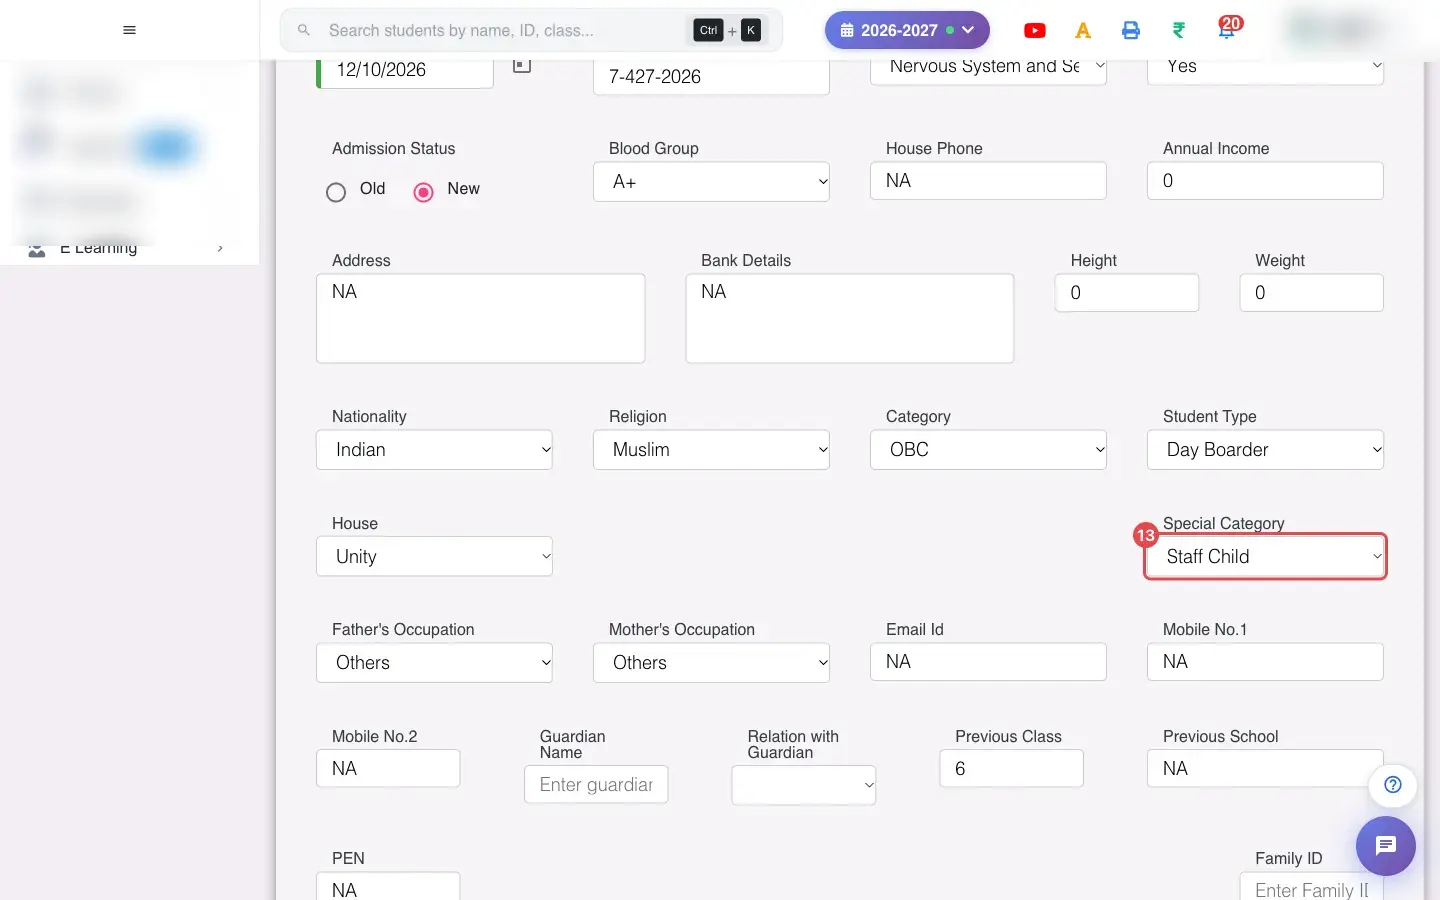
13. Choose Special Category (for example Staff Child)
Section titled “13. Choose Special Category (for example Staff Child)”Choose a Special Category.
 Open a bigger pictureतस्वीर बड़ी करें
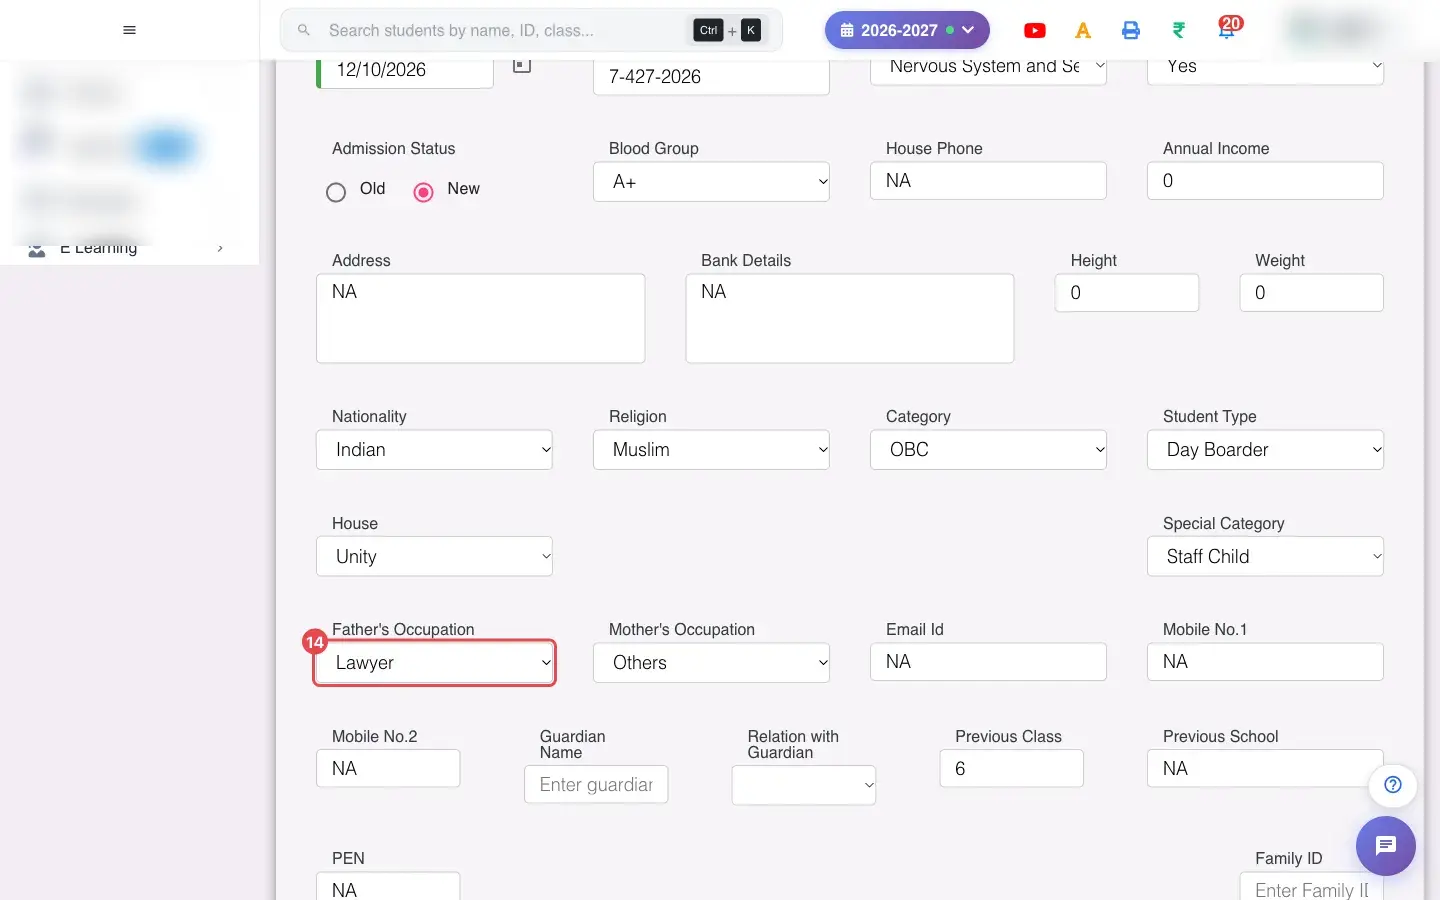
14. Choose Father’s Occupation (for example Lawyer)
Section titled “14. Choose Father’s Occupation (for example Lawyer)”Choose the Father’s Occupation.
 Open a bigger pictureतस्वीर बड़ी करें
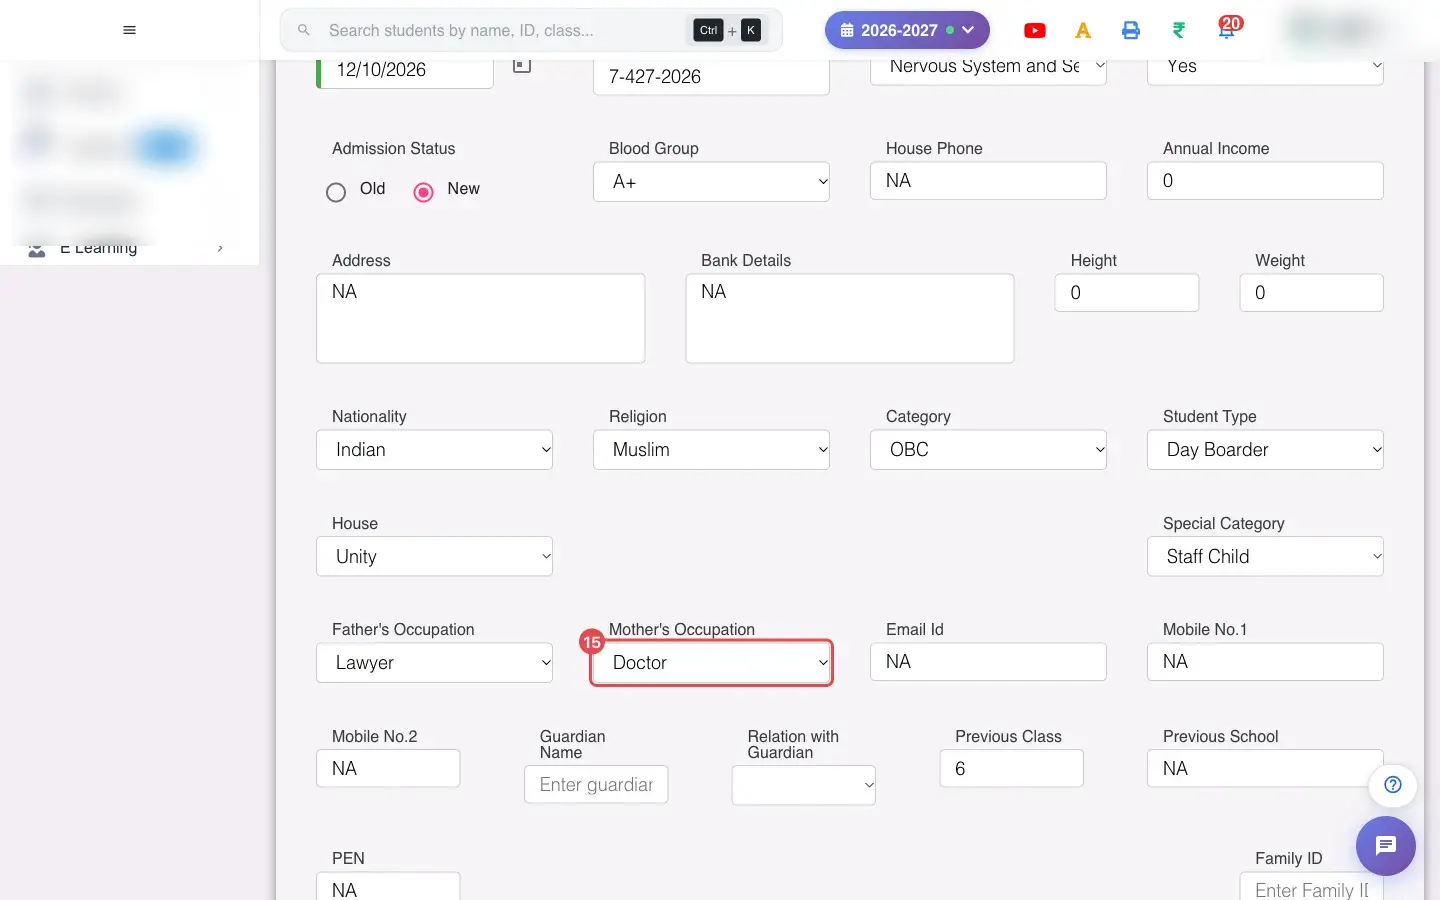
15. Choose Mother’s Occupation (for example Doctor)
Section titled “15. Choose Mother’s Occupation (for example Doctor)”Choose the Mother’s Occupation.
 Open a bigger pictureतस्वीर बड़ी करें
16. Choose Relation with Guardian (for example Father)
Section titled “16. Choose Relation with Guardian (for example Father)”Choose the Relation with Guardian.
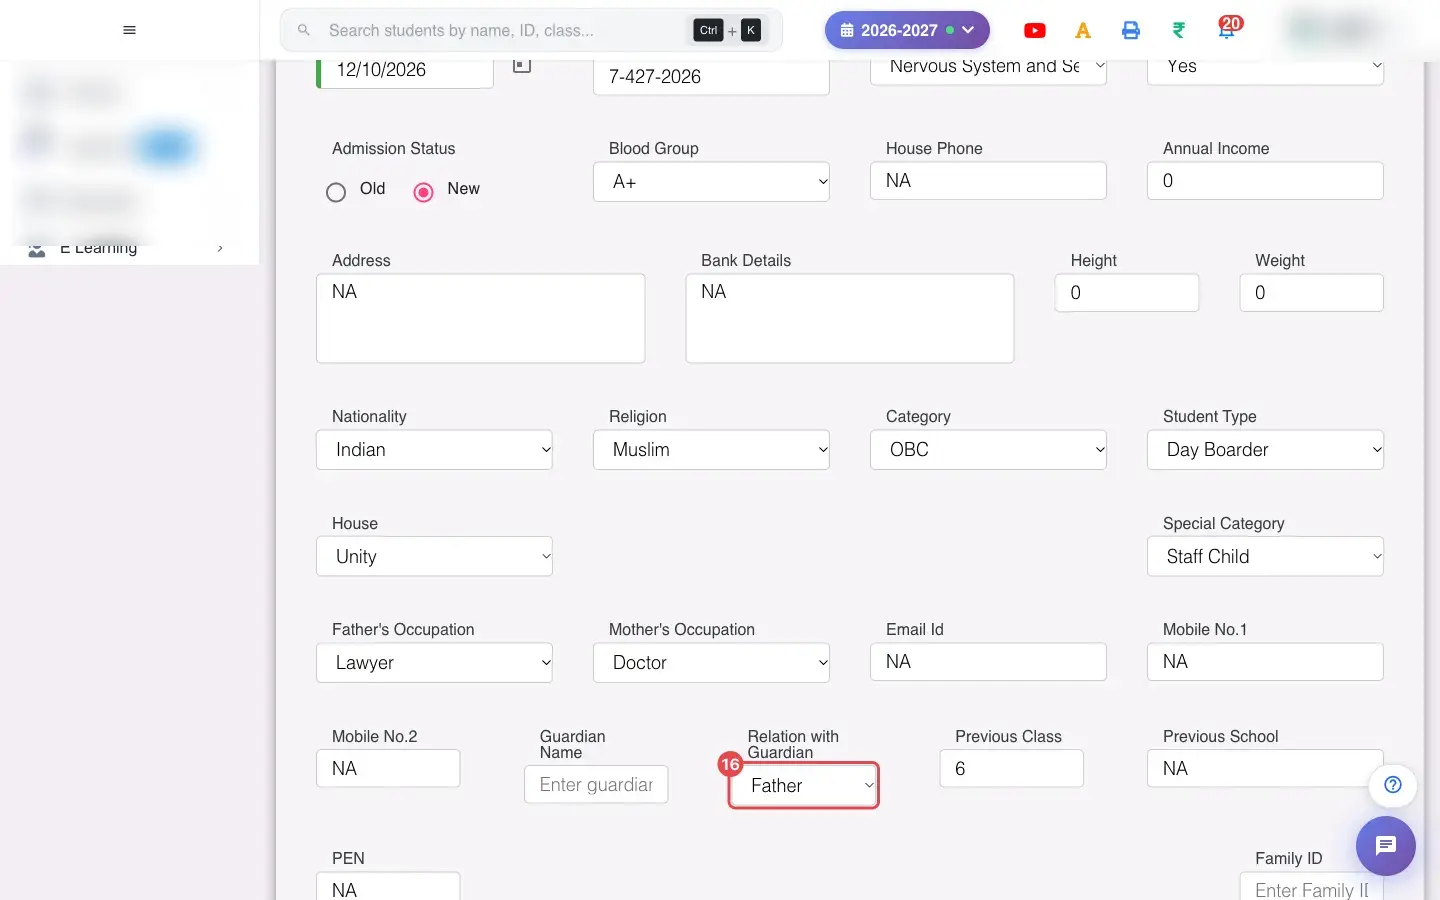 Open a bigger pictureतस्वीर बड़ी करें
17. Choose Medium/Language (for example Hindi)
Section titled “17. Choose Medium/Language (for example Hindi)”Choose the Medium/Language.
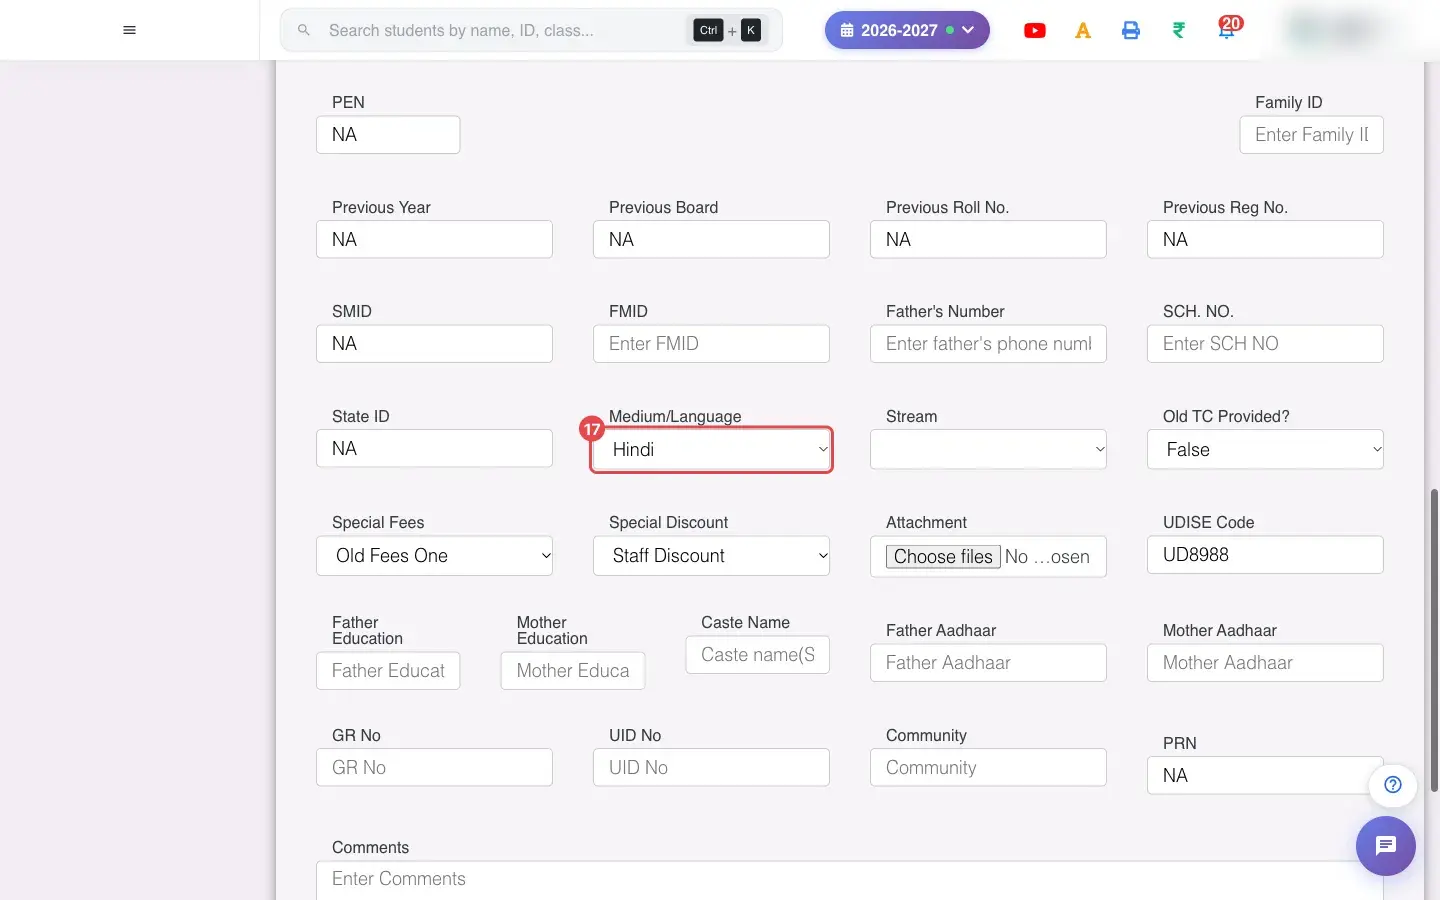 Open a bigger pictureतस्वीर बड़ी करें
18. Choose Old TC Provided? (for example True)
Section titled “18. Choose Old TC Provided? (for example True)”Say whether an Old TC Provided?.
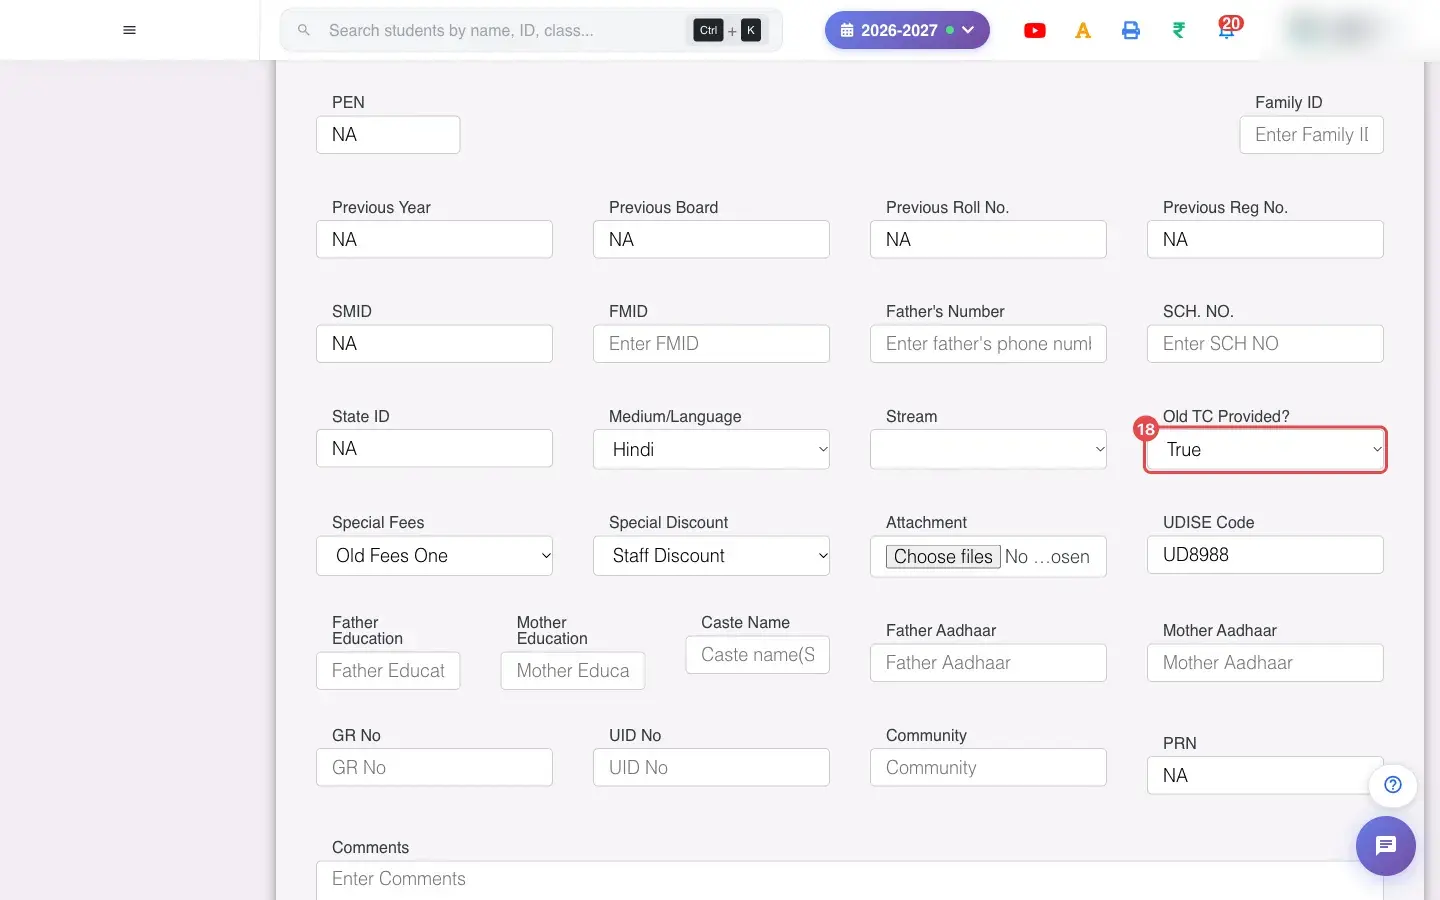 Open a bigger pictureतस्वीर बड़ी करें
19. Fill the mandatory details
Section titled “19. Fill the mandatory details”Required: Student Name, Class, Section, Father’s Name, Mother’s Name, Gender, Date of Birth (DD-MM-YYYY) (a valid date between 1900 and 2100), Phone No., Date of Admission, Blood Group and End Date of School. Mother No., Roll Number, Aadhar Number, Student ID and Admission Form No (both generated), Enrollment Number, Admission Status (Old or New), House Phone, Annual Income, Address, Bank Details, Height and Weight are optional.
20. Choose special fees and discount
Section titled “20. Choose special fees and discount”If your school collects fees at admission, pick Special Fees (for example an old-fees student rate) and Special Discount (for example a sibling discount).
21. Add a photo
Section titled “21. Add a photo”Choose a photo up to 10 MB (Max File Size is 10 MB).
22. Check for duplicates
Section titled “22. Check for duplicates”If a student with the same name, father’s name and class exists you see A student with same Name, Father Name and Class already exists: …. A PEN number must have more than 10 digits (PEN Number must be more than 10 digits).
23. Add the student
Section titled “23. Add the student”Select Add Student. The student is saved and a confirmation window appears.
With data
Section titled “With data”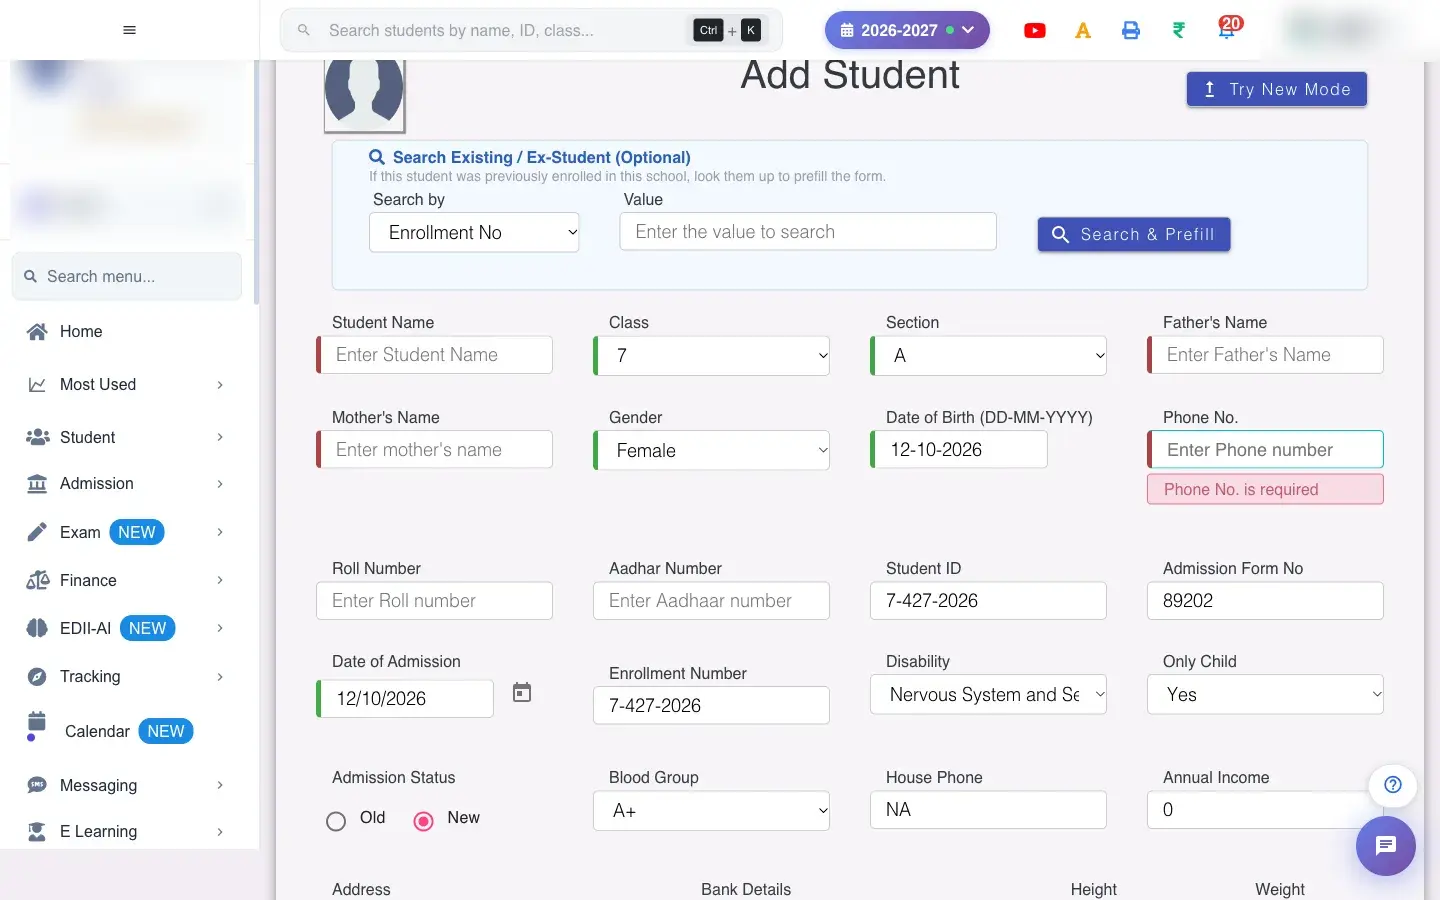 Open a bigger pictureतस्वीर बड़ी करें
Fields and filters
Section titled “Fields and filters”| Field | What it is | Notes |
|---|---|---|
| Student Name / Father’s Name / Mother’s Name / Gender | Identity. | Required. |
| Class / Section | Where they are admitted. | Required. |
| Date of Birth / Date of Admission / End Date of School | Dates in DD-MM-YYYY. | Required; the student must be at least 3 years old. |
| Phone No. | Parent mobile. | Required. |
| Blood Group | Health. | Required in this form. |
| Special Fees / Special Discount | Fees at admission. | Shown when the school enables them. |
Buttons
Section titled “Buttons”| Button | What it does | What happens next |
|---|---|---|
| Search & Prefill | Fills the form from a former student. | Form prefilled with ex-student details…. |
| Add Student | Saves the student. | A confirmation window appears. |
| Try New Mode | Opens the stepped form. | Unsaved entries are lost. |
After you save
Section titled “After you save”- The student is created in the class and section with a generated student ID and admission form number.
- Fees and discounts chosen are linked to the student.
- The student appears in the lists at once.
Good to know
Section titled “Good to know”- Mandatory fields must be filled.
- Duplicate students are flagged.
- PEN numbers must be more than 10 digits and unique.
- Photo up to 10 MB.
Messages you may see
Section titled “Messages you may see”| Message | What it means | What to do |
|---|---|---|
| A student with same Name, Father Name and Class already exists: … | Possible duplicate. | Check the existing student. |
| PEN Number must be more than 10 digits | PEN too short. | Enter the full PEN. |
| Date of Birth cannot be less than 3 years. | Too young. | Check the date. |
| Max File Size is 10 MB | Photo too large. | Use a smaller one. |
| Error generating admission number | The number could not be made. | Try again. |
- Use Search & Prefill for returning students.
- Switch to Try New Mode if you prefer the stepped form.
Stuck? Try this
Section titled “Stuck? Try this”| Problem | Likely cause | What to do |
|---|---|---|
| Add Student does nothing | A required field is empty. | Look for the red messages under fields. |
Did this page help?क्या इस पेज से मदद मिली?
Thanks! Glad it helped.धन्यवाद! अच्छा लगा कि काम बन गया।
Sorry about that. Ask in your own words, or write to us.माफ़ कीजिए। अपने शब्दों में पूछें, या हमें लिखें।